6 5 Task Configure IIS Plug in Communications with Data Application Server
From LANSA for the Web Administrator
6.5 Task: Configure IIS Plug-in Communications with Data/Application Server
Now you will create the links from the Web server to the Data/Application Server.
The Data/Application Server may be a Windows or IBM i Server.
Before you begin the Configuring IIS Plug-in Communications with Data/Application Server task, you must have completed the preceding steps:
Step 1. Define Connection from Web Server to Data/Application Server
1. On the Web Server, start the :
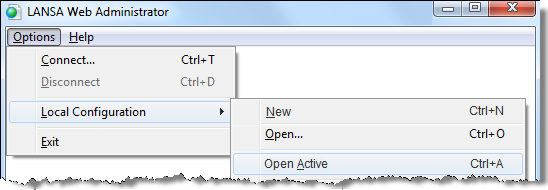
2. From the menu choose and then from the sub-menu.
The default configuration created by the install will now be loaded for you to adapt to your environment or you could create a new one.
3. Choose the menu and select the command.
4. The pre-set system created during the install is displayed. Press the button to add a new one.
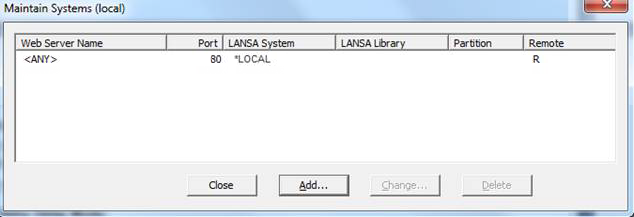
Step 2. Specify the Web Server Connection
You will now be able to set the values that connect the selected LANSA System using the Web Server and Data/Application Server tabs as shown in the following steps.

| Web Server |
For and select unless you are using multi-homing support. If you are using multi-homing support, select the option and enter either the DNS Name (for example: www.xyzzy.com) or the IP Address (for example: 124.54.56.21) in the Web Server Name field. Note: The values you enter for and must match the System and defined for the default user in the LANSA for the Web Administrator. DFTUSR is the default user when is selected. If these values are not the same, when you run a LANSA function from your browser, it will return a Dealloc Abend message. |
| Default Technology Service |
The technology service to use if no specific technology service is nominated in the browser's request. |
| Transform XSLT on Web Server |
By default, this option is ON. Select this option if you wish to perform all WAM XSLT Transformations on the Web Server, instead of the Application Server. When this option is ON, the WAM processing load is distributed between the Web Server and the Application Server so that the Data/Application Server executes the LANSA webroutine and the Web Server transforms XSLT. |
For details about the other options on this dialog, refer to Web Server (Local Configuration only).
Step 3. Specify Data/Application Server Connection
1. Select the Data/Application Server tab.
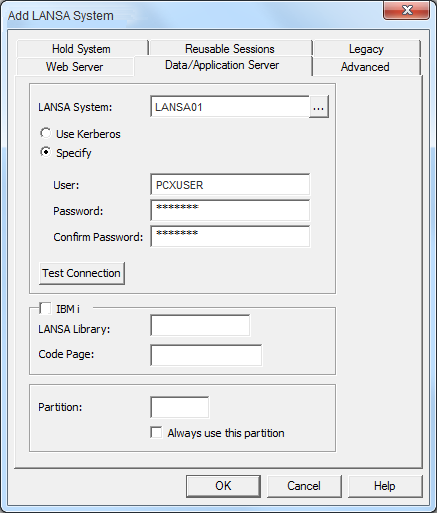
2. Enter the following information:
| LANSA Sytem Name |
Enter the name of the host that is acting as your Data/Application Server. This name must match the Partner LU Name specified for the LANSA Communications Administrator. |
| User, Password and Confirm
|
Specify a user name and password for the Data/Application Server. A user profile is required to allocate a communications conversation between the Web Server and the Data/Application Server. IBM I server: You may enter the user password of the default user profile you defined during the LANSA for the Web install. Windows server: This user/password will be the user/password specified in the Web Server tab. |
| Test Connection |
Use the Test Connection button to verify the User and Password. |
| LANSA Library |
If you are using an IBM i Data/Application Server, enter the name of the LANSA program library. If you are using a Windows Data/Application Server, leave this field blank. |
| Code Page |
Page translations to be applied for communications between the Web Server and the Data/Application Server. Windows/Linux - Leave blank. |
| Partition |
You may specify the default partition used for all the requests for this Web Server/Port. If a partition is specified, it will override any partition specified in the URL. If no partition is specified here, you must specify the partition parameter in your URL. |
3. Press to save your settings (or select the menu and choose the Save file).
If you do not save your settings, the changes you have made will not be applied.

4. from the .
Step 4. Restart IIS and Verify the Web Server is ready to use
1. Restart IIS to ensure the new settings take effect.
2. To test IIS, start your Web browser and type the following URL:
http://localhost
or
http://localhost:8080
A welcome page for IIS should be displayed.
3. Check that the IIS Plug-in is working by running from Internet Browser using this Web address:
http://localhost/cgi-bin/about
or
http://localhost:8080/cgi-bin/about
A message with the version of IIS Plug-in will appear with the details of the IIS Plug-in loaded.
4. Check that the IIS Plug-in can connect to the Data/Application Server by running from an Internet Browser using this Web address:
http://localhost/cgi-bin/lansaweb?about
or
http://localhost:8080/cgi-bin/lansaweb?about
A message with the version of IIS Plug-in will appear with the details of the IIS Plug-in loaded.
If you encounter any problems, refer to LANSA for the Web Troubleshooting Checklist.