6 3 Task Define Data Application Server Name
From LANSA for the Web Administrator
6.3 Task: Define Data/Application Server Name
On the web server, you must record the names of the data/application server(s) that it will need to connect to.
Step 1. Add a New Host Route
1. On the web server, start the LANSA Communications Administrator:
a. Open the folder from the menu.
b. Select the folder.
c. Select from the list and click it to start.
2. A list of all existing host routes for the current configuration is displayed in the . This is a list of the servers to which your PC will be able to connect.
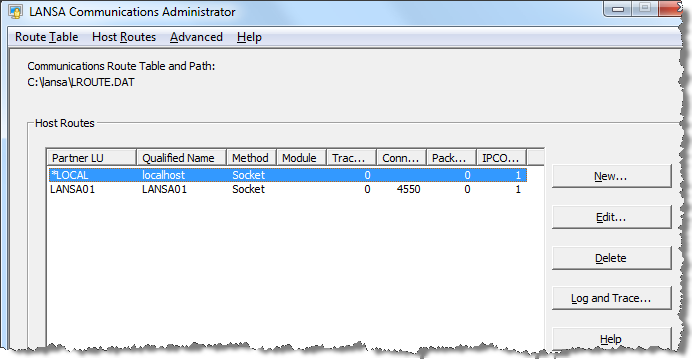
3. Click the button to create a new host route to your Data/Application Server.
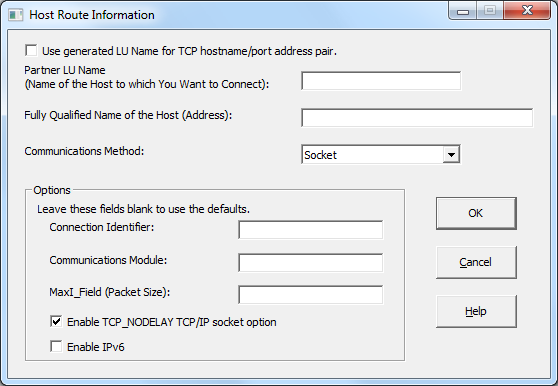
4. Enter the information to configure the TCP/IP connection to the Listener on the Data/Application Server:
| Partner LU Name |
A name that you nominate to identify the system you are connecting to. This name is referred to as the LANSA system name elsewhere in these procedures. The name must be unique. You will use this name to test in Step 3 of this task. |
| Fully Qualified Name of the Host |
The name of the host or alternatively, the IP address of your Data/Application Server expressed in nnn.nnn.nnn.nnn or Ipv6 fomat. IBM i: Enter the host name or IP address of the IBM i server. |
| Communications Method |
Select Socket. |
| Connection Identifier |
You may leave this field blank. The default port number used is 4545. IBM i: If you entered a different Connection ID when you configured the LANSA Communications Extensions on the IBM i, then enter the Connection ID number used. |
| Communications Module |
This field should be left blank for TCP/IP Sockets (default is Winsock). |
| Maxl_Field (Packet Size) |
It is recommended that this parameter is left with the default, but it may be set by a networking specialist configuring for special circumstances. |
| Enable TCP_NODELAY TCP/IP socket option |
The TCP_NODELAY socket option disables the Nagle algorithm to allow small data packets to be delivered to the remote host without delay. The Nagle algorithm combines multiple send calls in a small data buffer and delays sending it until an acknowledgement for the previous data packet sent is received from the remote host. It is enabled as the default in TCP/IP socket. As the LANSA Communication Extension implements its own data buffering, the Nagle algorithm is not needed. |
| Enable Ipv6 Support |
Select this option to enable Internet Protocol version 6 support. This option enables the application to work on both the IPv4 and IPv6 network. |
5. Press OK to continue.
6. Exit the .
Step 2. Test the new Host Route
1. Start the LANSA for the Web Administrator by opening the LANSA folder from the LANSA icon on your desktop, selecting the folder and choosing the from the list.

2. From the menu, select or press Ctrl +T to open the dialog
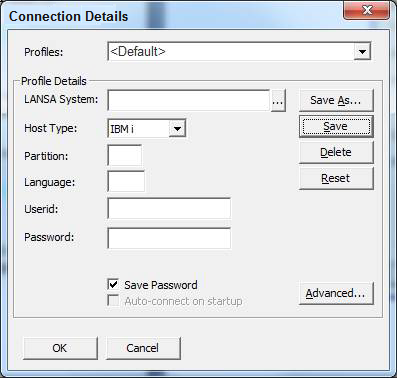
3. Enter the required details in the dialog:
|
name |
This is the same name that was used as the Partner LU name in Step 1of this task. If you press the button beside this entry, it will open the LANSA Communication Adminstrator so that you can copy and paste the name into this field. |
|
Host Type |
From the drop down list select IBM ior Other if using Windows or Linux. |
|
Partition |
Enter a partition. |
|
Language |
Enter ENG if the partition is multilingual. If this is a non-multilingual partition, leave this field blank. For information, refer to Multilingual Support in the . |
|
LANSA system owner |
IBM i: The user profile must have the LANSA program library in its library list. |
4. Press OK to connect to the Data/Application Server.
If you are not able to connect, refer to LANSA for the Web Troubleshooting in the .
You have now completed the 6.3 Task: Define Data/Application Server Name.
5. Exit from the Web Administrator.