Overview
This section describes how to view dynamic variables in the TCP/IP Demo App HTTP2 demo. For information about how to implement dynamic variables in your own page, see the HTTP2 dynamic variables topic.
Instructions
- Program your board with the demo code and upload the demo app web page. Open your web browser and navigate to the board's web page (http://mchpboard by default).
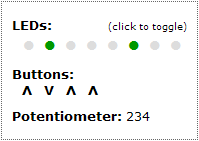
- Observe the LED output, button state, and potentiometer reading in the box in the upper right of the web page. The button and potentiometer values will be updated dynamically based on the status of the buttons on your board. In addition, if you click the LEDs to toggle them, their status will be dynamically updated on the page. Note that some LEDs or buttons may not be implemented, depending on your hardware setup. Consult the TCPIP Demo App Features by Hardware Platform topic for more information.

- Observe the current Stack Version and Build Date in the top center of the Overview Page.
- Navigate to the Dynamic Variables page using the navigation panel on the left of the page.
- Observe the Build Date and Time, LED state, stack version, and current IP address- these variables are output to this page dynamically when it's downloaded by the browser.
Exercises
You can optionally complete the exercises described on the Dynamic Variables page. You may want to read the HTTP2 dynamic variables topic first. The first exercise is to implement the display of LED0 on the dynamic variable demo page.
- Start by opening dynvars.htm in your "TCPIP Demo App\WebPages2" folder.
- Locate the dynamic variables in the page and replace the question mark with a dynamic variable to display the value of LED 0. You can use the other LED variables as a template, but specify 0 as the LED to open.

- In your MPLAB project, open CustomHTTPApp.c and ensure that the HTTPPrint_led function (if you used ~led(0)~ as your dynamic variable) if written to output data when 0 is passed in as a parameter.
- Rebuild your web page with the MPFS2 Utility.
- Rebuilt your project, and reprogram your board. Navigate to the dynamic variable page and verify that the LED0 field reflects the status of the LED on your board. Since the LED on your board is blinking, you may need to refresh the web page to view its current status.
The second exercise on this page simply demonstrates how to dynamically insert a file into a web page.
- Start by opening dynvars.htm in your "TCPIP Demo App\WebPages2" folder.
- Locate the dynamic variables that include header.inc and footer.inc. Observe the difference between the declaration of these variables and the other variables on the page.
Module