|
Audience |
Beginner |
|
Length |
30 minutes |
|
Prerequisites |
Complete Simple Orbit Transfer |
|
Script File |
|
In this tutorial we will modify an existing mission to add eclipse and station contact detection using the EclipseLocator and ContactLocator resources. We will start with the completed Simple Orbit Transfer mission and modify it to add these event reports.
The basic steps of this tutorial are:
-
Load the Simple Orbit Transfer mission.
-
Configure GMAT for event location.
-
Add and configure an EclipseLocator to report eclipses.
-
Run the mission and analyze the eclipse report.
-
Add and configure a GroundStation and a ContactLocator to report contact times.
-
Run the mission and analyze the contact report.
For this tutorial, we will start with a preexisting mission created during the Simple Orbit Transfer tutorial. You can either complete that tutorial prior to this one, or you can load the end result directly, as shown below.
-
Open GMAT.
-
Click Open in the toolbar and navigate to the GMAT
samplesdirectory. -
Select
Tut_SimpleOrbitTransfer.scriptand click Open. -
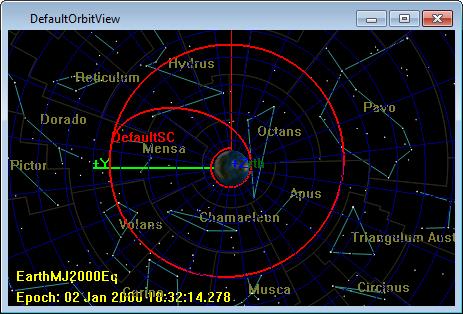
Click Run (
 ) to run the mission.
You should see the following result in the DefaultOrbitView window.
|
GMAT's event location subsystem is based on the NAIF SPICE library, which uses its own mechanism for configuration of the solar system. Instead of settings specified in GMAT via CelestialBody resources like Earth and Luna, SPICE uses "kernel" files that define similar parameters independently. This is discussed in detail in the ContactLocator and EclipseLocator references.
By default, GMAT offers general consistency between both configurations. But, it's useful to verify that the appropriate parameters are correct, and it's necessary for precise applications.
First, let's verify that the SolarSystem resource is configured properly for both configurations.
-
On the Resources tab, double-click the SolarSystem folder. This will display the SolarSystem configuration.
-
Scroll to the end of each input box to see the actual filenames being loaded.
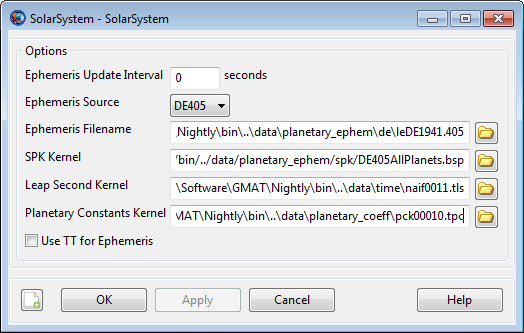
You should see a configuration like this:
|
Note the following items:
-
Ephemeris Source: This is set to use the DE405 planetary ephemeris, the default in GMAT. If you switch to another ephemeris version, the fields below will update accordingly.
-
Ephemeris Filename: This is the DE-format ephemeris file used for propagation and parameter calculations in GMAT itself.
-
SPK Kernel: This is the SPICE SPK file used for planetary ephemeris for SPK propagation and for event location. Note that this is set consistent with Ephemeris Filename (both DE405)
-
Leap Second Kernel: This is the SPICE LSK file used to keep track of leap seconds in the UTC time system for the SPICE subsystem. This is kept consistent with GMAT's internal leap seconds file (tai-utc.dat) specified in the GMAT startup file.
-
Planetary Constants Kernel: This is the SPICE PCK file used for default configuration for all the default celestial bodies. This file contains planetary shape and orientation information, similar to but independent from the settings in GMAT's CelestialBody resources (Earth, Luna, etc.).
These are already configured correctly, so we don't need to make any changes.
Next, let's configure the Earth model for precise usage with the ContactLocator resource. By default, the Earth size and shape differ by less than 1 m in equatorial and polar radii between the two subsystems But we can make them match exactly by modifying GMAT's Earth properties.
-
On the Resources tab, expand the SolarSystem folder.
-
Double-click Earth to display the Earth configuration.
-
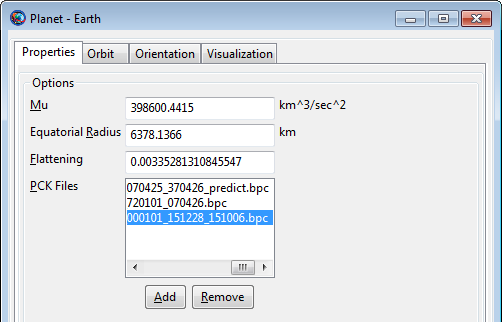
Note the various configuration options available:
-
Equatorial Radius and Flattening define the Earth shape for GMAT itself. PCK Files lists additional SPICE PCK files to load, in addition to the file shown above in the SolarSystem Planetary Constants Kernel box. In this case, these files provide high-fidelity Earth orientation parameters (EOP) data.
-
On the Orientation tab, Spice Frame Id indicates the Earth-fixed frame to use for the SPICE subsystem, and FK Files provides additional FK files that define the frame. In this case, Earth is using the built-in ITRF93 frame, which is different but very close to GMAT's EarthFixed coordinate system. See the CoordinateSystem reference for details on that system.
-
-
Set Equatorial Radius to
6378.1366. -
Set Flattening to
0.00335281310845547. -
Click OK.
These two values were taken from the pck00010.tpc file referenced in the SolarSystem configuration. Setting them for Earth ensures that the position of the GroundStation we create later will be referenced to the exact same Earth definition throughout the mission. Note that the exact position may still differ between the two based on the different body-fixed frame definition and the different EOP data sources, but this residual difference is small.
Your Earth panel should look like this after these steps are complete:
|
Now we are ready to search for eclipses in our mission. We do this by creating an EclipseLocator resource that holds the search configuration. Then we can perform a search by running the FindEvents command, but GMAT does this automatically at the end of the mission unless you configure it otherwise. In this case, we will use the automatic option.
First we create the EclipseLocator:
-
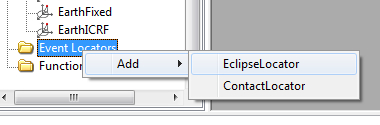
On the Resources tab, right-click the Event Locators folder, point to Add, and click EclipseLocator.
This will result in a new resource called EclipseLocator1.
|
Next, we need to configure the new resource for our mission:
-
Double-click EclipseLocator1 to edit the configuration.
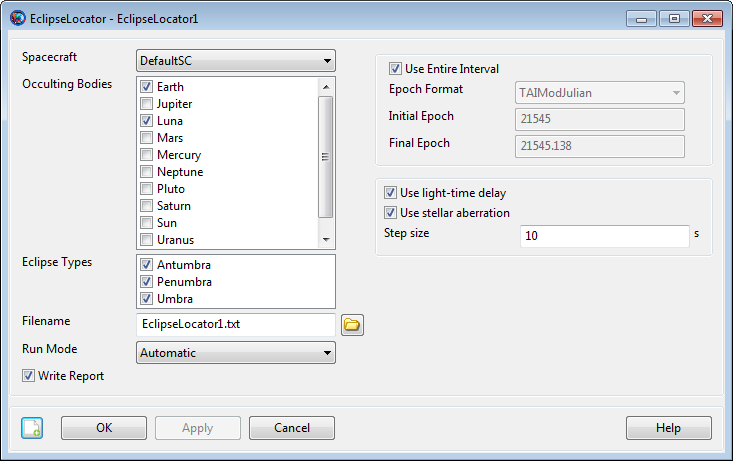
Note the following default settings:
-
Spacecraft is set to DefaultSC, the name of our spacecraft.
-
OccultingBodies is set to Earth and Luna. These are the two bodies that will be searched for eclipses.
-
EclipseTypes is set to search for all eclipse types (umbra or total, penumbra or partial, and antumbra or annular)
-
Run Mode is set to Automatic mode, which means the eclipse search will be run automatically at the end of the mission.
-
Use Entire Interval is checked, so the entire mission time span will be searched.
-
Light-time delay and stellar aberration are both enabled, so eclipse times will be adjusted appropriately.
-
Step size is set to 10 s. This is the minimum-duration eclipse (or gap between eclipses) that this locator is guaranteed to find.
-
-
Click OK to accept the default settings. They are fine for our purposes.
The final configuration should match the following screenshot.
|
Now it's time to run the mission and look at the results.
-
Click Run (
) to run the mission.The eclipse search will take a few seconds. As it progresses, you'll see the following message in the message window at the bottom of the screen:
Finding events for EclipseLocator EclipseLocator1 ...
Celestial body properties are provided by SPICE kernels.
-
When the run is complete, click the Output tab to view the available output.
-
Double-click EclipseLocator1 to view the eclipse report.
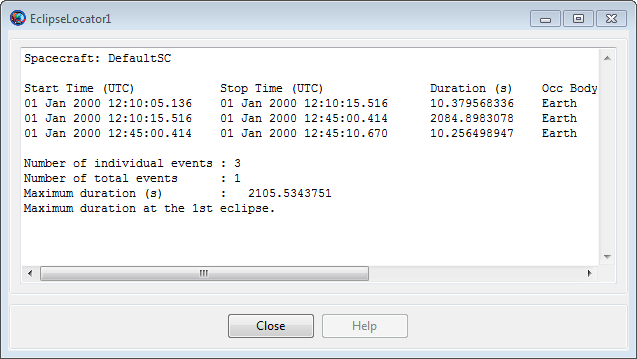
You'll see a report that looks similar to this:
|
Three eclipses were found, all part of a single "total" eclipse event totalling about 35 minutes. A total event consists of all adjacent and overlapping portions, such as penumbra eclipses occuring adjacent to umbra eclipses as in this case.
-
Click Close to close the report. The report text is still available as
EclipseLocator1.txtin the GMAToutputfolder.
Finding ground station contact times is a very similar process, but we'll use the ContactLocator resource instead. First we need to add a GroundStation, then we can configure the locator to find contact times between it and our spacecraft.
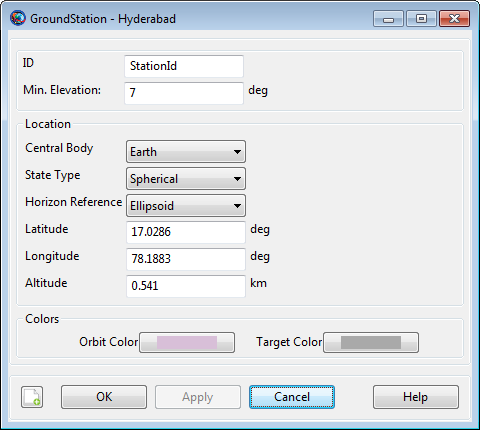
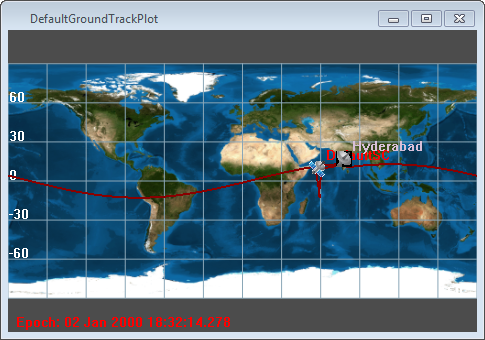
Let's create a ground station that will be in view from the final geostationary orbit. By looking at the DefaultGroundTrackPlot window, our spacecraft is positioned over the Indian Ocean. A ground station in India should be in view. We can choose the Hyderabad facility, which has the following properties:
-
Latitude: 17.0286 deg
-
Longitude: 78.1883 deg
-
Altitude: 0.541 km
Let's create this ground station in GMAT:
-
First, close all graphics and solver windows, to allow full manipulation of resources.
-
On the Resources tab, right-click the Ground Station folder and click Add Ground Station. This will create a new resource called GroundStation1.
-
Rename GroundStation1 to Hyderabad.
-
Double-click Hyderabad to edit its configuration.
The following values are configured appropriately by default, so we won't change them:
-
Min. Elevation: This is the minimum elevation angle from the ground station for a valid contact. The current value (7 deg) is appropriate for this case.
-
Central Body: Earth is the only allowed value at this time.
-
-
In the State Type list, select Spherical. This allows input in latitude, longitude, and altitude.
-
In the Horizon Reference list, select Ellipsoid.
-
In the Latitude box, type
17.0286. -
In the Longitude box, type
78.1883. -
In the Altitude box, type
0.541. -
Click OK to accept these changes.
The configured GroundStation should look like the following screenshot:
|
If you add the GroundStation to the DefaultGroundTrackPlot, you can see the location visually:
|
Now we can create a ContactLocator that will search for contact times between our spacecraft and the Hyderabad station.
-
On the Resources tab, right-click the Event Locators folder, point to Add, and click ContactLocator. This will create ContactLocator1.
-
Double-click ContactLocator1 to edit the configuration.
Many of the default values are identical to the EclipseLocator, so we don't need to explain them again. There are a couple new properties that we'll note, but won't change:
-
Occulting Bodies: These are celestial bodies that GMAT will search for occultations of the line of sight between the spacecraft and the ground station. Since our spacecraft is orbiting the Earth, we don't need to choose any occulting bodies. Note that Earth is considered automatically because it is the central body of the ground station.
-
Light-time direction: This is the signal sense of the ground station. You can choose to calculate light-time delay as if the ground station is transmitting, or if it is receiving.
-
-
In the Observers list, enable Hyderabad. This will cause GMAT to search for contacts to this station.
-
In the Step size box, type
600. Since we're not using third-body occultations, this step size can be increased significantly without missing events. See the ContactLocator documentation for details. -
Click OK to accept the changes.
When fully configured, the GroundStation1 window will look like the following screenshot:
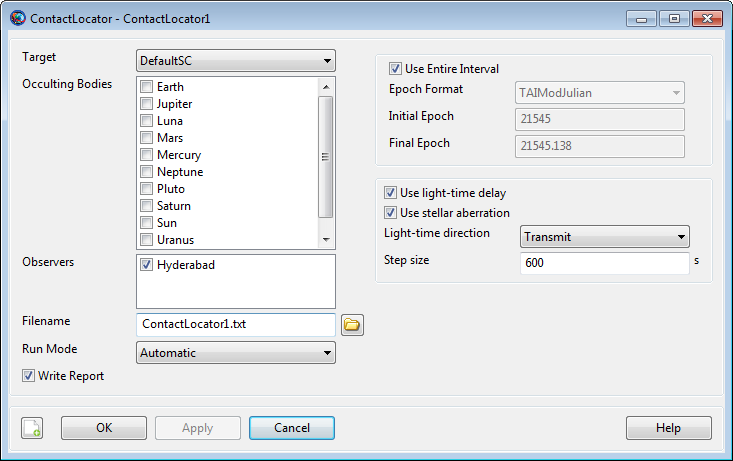
|
Now it's time to run the mission again and look at these new results.
-
Click Run (
) to run the mission.The contact search will take much less time than the eclipse search, since we're using a larger step size. As it progresses, you'll see the following message in the message window at the bottom of the screen:
Finding events for ContactLocator ContactLocator1 ...
Celestial body properties are provided by SPICE kernels.
-
When the run is complete, click the Output tab to view the available output.
-
Double-click ContactLocator1 to view the report.
You'll see a report that looks similar to this:
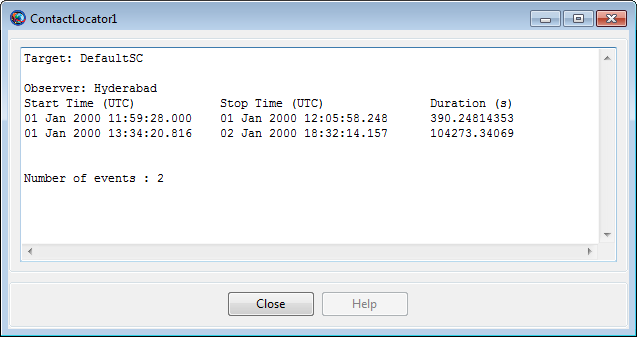
|
Notice that two contact intervals were found: one about 6 minutes long at the very beginning of the mission (it starts at the Spacecraft's initial epoch), and a second one about 29 hours long, starting once it gets into geosynchronous orbit and extending to the end of the simulation.
-
Click Close to close the report. The report text is still available as
ContactLocator1.txtin the GMAToutputfolder.
To expand on this tutorial, try the following exercise:
-
For a mission like this, you probably will want ground station coverage during both maneuvers. Try the following steps to make sure the coverage is adequate:
-
Change the colors of the Propagate commands, so you can see visually where the burns are located.
-
Add GroundStation resources near the locations of the burns on the ground track.
-
Confirm the burn epochs in the Command Summary for each Maneuver command.
-
Confirm in the contact report that these times occur during a contact interval.
-
Check the eclipse report, too: you may not want to perform a maneuver during an eclipse!
-
This tutorial shows you the basics of adding eclipse and station contact location to your mission. These resources have a lot of power, and there are many different ways to use them. Consult the ContactLocator and EclipseLocator documentation for details.