|
Audience |
Beginner |
|
Length |
30 minutes |
|
Prerequisites |
Complete Simulating an Orbit |
|
Script File |
|
Note
One of the most common problems in space mission design is to design a transfer from one circular orbit to another circular orbit that lie within the same orbital plane. Circular coplanar transfers are used to raise low-Earth orbits that have degraded due to the effects of atmospheric drag. They are also used to transfer from a low-Earth orbit to a geosynchronous orbit and to send spacecraft to Mars. There is a well known sequence of maneuvers, called the Hohmann transfer, that performs a circular, coplanar transfer using the least possible amount of fuel. A Hohmann transfer employs two maneuvers. The first maneuver raises the orbital apoapsis (or lowers orbital periapsis) to the desired altitude and places the spacecraft in an elliptical transfer orbit. At the apoapsis (or periapsis) of the elliptical transfer orbit, a second maneuver is applied to circularize the orbit at the final altitude.
In this tutorial, we will use GMAT to perform a Hohmann transfer from a low-Earth parking orbit to a geosynchronous mission orbit. This requires a targeting sequence to determine the required maneuver magnitudes to achieve the desired final orbit conditions. In order to focus on the configuration of the targeter, we will make extensive use of the default configurations for spacecraft, propagators, and maneuvers.
The target sequence employs two velocity-direction maneuvers and two propagation sequences. The purpose of the first maneuver is to raise orbit apoapsis to 42,165 km, the geosynchronous radius. The purpose of the second maneuver is to nearly circularize the orbit and yield a final eccentricity of 0.005. The basic steps of this tutorial are:
-
Create and configure a
DifferentialCorrectorresource. -
Modify the
DefaultOrbitViewto visualize the trajectory. -
Create two
ImpulsiveBurnresources with default settings. -
Create a
Targetsequence to (1) raise apoapsis to geosynchronous altitude and (2) circularize the orbit. -
Run the mission and analyze the results.
For this tutorial, you’ll need GMAT open, with the default mission
loaded. To load the default mission, click New Mission
( ) or start a new GMAT session. We will
use the default configurations for the spacecraft
(DefaultSC), the propagator
(DefaultProp), and the two maneuvers.
DefaultSC is configured by default to a near-circular
orbit, and DefaultProp is configured to use Earth as
the central body with a nonspherical gravity model of degree and order 4.
You may want to open the dialog boxes for these objects and inspect them
more closely as we will leave them at their default settings.
) or start a new GMAT session. We will
use the default configurations for the spacecraft
(DefaultSC), the propagator
(DefaultProp), and the two maneuvers.
DefaultSC is configured by default to a near-circular
orbit, and DefaultProp is configured to use Earth as
the central body with a nonspherical gravity model of degree and order 4.
You may want to open the dialog boxes for these objects and inspect them
more closely as we will leave them at their default settings.
The Target sequence we will create later
needs a DifferentialCorrector resource to
operate, so let’s create one now. We'll leave the settings at their
defaults.
-
In the Resource tree, expand the Solvers folder if it isn’t already.
-
Right-click the Boundary Value Solvers folder, point to Add, and click DifferentialCorrector. A new resource called DC1 will be created.
We need to make minor modifications to DefaultOrbitView so that the entire final orbit will fit in the graphics window.
-
In the Resource Tree, double-click DefaultOrbitView to edit its properties.
-
Set the values shown in the table below.
-
Click OK to save these changes.
We’ll need two ImpulsiveBurn resources for
this tutorial, both using default values. Below, we’ll rename the
default ImpulsiveBurn and create a new
one.
-
In the Resources tree, right-click DefaultIB and click Rename.
-
In the Rename box, type
TOI, an acronym for Transfer Orbit Insertion, and click OK. -
Right-click the Burns folder, point to Add, and click ImpulsiveBurn.
-
Rename the new ImpulsiveBurn1 resource to
GOI, an acronym for Geosynchronous Orbit Insertion.
Now we will configure a Target sequence to
solve for the maneuver values required to raise the orbit to
geosynchronous altitude and circularize the orbit. We’ll begin by creating
an initial Propagate command, then the
Target sequence itself, then the final
Propagate command. To allow us to focus on the
Target sequence, we’ll assume you have already
learned how to propagate an orbit to a desired condition by working
through the Chapter 5, Simulating an Orbit tutorial.
-
Click on the Mission tab to show the Mission tree.
-
Configure Propagate1 to propagate to
DefaultSC.Earth.Periapsis. -
Rename Propagate1 to
Prop To
          Periapsis
.
Now create the commands necessary to perform the
Target sequence. Figure 6.1, “Final Mission Sequence for the Hohmann Transfer” illustrates the
configuration of the Mission tree after you have
completed the steps in this section. We’ll discuss the
Target sequence after it has been created.
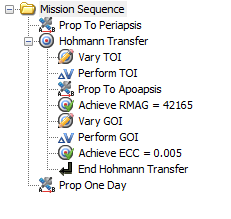
To create the Target sequence:
-
In the Mission tree, right-click Prop To Periapsis, point to Insert After, and click Target. This will insert two separate commands: Target1 and EndTarget1.
-
Right-click Target1 and click Rename.
-
Type
Hohmann Transferand click OK. -
Right-click Hohmann Transfer, point to Append, and click Vary.
-
Rename Vary1 to
Vary
          TOI
. -
Complete the Target sequence by appending the commands in Table 6.2, “Additional Target Sequence Commands”.
Table 6.2. Additional Target Sequence Commands
Command Name Maneuver Perform TOIPropagate Prop To ApoapsisAchieve Achieve RMAG = 42165Vary Vary GOIManeuver Perform GOIAchieve Achieve ECC = 0.005
Note
Let’s discuss what the Target sequence
does. We know that two maneuvers are required to perform the Hohmann
transfer. We also know that for our current mission, the final orbit
radius must be 42,165 km and the final orbital eccentricity must be
0.005. However, we don’t know the size (or ΔV magnitudes) of the
maneuvers that precisely achieve the desired orbital conditions. You
use the Target sequence to solve for those
precise maneuver values. You must tell GMAT what controls are
available (in this case, two maneuvers) and what conditions must be
satisfied (in this case, a specific orbital radius and eccentricity).
You accomplish this using the Vary and
Achieve commands. Using the
Vary command, you tell GMAT what to solve for—in
this case, the ΔV values for TOI and
GOI. You use the Achieve
command to tell GMAT what conditions the solution must satisfy—in this
case, the final orbital conditions.
We need a Propagate command after the
Target sequence so that we can see our final
orbit.
-
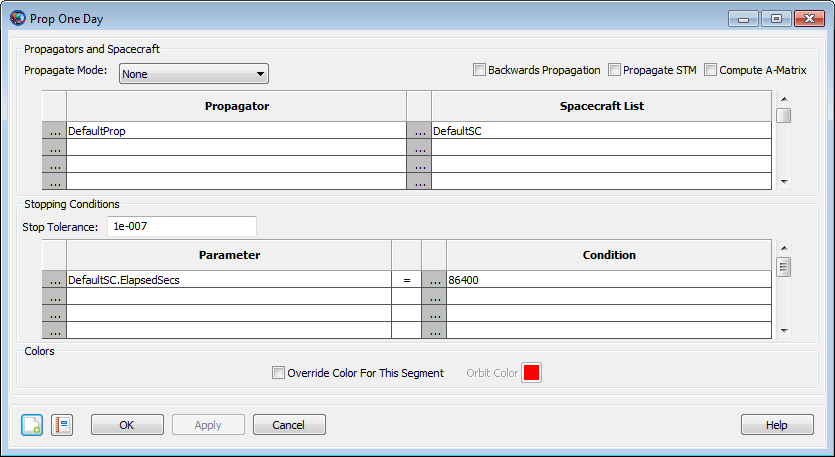
In the Mission tree, right-click End Hohmann Transfer, point to Insert After, and click Propagate. A new Propagate3 command will appear.
-
Rename Propagate3 to
Prop One
          Day
. -
Double-click Prop One Day to edit its properties.
-
Under Condition, replace the value
12000.0with86400, the number of seconds in one day. -
Click OK to save these changes.
Now that the structure is created, we need to configure the
various parts of the Target sequence to do what we
want.
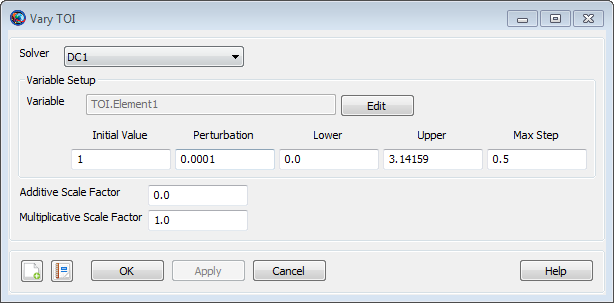
-
Double-click Vary TOI to edit its properties. Notice that the variable in the Variable box is
TOI.Element1, which by default is the velocity component of TOI in the local Velocity-Normal-Binormal (VNB) coordinate system. That’s what we need, so we’ll keep it. -
In the Initial Value box, type
1.0. -
In the Max Step box, type
0.5. -
Click OK to save these changes.
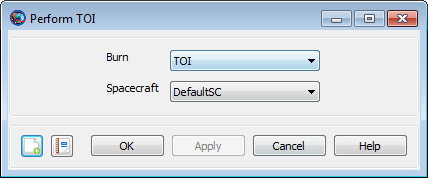
-
Double-click Perform TOI to edit its properties. Notice that the command is already set to apply the TOI burn to the DefaultSC spacecraft, so we don’t need to change anything here.
-
Click OK.
-
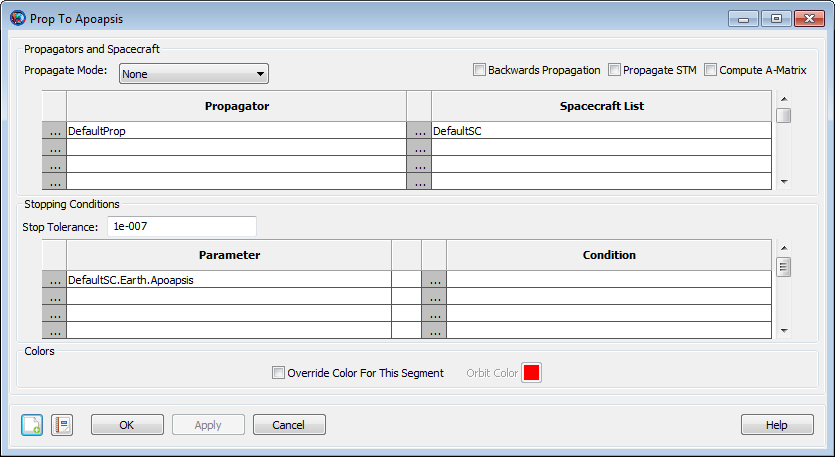
Double-click Prop to Apoapsis to edit its properties.
-
Under Parameter, replace
DefaultSC.ElapsedSecswithDefaultSC.Earth.Apoapsis. -
Click OK to save these changes.
-
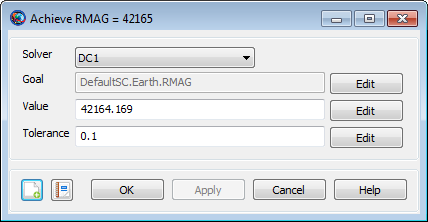
Double-click Achieve RMAG = 42165 to edit its properties.
-
Notice that Goal is set to DefaultSC.Earth.RMAG. This is what we need, so we make no changes here.
-
In the Value box, type 42164.169, a more precise number for the radius of a geosynchronous orbit (in kilometers).
-
Click OK to save these changes.
-
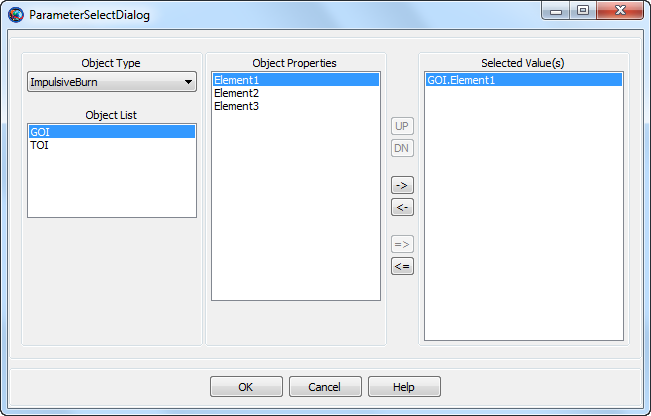
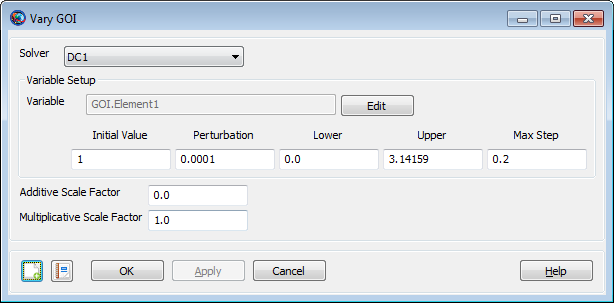
Double-click Vary GOI to edit its properties.
-
Next to Variable, click the Edit button.
-
Under Object List, click GOI.
-
In the Object Properties list, double-click Element1 to move it to the Selected Value(s) list. See the image below for results.
-
Click OK to close the ParameterSelectDialog window.
-
In the Initial Value box, type
1.0. -
In the MaxStep text box, type
0.2. -
Click OK to save these changes.
-
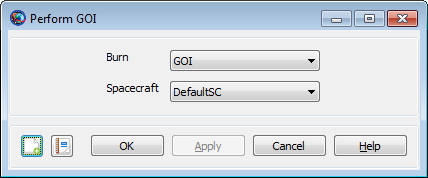
Double-click Perform GOI to edit its properties.
-
In the Burn list, click GOI.
-
Click OK to save these changes.
-
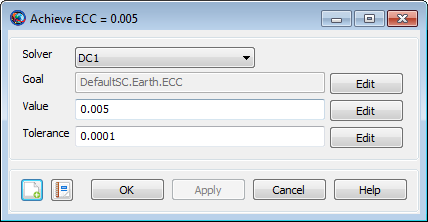
Double-click Achieve ECC = 0.005 to edit its properties.
-
Next to Goal, click the Edit button.
-
In the Object Properties list, double-click ECC.
-
Click OK to close the ParameterSelectDialog window.
-
In the Value box, type
0.005. -
In the Tolerance box, type
0.0001. -
Click OK to save these changes.
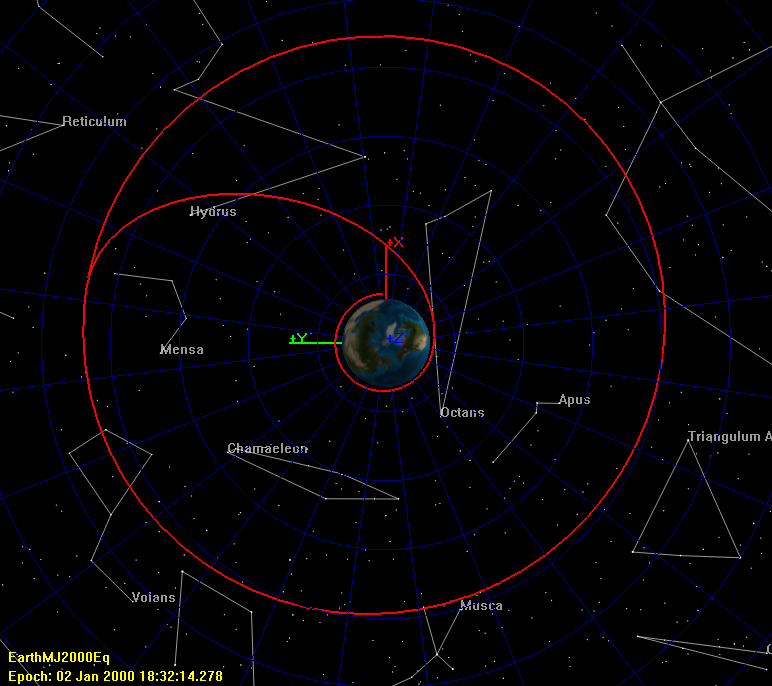
Before running the mission, click Save
( ) and save the mission to a file of your
choice. Now click Run (
) and save the mission to a file of your
choice. Now click Run ( ). As the mission runs, you will see
GMAT solve the targeting problem. Each iteration and perturbation is shown
in DefaultOrbitView window in light blue, and the
final solution is shown in red. After the mission completes, the 3D view
should appear as in to the image shown below. You may want to run the
mission several times to see the targeting in progress.
). As the mission runs, you will see
GMAT solve the targeting problem. Each iteration and perturbation is shown
in DefaultOrbitView window in light blue, and the
final solution is shown in red. After the mission completes, the 3D view
should appear as in to the image shown below. You may want to run the
mission several times to see the targeting in progress.
If you were to continue developing this mission, you can store the
final solution of the Target sequence as the initial
conditions of the TOI and GOI
resources themselves, so that if you make small changes, the subsequent
runs will take less time. To do this, follow these steps:
-
In the Mission tree, double-click Hohmann Transfer to edit its properties.
-
Click Apply Corrections.
-
Now re-run the mission. If you inspect the results in the message window, you will see that the
Targetsequence converges in one iteration because you stored the solution as the initial condition.