GMAT offers multiple ways to design and execute your mission. The two primary interfaces are the graphical user interface (GUI) and the script interface. These interfaces are interchangeable and each supports most of the functionality available in GMAT. When you work in the script interface, you are working in GMAT’s custom script language. To avoid issues such as circular dependencies, there are some basic rules you must follow. Below, we discuss these interfaces and then discuss the basic rules and best practices for working in each interface.
When you start a session, the GMAT desktop is displayed with a default mission already loaded. The GMAT desktop has a native look and feel on each platform and most desktop components are supported on all platforms.
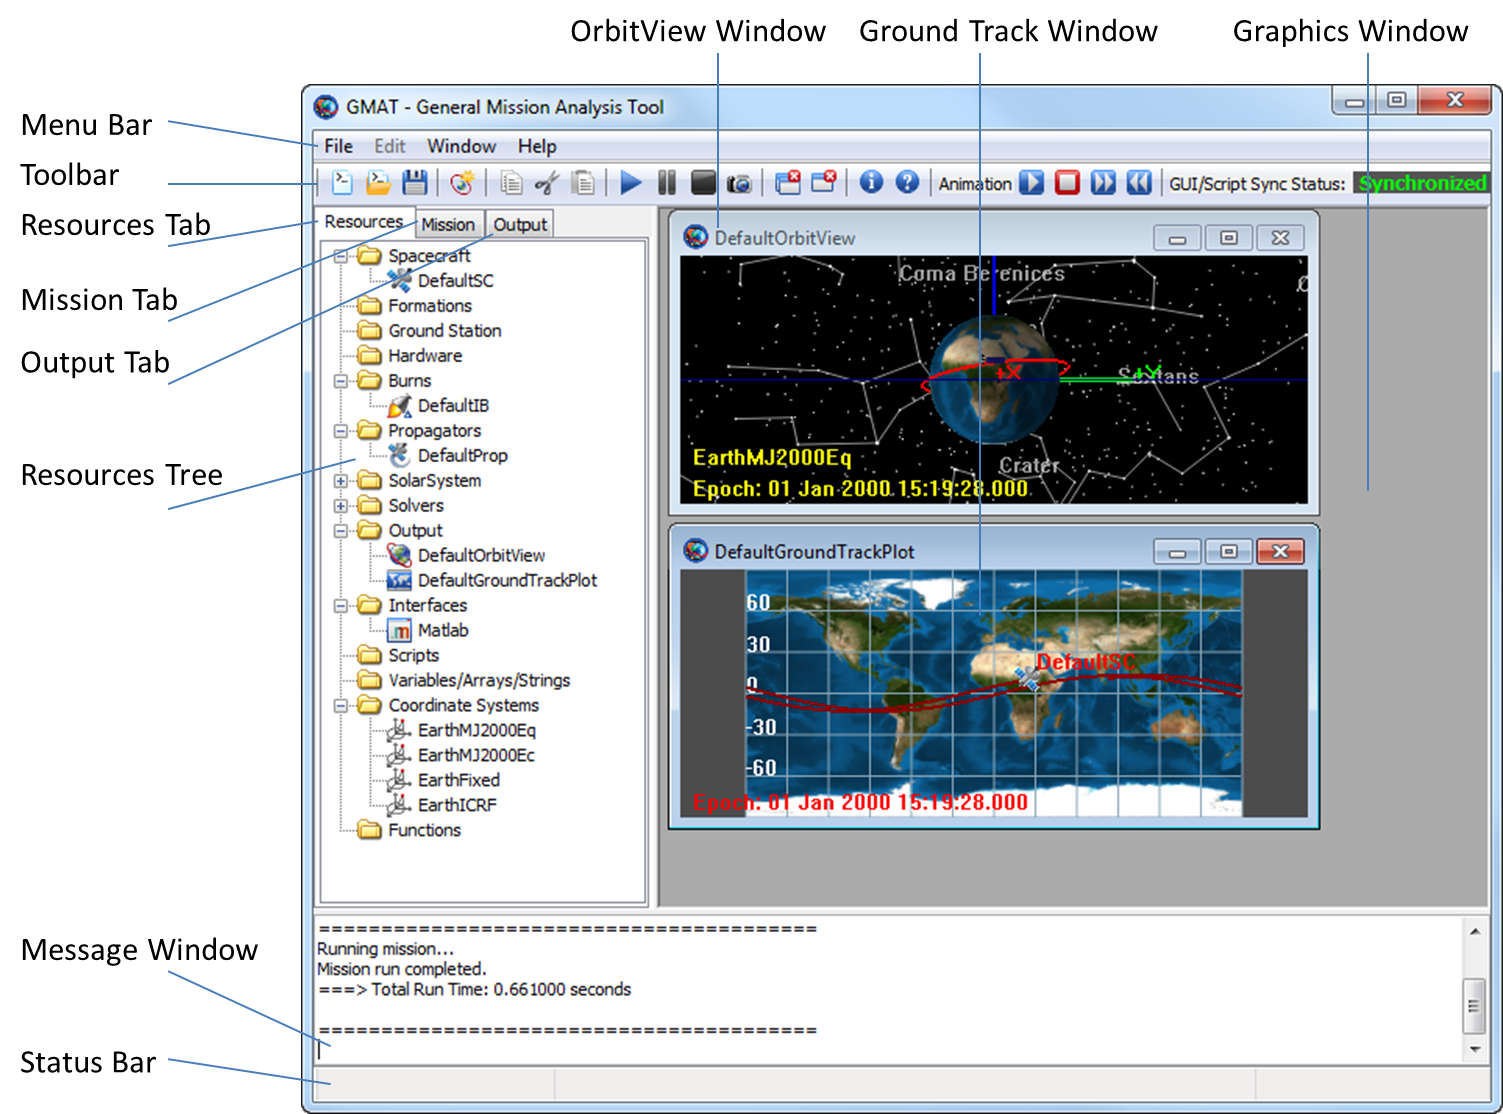
When you open GMAT on Windows and click Run in the Toolbar, GMAT executes the default mission as shown in the figure below. The tools listed below the figure are available in the GMAT desktop.
|
Menu Bar |
The menu bar contains File, Edit, Window and Help functionality. On Windows, the File menu contains standard Open, Save, Save As, and Exit functionality as well as Open Recent. The Edit menu contains functionality for script editing when the script editor is active. The Window menu contains tools for organizing graphics windows and the script editor within the GMAT desktop. Examples include the ability to Tile windows, Cascade windows and Close windows. The Help menu contains links to Online Help, Tutorials, Forums, and the Report An Issue option links to GMAT’s defect reporting system, the Welcome Page, and a Provide Feedback link. |
|
Toolbar |
The toolbar provides easy access to frequently used controls such as file controls, Run, Pause, and Stop for mission execution, and controls for graphics animation. On Windows and Linux, the toolbar is located at the top of the GMAT window; on the Mac, it is located on the left of the GMAT frame. Because the toolbar is vertical on the Mac, some toolbar options are abbreviated. GMAT allows you to simultaneously edit the raw script file representation of your mission and the GUI representation of your mission. It is possible to make inconsistent changes in these mission representations. The GUI/Script Sync Status indicator located in the toolbar shows you the state of the two mission representations. See the the section called “GUI/Script Interactions and Synchronization” section for further discussion. |
|
Resources Tab |
The Resources tab brings the Resources tree to the foreground of the desktop. |
|
Resources Tree |
The Resources tree displays all configured GMAT resources and organizes them into logical groups. All objects created in a GMAT script using a Create command are found in the Resources tree in the GMAT desktop. |
|
Mission Tab |
The Mission tab brings the Mission Tree to the foreground of the desktop. |
|
Mission Tree |
The Mission tree displays GMAT commands
that control the time-ordered sequence of events in a mission. The
Mission tree contains all script lines that
occur after the
|
|
Output Tab |
The Output tab brings the Output Tree to the foreground of the desktop. |
|
Output Tree |
The Output tree contains GMAT output such as report files and graphical displays. |
|
Message Window |
When you run a mission in GMAT, information including warnings, errors, and progress are written to the message window. For example, if there is a syntax error in a script file, a detailed error message is written to the message window. |
|
Status Bar |
The status bar contains various informational messages about the state of the GUI. When a mission is running, a Busy indicator will appear in the left pane. The center pane displays the latitude and logitude of the mouse cursor as it moves over a ground track window. |
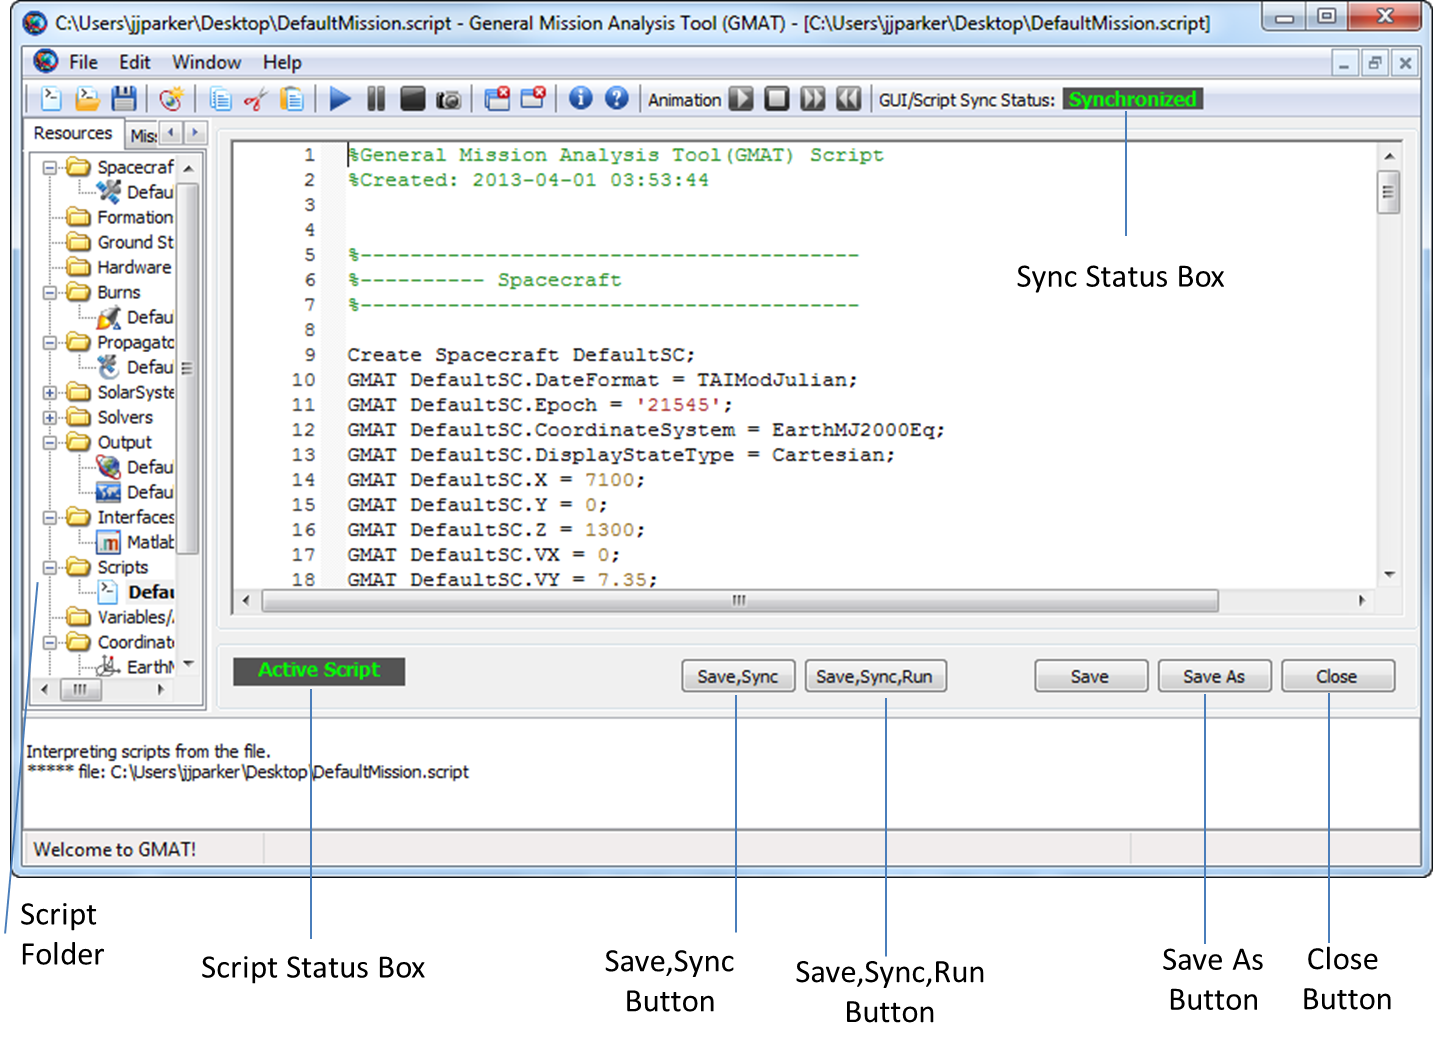
The GMAT script editor is a textual interface that lets you directly edit your mission in GMAT's built-in scripting language. In Figure 3.3, “GMAT Script Editor” below, the script editor is shown maximized in the GMAT desktop and the items relevant to script editing are labeled.
|
Scripts Folder |
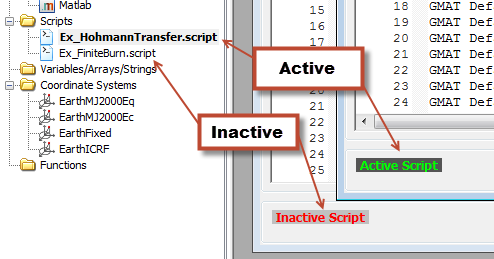
The GMAT desktop allows you to have multiple script files open simultaneously. Open script files are displayed in the Scripts folder in the Resources tree. Double click on a script in the Scripts folder to open it in the script editor. The GMAT desktop displays each script in a separate script editor. GMAT indicates the script currently represented in the GUI with a boldface name. Only one script can be loaded into the GUI at a time. |
|
Script Status Box |
The Script Status box indicates whether or not the script being edited is loaded in the GUI. The box says Active Script for the script currently represented in the GUI and Inactive Script for all others. |
|
Save,Sync Button |
The Save,Sync button saves any script file changes to disk, makes the script active, and synchronizes the GUI with the script. |
|
Save,Sync,Run Button |
The Save,Sync,Run button saves any script file changes to disk, makes the script active, synchronizes the GUI with the script, and executes the script. |
|
Save As Button |
When you click Save As, GMAT displays the Choose A File dialog box and allows you to save the script using a new file name. After saving, GMAT loads the script into the GUI, making the new file the active script. |
|
Close |
The Close button closes the script editor. |
The GMAT desktop supports both a script interface and a GUI interface and these interfaces are designed to be consistent with each other. You can think of the script and GUI as different "views" of the same data: the resources and the mission command sequence. GMAT allows you to switch between views (script and GUI) and have the same view open in an editable state simultaneously. Below we describe the behavior, interactions, and rules of the script and GUI interfaces so you can avoid confusion and potential loss of data.
GMAT allows you to simultaneously edit both the script file representation and the GUI representation of your mission. It is possible to make inconsistent changes in these representations. The GUI/Script Sync Status window located in the toolbar indicates the state of the two representations. On the Mac, the status is indicated in abbreviated form in the left-hand toolbar. Synchronized (green) indicates that the script and GUI contain the same information. GUI Modified (yellow) indicates that there are changes in the GUI that have not been saved to the script. Script Modified (yellow) indicates that there are changes in the script that have not been loaded into the GUI. Unsynchronized (red) indicates that there are changes in both the script and the GUI.
Caution
GMAT will not attempt to merge or resolve simultaneous changes in the Script and GUI and you must choose which representation to save if you have made changes in both interfaces.
The Save button in the toolbar saves the GUI representation over the script. The Save,Sync button on the script editor saves the script representation and loads it into the GUI.
Clicking the Save button in the toolbar saves
the GUI representation to the script file; this is the same file you
edit when working in the script editor. GUI items that appear in the
Resources tree appear before the
BeginMissionSequence command in a script file and
are written in a predefined order. GUI items that appear in the Mission
Tree appear after the BeginMissionSequence command
in a script file in the same order as they appear in the GUI.
Caution
If you have a script file that has custom formatting such as spacing and data organization, you should work exclusively in the script. If you load your script into the GUI, then click Save in the toolbar, you will lose the formatting of your script. (You will not, however, lose the data.)
Clicking the Save,Sync button on the script
editor saves the script representation and loads it into the GUI. When
you work in a GMAT script, you work in the raw file that GMAT reads and
writes. Each script file must contain a command called
BeginMissionSequence. Script lines that appear
before the BeginMissionSequence command create and
configure models and this data will appear in the
Resources tree in the GUI. Script lines that appear
after the BeginMissionSequence command define your
mission sequence and appear in the Mission tree in
the GUI. Here is a brief script example to illustrate:
Create Spacecraft Sat
Sat.X = 3000
BeginMissionSequence
Sat.X = 1000
The line Sat.X = 3000 sets the x-component of the
Cartesian state to 3000; this value will appear on the
Orbit tab of the Spacecraft
dialog box. However, because the line Sat.X = 1000 appears
after the BeginMissionSequence command, the line
Sat.X = 1000 will appear as an assignment command in the
Mission tree in the GUI.
-
Each script file must contain one and only one
BeginMissionSequencecommand. -
GMAT commands are not allowed before the
BeginMissionSequencecommand. -
You cannot use inline math statements (equations) before the
BeginMissionSequencecommand in a script file. (GMAT considers in-line math statements to be an assignment command. You cannot use equations in the Resources tree, so you also cannot use equations before theBeginMissionSequencecommand.) -
In the GUI, you can only use in-line math statements in an assignment command. So, you cannot type
3000 + 4000orSat.Y - 8in the text box for setting a spacecraft’s dry mass. -
GMAT’s script language is case-sensitive.
For a more complete discussion of GMAT's script language, see the Script Language documentation.
The Resources tree displays GMAT resources and organizes them into logical groups and represents any objects that might be used or called in the Mission tree. This tree allows a user to add, edit, rename, or delete most available resources. The Resources tree can be edited either in the GMAT GUI or by loading or syncing a script file. All objects created in a GMAT script using a Create command are found in the Resources tree in the GMAT desktop. The default Resource tree is displayed below (Figure 3.4).
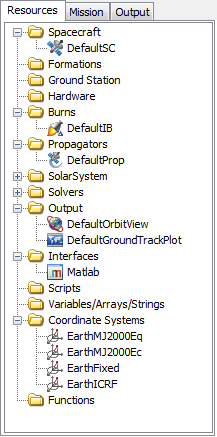
The Resources tree displays created resources organized into folders by object category. The SolarSystem and Solvers folders contain more specific folders which can be found by clicking the expand (+) icon. Conversely, folders can be collapsed by clicking the minimize (-) icon.
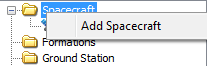
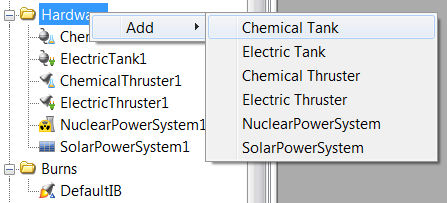
Resources can be added by right clicking the folder of the resource and clicking the resource type from the available menu. Most folders have only one available resource type; for example if the Spacecraft folder is right-clicked, the user can only click “Add Spacecraft” (Figure 3.5). Other folders have multiple objects that can be added and the user must first select the “Add” menu before selecting the object; for example to add a ChemicalTank, right click the “Hardware” folder, select “Add”, then the list of available resource types is displayed and the user can click “Fuel Tank” (Figure 3.6). User-defined solar system resources are added by right-clicking either Sun or a default CelestialBody resource. By right-clicking Sun the user can add a Planet, Comet, or Asteroid to the solar system. By right-clicking a Planet the user can add a Moon to that Planet.
Resources can be edited by right-clicking on the resources and selecting one of the options from the menu (Figure 3.7).
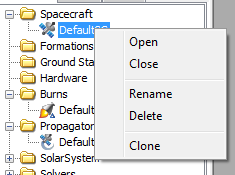
To open a resource, you can either right-click the resource and select “Open”, or you can double click the resource. Conversely, the resource can be closed either by options in the resource properties window or selecting “Close” from the resource menu. When a resource is opened and the name is right-clicked in the Resource tree, the only options in the object menu are “Open” and “Close”.
Once a resource has been created, the user can rename it to any valid name. Valid names must begin with a letter and may be followed by any combination of letters digits and underscores. Invalid names include:
-
Folder names (eg, Spacecraft)
-
Command names (eg, Propagate)
-
Names already in use (eg, naming two variables “
var”) -
Keywords (eg, “
GMAT” or “function”) -
Names with spaces
Resources can be deleted by right clicking the object and selecting “Delete”. Resources cannot be deleted if they are used by another resource or command and an error with be thrown. For example, a Spacecraft resource cannot be deleted if one of its properties (eg. DefaultSC.A1ModJulian) is being used by the Report command. Some default objects cannot be deleted. In such cases, the Delete menu item will not be shown. They include:
-
Default coordinate systems
-
EarthMJ2000Eq
-
EarthMJ2000Ec
-
EarthFixed
-
EarthICRF
-
-
Default planetary bodies
-
Sun
-
Mercury
-
Venus
-
Earth
-
Luna
-
Mars
-
Jupiter
-
Saturn
-
Uranus
-
Neptune
-
Pluto
-
Objects can be cloned by selecting the “Clone” option in the menu. A cloned object will be an exact copy of the original object with a different name. Some objects cannot be cloned. In such cases, the Clone menu item will not be available. The only objects that cannot be cloned are:
-
Default coordinate systems (listed above)
-
Default planetary bodies (listed above)
-
Propagator resource objects
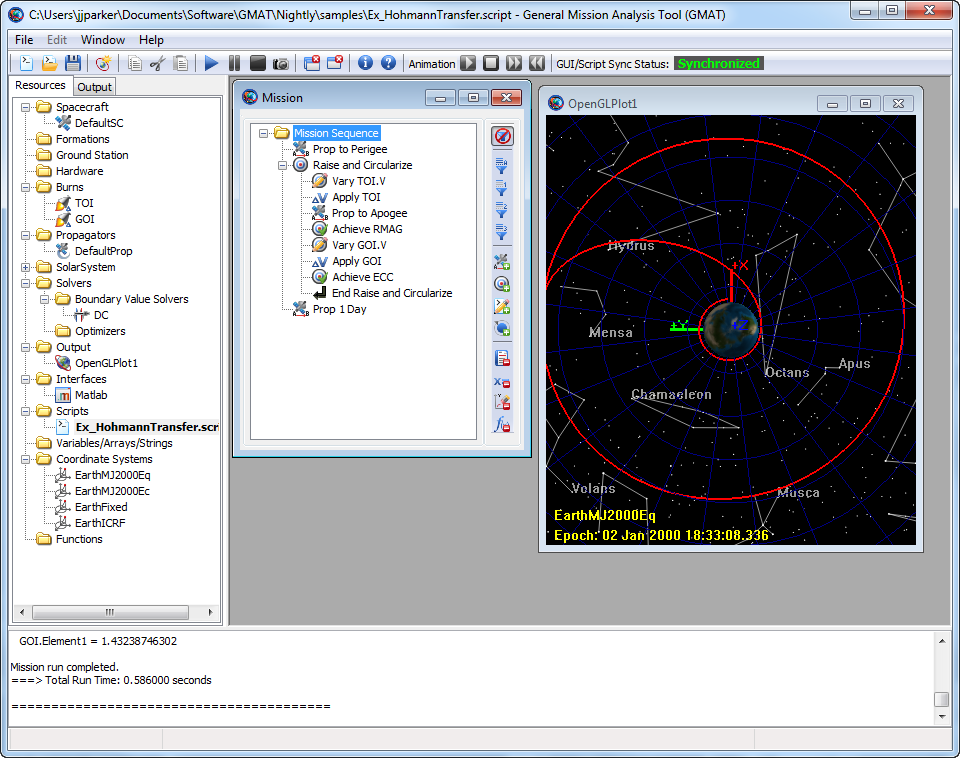
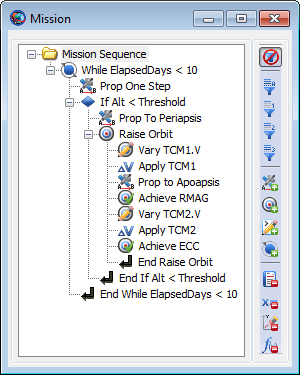
The Mission Tree is an ordered, hierarchical, display of your GMAT script command mission sequence (everything after the BeginMissionSequence in your script). It represents the ordered list of commands to be executed to model your mission. The hierarchical grouping in the mission tree represent commands that are executed inside a control logic command, e.g., If, For, While, etc. The mission tree allows you to add, edit, delete and rename commands. It allows you to configure or filter the display of the commands in the Mission Tree to make the command execution easier to understand or modify. An example Mission Tree screenshot is below. The Mission Tree window is made up of 2 elements: the Mission Sequence on the left and the view filters toolbar on the right.
|
Warning
Edits to the Mission Tree will be reflected in your script after it is synchronized and vice-versa. If you edit the Mission Tree, you need to synchronize with the script to see it in the script editor. If you edit the script, you need to synchronize with the GUI to see your changes reflected in the Mission Tree.
The Mission Tree Display shows your hierarchical, ordered list of commands. Normally, the Mission Tree displays only the command name in the tree for each command node (more information such as command type, construction information, etc can be displayed using the Show Detail menu option). Commands are executed in the order they appear, e.g., GMAT executes commands from the top of the Mission Tree to the bottom. For control logic (If, For, and While) and the Optimize and Target commands, you can define a block of commands that execute as children of the parent command. These child commands of the control logic or the Optimize and Target commands appear indented. Use the plus (+) symbol to the left of the control logic command to show all the grouped commands and the minus (-) symbol to hide all the grouped commands. Commands that are grouped under control logic commands (e.g. If, For, and While) only execute if that control logic command is successfully executed (e.g., if the local expression evaluates to true for If command, or the loop condition evaluates to true for For and While commands).
In general, commands are executed only once. However, child commands grouped under the loop commands (e.g. For and While) may execute multiple times. These commands will execute for each time the loop command evaluates to true. Commands under the If commands are only executed if the If condition evaluates to true; otherwise, they are skipped. For the If-Else command, child commands grouped under the If portion of the command execute if the conditional statement evaluates to true; otherwise, the child commands grouped under the Else portion of the command execute.
Note
Note that all commands in the Mission Tree are grouped under a special Mission Sequence home item. This home item is always present as the first item in the Mission Tree and cannot be deleted.
The Mission Tree may display a subset of the commands of the full mission sequence based on your view filter options. There are 3 basic filtering options available within GMAT:
-
Filter by branch level
-
Filter by command types (inclusive)
-
Filter by command types (exclusive)
The view filters activate by clicking one of the view filter buttons to the right of the Mission Tree. The pressed (pushed in) button indicates which filter is currently enabled. The four buttons on the top are the Filter by branch level buttons. The next four buttons in the middle are the inclusive filter-by-command-types buttons, and the four buttons on the bottom are the exclusive filter-by-command-types buttons. The button at the very bottom of the view filters toolbar allows you to define a custom filter. You cannot combine filter-by-branch-level filters with the filter-by-command-type filters nor combine inclusive and exclusive command type filters. However, multiple inclusive command type filters can be combined (e.g., filter both physics related and solver related commands) or multiple exclusive command type filters can be combined.
Note
Note that all parents of a viewable command are displayed, even if the parent command is not part of the viewable command set.
Also note that the Mission Tree automatically reconfigures to show all commands when the user Appends or Inserts a new command.
Filtering by branch level causes GMAT to not display commands in the mission tree that are below a certain level. To select the number of levels you wish to display, click the buttons on the top. The four buttons correspond to (from top to bottom):
-
Show all branches
-
Show one level of branching
-
Show two levels of branching
-
Show three levels of branching
Only one filter-by-branch-level button may be active at a time. The default GMAT behavior is to display all branches of a mission tree.
GMAT allows you to filter what commands are displayed by their command type. You may select to only display commands that are in a filter command type set (inclusive) or only display commands that are not in a filter command type set (exclusive). GMAT provides both pre-configured command type sets (e.g., physics related or output related) and custom command type sets that you define
The four middle buttons in the View Options toolbar are pre-configured inclusive command filters, e.g., only display commands that are in the desired command set. The four inclusive filter buttons correspond to (from top to bottom):
-
Physics Related (Propagate, Maneuver, BeginFiniteBurn, and EndFiniteBurn)
-
Solver Related (Target, Optimize, Vary, Achieve, NonlinearConstraint, Minimize, EndTarget, EndOptimize)
-
ScriptEvent commands
-
Control Flow (If, If-Else, For, and While)
Multiple inclusive command type filters can be active at once. For example, to filter both physics related and solver related commands, click both the physics-related and solver-related filter buttons so that they appear pressed down. This option will show all physics related and solver related commands and hide all other commands (except Parents of the viewable commands)).
The four buttons at the bottom in the View Options toolbar are pre-configured exclusive command filters, e.g., only display commands that are not in the command set. The four exclusive filter buttons correspond to (from top to bottom):
-
Report
-
Equation
-
Output-related (Report, Toggle, PenUp, PenDown, MarkPoint, and ClearPlot)
-
Function calls (CallMatlabFunction)
Multiple exclusive command type filters can be active at once. For example, to show everything but Report and output-related commands, click both the Report and output-related filter buttons so that they appear pressed down.
Note
Note that the Mission Tree shows an ellipsis (…) after a command name if the command is followed by items not graphically displayed in the tree because of filter options.
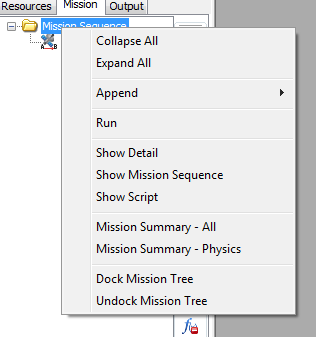
The Mission Tree has two context-sensitive popup menus, depending on whether you right-click the Mission Sequence home item or a command in the Mission Tree. The Mission Sequence popup menu primarily allows you to manipulate the Mission Tree window and the entire command sequence. It also enables appending (adding to the end) commands to the mission tree.
|
Mission Sequence menu options are always available and active in the menu list.
This menu option collapses all the branches in the Mission Tree so that you only see the top-level commands. To show branches, click the plus (+) button next to a command or select Expand All from the Mission Sequence popup menu.
This menu option expands all the branches and sub-branches in the Mission Tree so that you see every command in the mission sequence. To hide branches, click the minus (-) button next to a command or select Collapse All from the Mission Sequence popup menu.
The Append menu option displays the submenu of commands that can be appended to the mission sequence. This menu is not available when the Mission Tree view is filtered.
The Run menu option executes the mission command sequence. This menu option is always available.
The Show Detail menu option toggles an option to display the mission tree with short or verbose text. When the show detail menu option is checked, each command is displayed with the script line for the command (e.g. what appears in “Show Script” for the command). When the show detail menu option is unchecked, the mission tree shows only the label for the command which will be your custom label if you have provided one and a system provided label if you have not labelled the command. This menu option is always available.
The Show Mission Sequence menu option displays a streamlined text view of the mission sequence in text window. This view shows a hierarchical view of every command (similar to a script view) in the mission sequence. Unlike the script editor, this view only includes the command names and labels. This menu option is always available.
The Show Script menu option displays the script associated with the GUI version of the current mission script. This is the complete script that would be saved to a file if you clicked the GUI save button. Note that when the GUI is unsynchronized with the script editor (please see Script Editor for more details), this mission script is different than the script displayed in the script editor. This menu option is always available
The Mission Summary - All menu option displays a mission simulation summary for the all commands in the mission sequence. This summary information includes spacecraft state information, spacecraft physical properties, time information, planetodetic properties, and other orbit data for each command. This information is only available after a mission simulation is run and the data shows state information after the execution of the command. Showing Mission Summary data for a ScriptEvent command is equivalent to showing summary data for the last command in that ScriptEvent. If commands are nested in control flow or solver branches, the summary data that is displayed is for the last pass through the sequence. This menu option is always available.
The Mission Summary - Physics menu option displays a mission simulation summary for physics related commands in the mission sequence. This summary information includes spacecraft state information, spacecraft physical properties, time information, planetodetic properties, and other orbit data for each command. This information is only available after a mission simulation is run and the data shows state information after the execution of the command. Note that if you have physics-based commands such as Propagate or Maneuver inside a ScriptEvent command, then summary information for those commands, are not displayed. Showing Mission Summary data for a ScriptEvent is equivalent to showing summary data for the last command in that ScriptEvent. If commands are nested in control flow or solver branches, the summary data that is displayed is for the last pass through the sequence. This menu option is always available.
The Dock Mission Tree menu option docks the Mission Tree window in the notebook containing the Resources tree and Output tree. This option is only selectable if the Mission Tree is currently floating or undocked. Please see the Docking/Undocking/Placement section for more information.
The Undock Mission Tree menu option undocks, or makes floating, the Mission Tree window from the Resources tree and Output tree. The undocked Mission Tree window may be resized, moved, maximized, minimized, and restored. This option is only selectable if the Mission Tree is currently docked. Please see the the section called “Docking/Undocking/Placement” section for more information.
The Command popup menu allows you to add, edit, or delete the commands in the Mission Tree by using the right mouse button. This displays a context sensitive menu for adding and modifying commands as well as viewing your command sequence and command summary. To add commands to the Mission Tree, right click a command and select Append, Insert Before, or Insert After. To edit commands, double click the command name or right click and select Open.
Most commands in GMAT can appear anywhere in the mission sequence. However, there are some exceptions and the Command popup menu is context sensitive, meaning the options available under the menu change based on what command is selected and where in the tree the command occurs. Here is a complete list of context sensitivities:
-
Insert and Append are not available unless the mission tree filter is set to show all levels.
-
Achieve commands can only appear inside of a Target sequence.
-
Vary commands can only appear in a Target or Optimize sequence,
-
NonlinearConstraint and Minimize commands can only appear in an Optimize sequence.

|
This menu option opens the command editor window for the selected command. The Open menu option is always active in the menu list. If the window is already open, the Open option brings the window to the front and makes it the active window.
This menu options closes the command editor window for the selected command. The Close menu option is always active in the menu list.
The Append menu option displays the submenu of commands that can be appended as the last sub-item of the selected command in the Mission Tree. As such, the Append menu option only appears when the selected tree item can contain sub-items, e.g., the Mission Sequence home item, control logic commands, and Optimize and Target commands. Note that the Append submenu is context-sensitive and will only show commands that may be appended to the selected command. Finally, this menu is not available when the Mission Tree view is filtered.
The Insert After menu option displays the submenu of commands that can be inserted after the selected command (and any child commands, if any) in the Mission Tree. Nominally, the new command is inserted at the same level as the selected command. However, if the selected command is the “End” command of a control logic or Optimize or Target command (e.g., End For, End If, End Optimize, etc), the new command is inserted after the End command and on the same level (e.g., the next level up) as the parent command. The Insert After menu option is always active in the menu list except when the Mission Sequence home item is selected. Note that the Insert After submenu is context-sensitive and will only show commands that may be added after the selected command. Finally, this menu is not available when the Mission Tree view is filtered.
The Insert Before menu option displays the submenu of commands that can be inserted before the selected command (and any child commands, if any) in the Mission Tree. The new command is always inserted at the same level as the selected command. The Insert Before menu option is always active in the menu list except when the Mission Sequence Home item is selected. Note that the Insert Before submenu is context-sensitive and will only show commands that may be added before the selected command. Finally, this menu is not available when the Mission Tree view is filtered.
The Rename menu option displays a dialog box where you can rename the selected command. A command name may contain any characters except the single quote. Note that, unlike resources, command names do not have to be unique. The Rename menu option is always active in the menu list except when the Mission Sequence home item is selected.
The Delete menu option deletes the selected command. GMAT does not confirm the option before deletion occurs. The Delete menu option is always active in the menu list except when the Mission Sequence home item is selected.
The Command Summary menu option displays a mission simulation summary for the selected command, including spacecraft state information, time information, planetodetic properties, and other orbit data. This information is only available after a mission simulation run. This menu option is always available. However, command summary data is not available for Propagate command in single step mode. The button is available but no data is displayed.
The Mission Tree window may be used as a floating window or docked with the Resource tree. GMAT remembers the placement and docking status of the Mission Tree even after you quit. The undocked Mission Tree window may be resized, moved, or minimized. When the Mission Tree is undocked, and the user opens a dialog box for a GUI component, the dialog box does not cover the Mission Tree.
To undock the Mission Tree Display, either:
-
Right click and drag the Mission tab out of the Resource Tree window.
-
Right click the Mission Sequence home item and select Undock Mission Tree.
To dock the Mission Tree display, either:
-
Left click the close button (x) of the undocked Mission Tree window.
-
RIght click the Mission Sequence home item and select Dock Mission Tree.
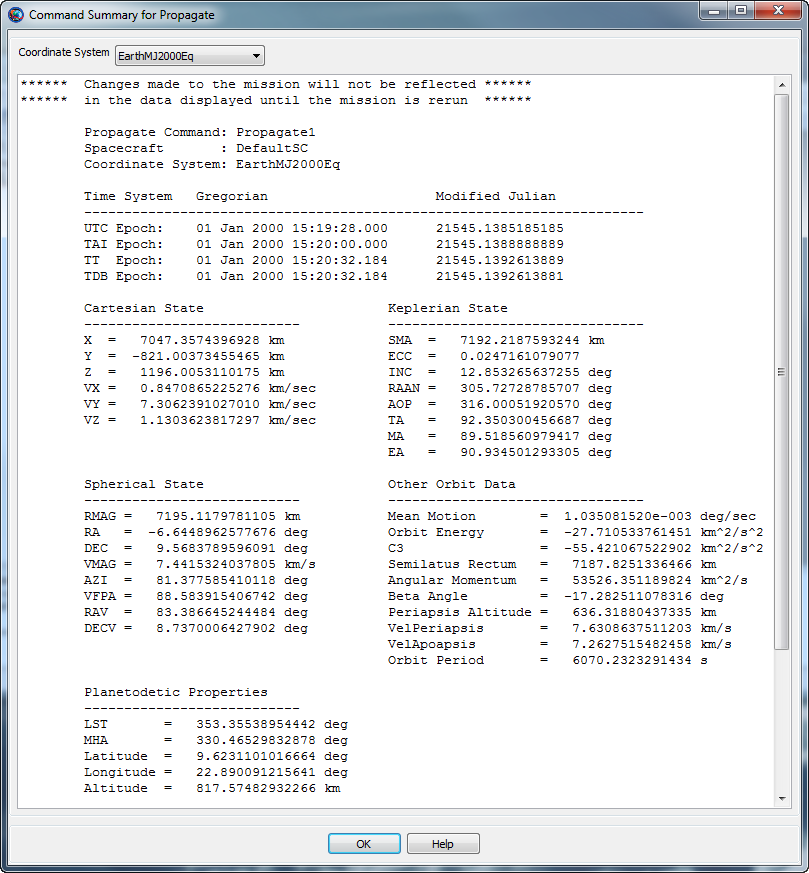
The Command Summary is a summary of orbit and spacecraft state information after execution of a command. For example, if the command is a Propagate command, the Command Summary contains state data after propagation is performed.
To view the Command Summary, right-click on the desired command, and select Command Summary. Or alternatively, double-click on the desired command, and click the Command Summary icon located near the lower left corner of the panel. You must run the mission before viewing Command Summary data.
Snapshot of a sample Command Summary is shown in the following figure.
|
To view a Command Summary, you must first run the mission. If the mission has not been run during the current session, the Command Summary will be empty. If changes are made to your configuration, you must rerun the mission for those changes to take effect in the Command Summary.
The Command Summary contains several types of data. Orbit state representations include Cartesian, spherical, and Keplerian. For hyperbolic orbits, B-Plane coordinates, DLA and RLA are provided. Planetodetic information includes Longitude and Latitude among others. For a Maneuver command, the Maneuver properties are displayed in the CoordinateSystem specified on the ImpulsiveBurn resource. See the Coordinate Systems subsection below for more information on the command summary contents when some data is undefined.
In the event when the orbit is nearly singular conic section and/or any of the keplerian elements are undefined, an abbreviated Command Summary is displayed as shown in the Coordinate Systems subsection below.
For performance reasons, propagation in step mode does not write out a command summary. Additionally, if a command is nested in control logic and that command does not execute as a result, no command summary data is available.
The Coordinate System menu at the top of the Command Summary dialog allows you to select the desired coordinate system for the state data. When the Coordinate System has a celestial body at the origin, the Command Summary shows all supported data including Cartesian, Spherical, Keplerian, Other OrbitData, and Planetodetic properties as shown in the GUI screenshot above. When the Coordinate System does not have a celestial body at the origin, the CommandSummary contains an abbreviated command summary as shown below.
Note: GMAT currently requires that the selected CoordinateSystem cannot reference a spacecraft.
          Propagate Command: Propagate1
        Spacecraft       : DefaultSC
        Coordinate System: EarthMJ2000Eq

        Time System   Gregorian                     Modified Julian
        --------------------------------------------------------------------
        UTC Epoch:    01 Jan 2000 15:19:28.000      21545.1385185185
        TAI Epoch:    01 Jan 2000 15:20:00.000      21545.1388888889
        TT  Epoch:    01 Jan 2000 15:20:32.184      21545.1392613889
        TDB Epoch:    01 Jan 2000 15:20:32.184      21545.1392613881

        Cartesian State                       Spherical State
        ---------------------------           ------------------------------
        X  =   7047.3574396928 km             RMAG =   7195.1179781105 km
        Y  =  -821.00373455465 km             RA   =  -6.6448962577676 deg
        Z  =   1196.0053110175 km             DEC  =   9.5683789596091 deg
        VX =   0.8470865225276 km/sec         VMAG =   7.4415324037805 km/s
        VY =   7.3062391027010 km/sec         AZI  =   81.377585410118 deg
        VZ =   1.1303623817297 km/sec         VFPA =   88.583915406742 deg
                                              RAV  =   83.386645244484 deg
                                              DECV =   8.7370006427902 deg

        Spacecraft Properties
        ------------------------------
        Cd                    =   2.200000
        Drag area             =   15.00000 m^2
        Cr                    =   1.800000
        Reflective (SRP) area =   1.000000 m^2
        Dry mass              =   850.00000000000 kg
        Total mass            =   850.00000000000 kg
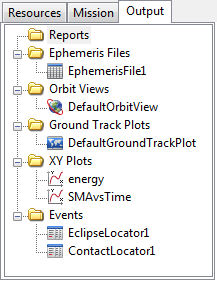
The Output tree contains data files and plots after a mission is executed. Files consist of output from ReportFile and EphemerisFile resources. Plots consist of graphical OrbitView, GroundTrackPlot, and XYPlots windows.
To display the contents of an output file, double-click the name in the Output tree. A simple text display window will appear with the contents of the file.
Graphical output is automatically displayed during the mission run, but double-clicking the name of the output window in the Output tree will bring that display to the front. If you close the display window, however, you must rerun the mission to display it again.
A populated Output tree is shown in the following figure.
|
A GMAT mission can be created in either the graphical user interface (GUI), or in a text script language. When a mission is loaded into the GUI from a script, or when it is saved from the GUI, there is a script file that can be accessed from the Scripts folder in the resources tree. When you open this script, it opens in a dedicated editor window called the Script Editor. While a GMAT script can be edited in any text editor, the GMAT script editor offers more features, such as:
-
GUI/script synchronization
-
Mission execution from the editor
-
Syntax highlighting
-
Comment/uncomment or indent blocks of text
-
Standard features like copy/paste, line numbering, find-and-replace, etc.
The following figure shows a basic script editor session with the major features labeled.
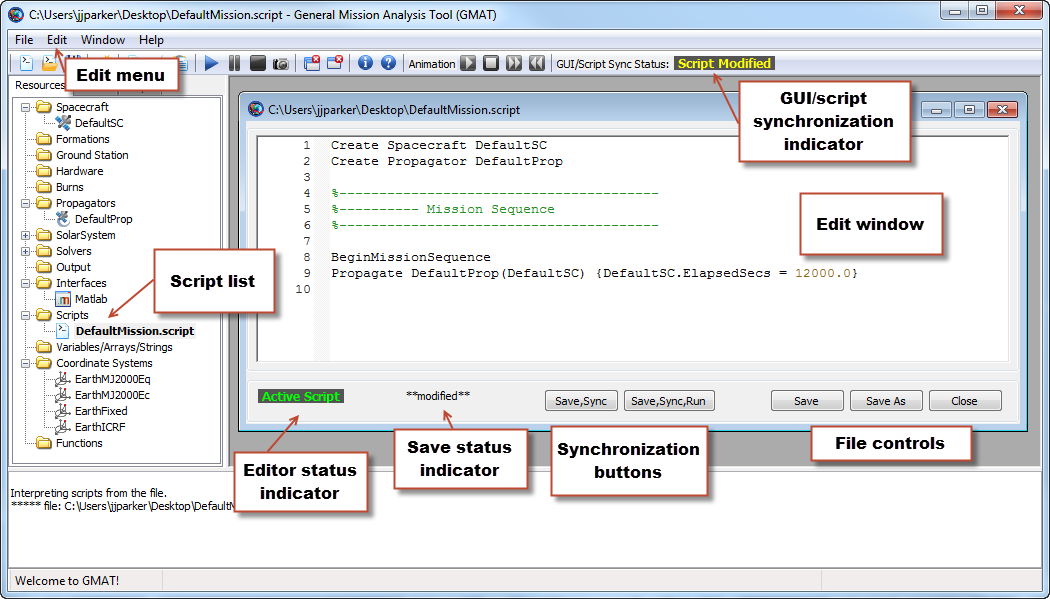
When you load a script into the GMAT GUI, it is added to the script list in the resources tree. GMAT can have many scripts loaded at any one time, but only one can be synchronized with the GUI. This script is called the active script, and is distinguished by a bolded name in the script list. The editor status indicator in the script editor for the active script shows “Active Script” as well. All other scripts are inactive, but can be viewed and edited in the script editor.
To synchronize with the GUI, you must make an inactive script active by clicking either of the synchronization buttons (described in the next section). This will change the current script to active, synchronize the GUI, and change the the previously active script to inactive. Alternately, you can right-click the script name in the resources tree and click Build.
GMAT provides two separate representations of a mission: a script file and the GUI resources and mission trees. As shown in Figure 3.8, “Parts of the script editor”, you can have both representations open and active at the same time, and can make changes in both places. The GUI/Script Sync Status indicator shows the current status of the two representations relative to each other. The following states are possible:
| Synchronized |
The GUI and script representations are synchronized (they contain the same data). |
| Script Modified |
The mission has been modified in the script representation, but has not been synchronized to the GUI. Use the synchronization buttons in the script editor to perform this synchronization. To revert the modifications, close the script editor without saving your changes. |
| GUI Modified |
The mission has been modified in the GUI, but has not been synchronized to the script. To perform this synchronization, click the Save button in the GMAT toolbar. To revert the modifications, use the synchronization buttons in the script editor, or restart GMAT itself. |
| Unsynchronized |
The mission has been modified both in the GUI and in the script. The changes cannot be merged; you have a choice of whether to save the modifications in either representations, or whether to revert either of them. See the notes above for instructions for either case. |
| Script Error |
There is an error in the script. This puts the GUI in a minimal safe state. The error must be corrected before continuing. |
Warning
Saving modifications performed in the GUI will overwrite the
associated script. The data will be saved as intended, but with full
detail, including fields and settings that were not explicitly listed in
the original script. A copy of the original script with the extension
“.bak” will be saved alongside the new
version.
The script editor provides two buttons that perform synchronization from the script to the GUI. Both the Save,Sync and the Save,Sync,Run buttons behave identically, except that the Save,Sync,Run button runs the mission after synchronization is complete. The following paragraphs describe the behavior of the Save,Sync button only, but the description applies to both buttons. If you right-click the name of a script in the resources tree, a context menu is displayed with the items Save, Sync and Save, Sync, Run. These are identical to the Save,Sync and Save,Sync,Run buttons in the script editor.
When pressed, the Save,Sync button performs the following steps:
-
Saves any modifications to the script
-
Closes all open windows (except the script editor itself)
-
Validates the script file
-
Refreshes the GUI by loading the saved script
-
Sets GUI/Script Sync Status to Synchronized.
If the GUI has existing modifications, a confirmation prompt will be displayed. If confirmed, the GUI modifications will be overwritten.
If the script is not active, a confirmation prompt will be displayed. If confirmed, the script will be made active before the steps above are performed.
If the script has errors, the GUI will revert to an empty base state until all errors are corrected and the script is synchronized successfully.
The scripts folder in the Resources tree contains items for each script that has been loaded into GMAT. Individual scripts can be added to the list by right-clicking the Scripts folder and clicking Add Script.
The right-click menu for an individual script contains several options:
-
Open: opens the script in the edit window
-
Close: closes any open edit windows for this script
-
Save, Sync: opens the script and synchronizes it with the GUI, making it the active script. This is identical to the Save,Sync button in the script editor.
-
Save, Sync, Run: builds the script (see above), and also runs it. This is identical to the Save,Sync,Run button on the script editor.
-
Reload: reloads the script from the last-saved version and refreshes the script editor
-
Remove: removes the script from the script list
The edit window displays the text of the loaded script and provides tools to edit it. The edit window provides the following features:
-
Line numbering: Line numbers along the left side of the window
-
Syntax highlighting: Certain elements of the GMAT script language are colored for immediate recognition.
-
Folding: Script blocks (like For loops, Target sequences, etc.) can be collapsed by clicking the black downward-pointing triangle to the left of the command that begins the block.
If you right-click anywhere in the edit window, GMAT will display a context menu with the following options:
-
Undo/Redo: Undo or redo any number of changes since the last time the script was saved
-
Cut/Copy/Paste: Cut, copy, or paste over the current selection, or paste the current clipboard contents at the location of the cursor
-
Delete: Delete the current selection
-
Select All: Select the entire script contents
When the script editor is active in the GMAT GUI, the Edit menu is also available with the following options:
-
Undo/Redo: Undo or redo any number of changes since the last time the script was saved
-
Cut/Copy/Paste: Cut, copy, or paste over the current selection, or paste the current clipboard contents at the location of the cursor
-
Comment/Uncomment: Add or remove a comment symbol (
%) at the beginning of the current selection -
Select All: Select the entire script contents
-
Find/Replace: Starts the Find & Replace utility (see below)
-
Show line numbers: When selected (default), the editor window displays line numbering to the left of the script contents.
-
Goto: Place the cursor on a specific line number
-
Indent more/less: Adds or removes an indentation from the current line or selection. The default indentation is three space characters.
See the Keyboard Shortcuts reference page for the list of keyboard shortcuts that are available when working in the script editor:
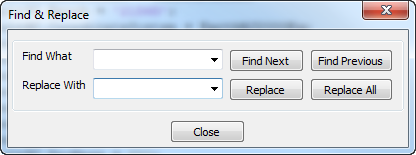
On the Edit menu, if you click Find or Replace (or press Ctrl+F or Ctrl+H), GMAT displays the Find & Replace utility, which can be used to find text in the active script and optionally replace it with different text. The utility looks like the following figure.
|
To find text within the active script, type the text you wish to find in the Find What box and click Find Next or Find Previous. Find Next (F3) will start searching forward (below) the current cursor position, while Find Previous will start searching backward (above). If a match is found, the match will be highlighted. You can continue clicking Find Next or Find Previous to continue searching. The search text (in the Find What box) can be literal text only; wildcards are not supported. To replace found instances with different text, type the replacement text in the Replace With box. Click Replace to replace the currently-highlighted match and highlight the next match, or click Replace All to replace all matches in the file at once. The Find & Replace utility saves a history of text previously entered in the Find What and Replace With boxes in the current session. Click the down arrow in each box to choose a previously-entered value.
The Save button saves the current script without checking syntax or synchronizing with the GUI, and without switching the active script. The Save As button is identical, but allows you to save to a different file.
The Close button closes the script editor, and prompts you to save any unsaved changes.