Verifying the Hostname
To correct a problem with the hostname, complete the following steps:
- Locate the device that has a problem. This is indicated by an (!) on the device icon, as shown in the NI Ethernet Device Configuration utility.
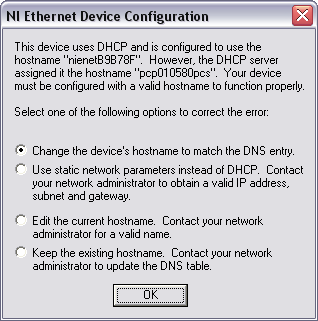
- Select Properties.... A dialog box similar to the following appears.

Resolving a Hostname Verification Error
- The utility gives you four options for resolving the verification error. Select the one that best fits your situation and click OK.
- Change the device's hostname to match the DNS entry. Use this option if you want to accept the hostname the DHCP server assigns, or if you cannot contact the network administrator to change the DNS entry.
- Use static network parameters instead of DHCP. Use this option if you cannot use the hostname the DHCP server assigns. Contact your network administrator to obtain a valid IP address, subnet, and gateway. This option disables DHCP on the device.
- Edit the current hostname. Use this option to change the hostname to a name other than either the configured hostname or the name the DHCP server assigns. Contact your network administrator to obtain a valid name.
- Keep the existing hostname. Use this option to keep the previously assigned hostname. If you select this option, contact your network administrator to change the DNS entry.
- Review the network parameter settings in the Properties window.
- Confirm that the device is in network configuration mode and click OK. The device reboots with the new settings in effect.
- After the device reboots, click Refresh to verify that the hostname is now valid.