PXI Hardware Installation
 |
Note If you are installing a PXI RS-485 interface, you might need to adjust the value of the bias resistors, depending on your application. Bias resistors are not available on eight-port PXI hardware. For more information, refer to Bias Resistors. |
 |
Caution Before you remove your board from the package, touch the antistatic plastic package to a metal part of your system chassis to discharge electrostatic energy, which can damage several components on your serial board. |
Before installing your hardware, follow the NI-Serial Software Installation instructions.
To install your PXI serial board, complete the following steps:
- Turn off your PXI or CompactPCI chassis. Keep the chassis plugged in so that it remains grounded while you install the PXI serial board.
- Find an unused PXI or CompactPCI peripheral slot.
- Remove the corresponding filler panel.
- Touch a metal part on your chassis to discharge any static electricity.
- Insert the PXI serial board into the slot. Use the injector/ejector handle to fully inject the device into place. The following figure shows how to install the PXI serial board into a PXI or CompactPCI chassis.
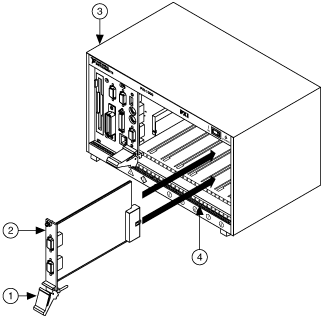
1 Injector/Ejector Handle (In Down Position) 2 PXI Serial Board 3 PXI Chassis 4 Injector/Ejector Rail Installing the PXI Serial Board
- Screw the PXI serial board front panel to the front panel mounting rail of the PXI or CompactPCI chassis.
- Turn on your PXI or CompactPCI chassis.
- The operating system will automatically detect your hardware.
The serial hardware installation is complete. Continue to Verify the Installation.