RAMP TS004 Step 2 Classify Screens
From RAMP-TS
RAMP-TS004 Step 2. Classify Screens
In this step you will classify the screens as Junction Screen , Special Screen or Destination screen.
1. Deselect the Auto Update Navigation Scripts check box (you will track navigation in the next step, now you are just classifying the screens) and ignore any messages about auto navigation for the moment:
![]()
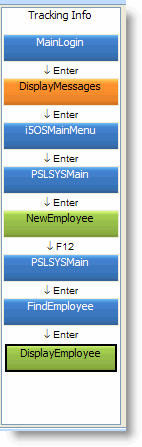
2. Log on to your system in the RAMP-TS 5250 session.
3. If the messages screen is displayed dismiss it.
4. In the i5/OS Main menu, enter this command:
lansa run pslsys partition(dem)
5. Select option 2 to enrol a new employee.
6. When the Enrol a New Employee screen is displayed, press F12 to return to the Personnel System main menu.
7. Select option 3 to browse employees.
8. In the Find Employee screen type any employee number, for example A1234.
The Browse/Maintain Employee and Skill Files screen is displayed.
You now have a list of all the screens in the Personnel System application about to be modernized ready to be classified (you can do the classification either while you are tracking the navigation as in RAMP-TS002 Step 2: Classify the Screens and Track Navigation or you can do it as two distinct steps as in here).
It is usually preferable to make the classification of screens a distinct task. When you are ready, you can use your spreadsheet or whatever document you have and methodically track the movement through the junctions to your destinations. Doing it this way should produce the least amount of rework later.
Now you can start classifying the screens:
9. Click on the MainLogin screen in the Tracking Info area. Notice that it is predefined as a Junction (it is automatically classified).
10. Using the Tracking Info area, classify the rest of the screens like this:
|
PSLSYSMain |
Junction |
|
NewEmployee |
Destination |
|
FindEmployee |
Junction |
|
DisplayEmployee |
Destination |
You have now completed classifying the screens.