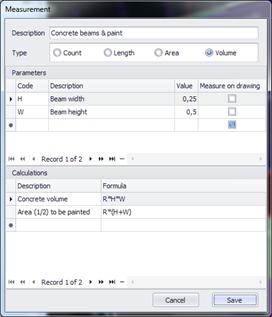
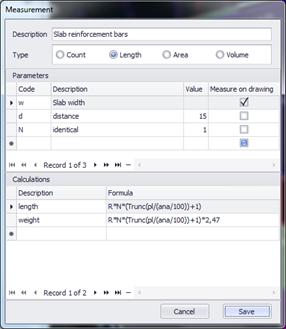
Calculations
You can optionally enter one or more formulas for each measurement, so they can be ready to use during measurements.
Set the description and formula for the calculation of the result. Enter the left part of the formula you desire without the = symbol, inserting numbers, parameters, and functions.
· Numbers (without the thousands separator), using the (.) as decimal point.
· Library
parameters Pi which you have already defined in the library. The values that
will be used in the formulas will be the ones you set for the current project in
the ‘Project measurement parameters’ window (See General/Project measurements parameters  ).
).
· The letters R, L, and A to symbolize the result of a measurement (Result), the measured length (Length), or the measured area (Area) respectively. In the case of measuring area, the program automatically computes the perimeter length while in the case of measuring length (using a polyline) it attempts to calculate the area as well.
· The symbols of the mathematical operations: plus (+), minus (-), multiply (*), divide (/) and raise to power (^).
· Parentheses for grouping parts of the expression.
· Functions, which are input in the exact same format used in Excel.
 There are many of the most
widely used Excel functions. See the Appendix for their correct syntax. You can
also refer to Excel Help.
There are many of the most
widely used Excel functions. See the Appendix for their correct syntax. You can
also refer to Excel Help.
Some of the available functions are:
ABS, ACOS, ASIN, ASINH, ATAN, ATAN2, CEILING, COS, COSH, EXP, FACT, FLOOR, LOB, ROUND, SIGN, SIN, SINH, SQRT, TRUNC
Use the navigator at the bottom of the window to
move from one entry to another or to delete an entry. Specifically, use the  ,
,  buttons to move to the
previous or next entry, the
buttons to move to the
previous or next entry, the  ,
,  to move to the previous or next page, the
  ,
,  buttons to move to the
first or last entry, and finally the
buttons to move to the
first or last entry, and finally the  button to delete an entry.