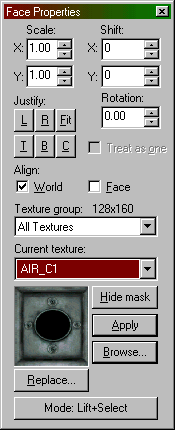
Dialogs: Face Properties
 Hotkey: Shift+A
The Face Properties dialog allows you to manipulate the texture properties of selected brush faces. To select a brush face, click on it in the 3D view with the left mouse button. To select multiple faces, hold down the Ctrl key while you do this. You can also select multiple brushes before bringing up the Face Properties tool.
"Right-Click"
Texture Application
A special feature of the Face
Properties tool is that of being able to apply the current texture to
a brush face by right-clicking on that face.
In order to make the textures match up from one face to the next, first align the texture on one of the faces, lift the texture from that face (left-click by default), then Alt-right-click on the other faces one by one. The texture should flow continuously across all the faces.
Scale (X/Y)
You can modify the scale of a texture to shrink or enlarge it.
Numbers less than 1 shrink, and numbers greater than 1 enlarge. You
can use negative values to mirror the texture in one or both planes.
Shift (X/Y)
This simply allows you to shift the texture along the horizontal or
vertical texture axes.
Rotation
Rotation allows you to rotate the texture on a brush face.
Justify
There are six buttons you can
press here: L (left), R (right), Fit (fit to face), T (top), B
(bottom), and C (center on face). These allow you to quickly and
easily align a texture on a brush.
Treat as one
If you have multiple faces
selected, you can check this option to treat all the faces as one
single face.
Align: World and Face
These checkboxes allow you to set
the texture alignment style for the selected faces. World alignment
causes textures to be aligned according to world coordinates (if
you're familiar with versions of the editor before 3.3, this was the
standard behavior). Face alignment uses the coordinates of the face
as a basis for alignment.
Texture Group
You can select which group of textures you want to use - either all
of them, or individual texture WADs.
Current Texture
The name of the current texture
is displayed here, along with a thumbnail picture of the texture.
Hide Mask
If this button is toggled on, the selected brush face(s) will not
appear as selected (with a reddish hue). This may make it easier to
perform some texture manipulations.
Mode
This lets you select what will happen when you click on a brush face
with the left mouse button. The available options are Lift+Select,
Lift, Select, Apply (texture only), Apply (texture + values), and
Align to View.
-
Lift+Select - Clicking on a brush face in the 3D view will select that face and make it's texture the current texture.
- Lift
- Clicking on a brush face will make it's texture the current texture
without selecting the face.
- Select
- Clicking on a brush face will select that face without changing the
current texture.
- Apply
(texture only)
- Clicking on a brush face will apply the current texture to that
face without changing any of it's other properties.
- Apply
(texture + values)
- Clicking on a brush face will apply the current texture and texture
properties.
- Align to View - This is like projecting a texture from the camera face, as if you were a slide projector and the texture is a slide. It's useful for painting a texture onto a cliff or other irregular things.
Return to the Valve Hammer Editor 3.x User's Guide