Valve Hammer Editor 3.4 Setup Guide
Valve Hammer Editor 3.4 has had many changes made to it since version 2.1, and some of these changes mean that you'll need to set things up a little differently compared to what you might be used to.
Before You Start Before you continue on to use Hammer, there are a few things you should keep in mind?:
-
Hammer 3.4 makes use of OpenGL for its 3D rendering. As such, driver compatability issues may exist, so be sure you are running the latest version of your OpenGL video drivers. Below are some links to the major driver pages.
-
Hammer 3.4 only allows for the creation of Half-Life (and Half-Life mod) levels.
-
In order for Hammer 3.4's 3D sprite preview to work, you must unpack the Sprites folder from your PAK file. For more information, see the Unpacking Your PAK tutorial. It is also recommended that you unpack your sounds and models folders from the PAK file.
Setup
The first thing you should do
after installing Hammer is configure it's settings. The options
settings can be reached by selecting Options from the Tools menu.
There are six different tabs in the Option's dialog:
If you are going to use Hammer to compile your maps, you also need to setup the compile modes.
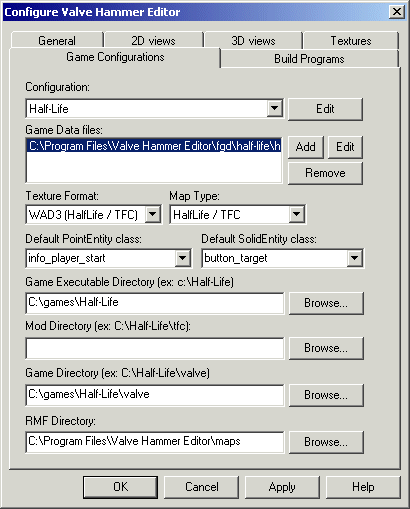
Game Configurations
The Game Configuration options allow you to setup the editor to edit
Half-Life and it's mods. A separate configuration is needed for each
game or mod.

Configuration
If this is a new installation of
Hammer, there won't be any game configurations yet. Click Edit, then
Add, and enter Half-Life (or whatever Half-Life mod you're setting up
the editor for).
For new users, note that you can add more than one game configuration. This is handy if you plan on working on Half-Life levels and Half-Life mod levels.
Game Data Files
The game data file contains all of the entity information that will
be used to create your maps. Hammer's game data files have the file
extension .FGD. It must be present in order for you to create levels.
-
Click on the Add button.
-
An Open dialog will appear. If it doesn't show the contents of your Hammer folder, browse to it.
-
In the FGD folder, browse to and select the game .FGD that you require. Hammer ships with game data files for Half-Life, Team Fortress 1.5, Counter-Strike, and Day of Defeat.
-
You will be taken back to the Options dialog. You will see that C:\Valve Hammer Editor\halflife.fgd (or wherever you've stored the FGD) has been added to the Game Data File list.
Note: There is a new version of the Half-Life game data file available here. You can unzip it into your Hammer directory and use the same steps as above to add it as your Half-Life game data file. Be sure to remove the previous version of the game data file first.
Texture Format and
Map Type
The Hammer editor is only capable of creating Half-Life maps. As
such, these two options are locked on WAD3 (Half-Life) for the
texture format, and Half-Life for the map format.
Default PointEntity and SolidEntity
class
Select a default point and solid entity here. This controls which
entity will appear selected when you go to place an entity. It is
only a time-saving device. I recommend using info_player_start as the
default point entity and func_door as the default solid entity.
Game Executable Directory
The value here should be the
directory where your Half-Life executable is stored. The value should not
include hl.exe. For example, C:\Half-Life is correct, but
C:\Half-Life\hl.exe is not.
Mod Directory
If you are setting up the editor
for a mod, the game directory of the mod should go here. For example,
if Half-Life is in C:\Half-Life, and you're setting up Hammer for
Team Fortress Classic, the Mod Directory value would be
C:\Half-Life\tfc. For a normal Half-Life game configuration, the Mod
Directory should be set to C:\Half-Life\valve.
Game Directory
This value should be the base
game directory for Half-Life. Keeping with the above examples, this
would be C:\Half-Life\valve.
Note: The above two settings are required for the search paths for displaying sprites in the 3D view. They allow you to use custom development directories rather than locking you into using the standard Half-Life directories. For the most part, it is likely that you will be using the standard directories.
RMF Directory
The value here is the directory where the editor will store your
maps. I recommend using the maps folder that gets created in your
Hammer directory.
Note: As a point of trivia, RMF stands for Rich Map Format. It is the Valve Hammer Editor's proprietary map format. Before a map can be compiled, it must be converted from an RMF file to a .MAP file. The editor handles this conversion automatically, but you can also do it manually by selecting Export to MAP from the Files menu.
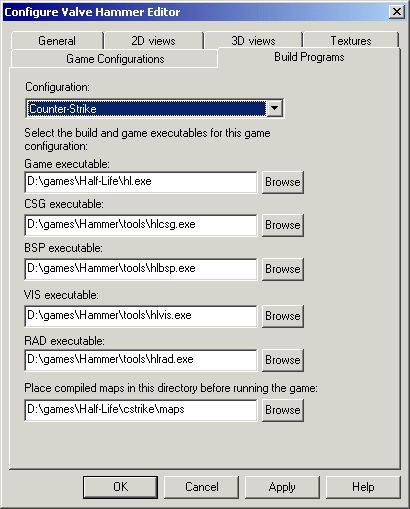
Build Programs
The settings in the Build Programs dialog affect how the editor
handles things when you compile your map. If you don't plan on using
the editor to compile your maps, then this section is irrelevant and
does not need to be filled out.

Configuration
Choose which game configuration you are setting up the Build Programs
for here. If you've only created a Half-Life game configuration,
that's all you'll have access to here.
Note: If no Configuration is shown, click on the Ok button to return to the editor screen, then select Options from the Tools menu again and click on the Build Programs tab. The Configuration you've previously created should now be listed.
Game executable
Specify the game executable here. If you know the path to the
Half-Life executable, type in the path and filename here, otherwise,
click on the Browse button and browse to the Half-Life directory.
Select hl.exe and click the Open button.
CSG, BSP, VIS, and RAD executable
This is where you specify the compile tools to be used. The standard
tools are, in order, qcsg.exe, qbsp2.exe, vis.exe, and qrad.exe. If
you are using Zoner's compile tools, they will be hlcsg.exe,
hlbsp.exe, hlvis.exe, and hlrad.exe. By default the tools are stored
in the Valve Hammer Editor\tools folder.
Note: There is another file, lights.rad, in your Valve Hammer Editor\tools directory. It contains information that controls the texture lighting when you compile a Half-Life map. If you move the compile tools to a different directory, you must also move the lights.rad file.
Place compiled maps in this
directory before running the game
Compiled maps must be placed in a specific directory for Half-Life to
recognize their existence. This directory is the Valve\Maps\
directory, located in your Half-Life folder. For example, my
Half-Life game directory is D:\games\half-life, so my compiled-maps
directory is D:\games\half-life\valve\maps. If no Maps directory
exists in the Valve folder, you must create one.
Note: If you are setting up the editor for mod editing, replace "valve" in the above example with the mod directory. For example, d:\games\half-life\tfc\maps.
You can leave these options at their default settings for now. Once you are familiar with Hammer, it is recommended you play around with these settings until you've got things set like you prefer. More information can be found in the General dialog page.
You can leave these options at their default settings for now. Once you are familiar with Hammer, it is recommended you play around with these settings until you've got things set like you prefer. More information can be found in the 2D Views dialog page.
You can leave these options at their default settings for now. Once you are familiar with Hammer it is recommended you play around with these settings until you've got things set like you prefer. More information can be found in the 3D Views dialog page.
Textures
Without any textures installed, you cannot create a map. The main
Half-Life texture file is halflife.wad, and it is located in your
Half-Life directory, in the Valve folder. To add it to your Texture
list, follow these steps.
-
Click on the Textures options tab.
- In the Textures options, click on the Add WAD button.
- An Open dialog will appear. Use it to browse to
your Half-Life directory.
- Double-click on the Valve folder to view its contents.
- Find halflife.wad and select it.
- Click on the Open button to add it to your Textures list.
Note: You can also add liquids.wad, xeno.wad, and decals.wad using the above steps. There are a number of other .WAD files that may be available in the Valve folder, including cached.wad, gfx.wad, pldecal.wad, and spraypaint.wad - do not use these. These files are generated by Half-Life and will not be the same on all user's systems.
Compile Setup
If you are going to use the editor
to compile your maps, there are two different compile modes for you
to use: the normal compile mode and the advanced compile mode.
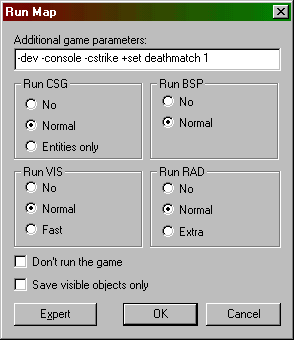
Normal Compile Mode
The normal compile mode allows
for one button compiling with no further setup other than what has
been mentioned above.

-
Additional game parameters - This is where you specify the additional parameters for the game executable. If you are compiling a map for a mod, be sure to include the -game <moddir> parameter as shown in the above picture. -dev and -console, also shown, are good parameters to use when testing maps.
- Run
CSG, BSP, VIS, and RAD
- These settings allow you to define which tools will be run along
with a couple of their most basic parameters.
- Don't
run the game
- If this option is checked, the game will not be started after the
map has finished compiling.
- Save
visible objects only
- If this option is checked, only objects that are not hidden will be
compiled into the map.
- Expert (button) - Press this to go into Advanced Compile Mode.
Note: User's of Worldcraft 2.x may remember that the normal compile mode did not work correctly. This problem is fixed now, and the normal compile mode can be used without error, but the advanced compile mode is still recommended due to it's increased versatility.
Advanced
Compile Mode
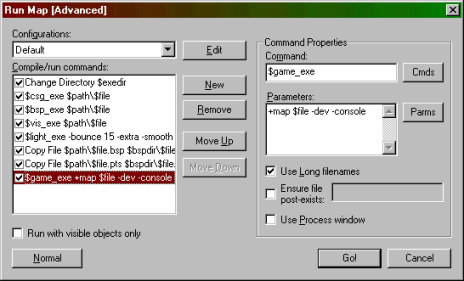
The advanced
compile mode gives you much more freedom over how the compile process
is performed.

To make a standard compile setup, follow these steps:
-
Press the New button 8 times. Eight check-boxes will be created.
- Click on the
1st checkbox line. Click on the Cmds button and select Change
Directory. Click on the Parms button and select Game Executable Directory.
Note: It is important that you select the commands from the Cmds menu rather than typing them in the Command text box. Although they may look the same, typing out the commands will cause problems in the compile.
-
Click on the 2nd checkbox line. Click on the Cmds button and select CSG program. In the Parameters text box, type $path\$file. It is very important that "$path\$file" be typed correctly.
- Click on the
3rd checkbox line. Click on the Cmds button and select BSP program.
In the Parameters text box, type $path\$file.
- Click on the
4th checkbox line. Click on the Cmds button and select VIS program.
In the Parameters text box, type $path\$file.
- Click on the
5th checkbox line. Click on the Cmds button and select LIGHT program.
In the Parameters text box, type $path\$file.
- Click on the
6th checkbox line. Click on Copy File in the Cmds menu. In the
Parameters text box, type $path\$file.bsp $bspdir\$file.bsp.
- Click on the
7th checkbox line. Click on Copy File in the Cmds menu. In the
Parameters text box, type $path\$file.pts $bspdir\$file.pts. (The
.pts file is created when there is a leak in your level)
- Click on the
8th checkbox line. Click on Game Program in the Cmds menu. In the
parameters text box, type +map $file. Other parameters you
might also want to use are:
-
-dev - this puts the game in developer mode, providing extra debugging information for you when you're testing your map.
- -console
- this enables the in-game console which is accessible by pressing
the ~ key.
- +set
deathmatch 1 - this starts the game in deathmatch mode. Some
games, like Counterstrike, require this.
- -game <moddir> - this should be used when you're making a map for a mod. For example, if you're making a TFC map, you'd need to use the -game tfc parameter.
-
Conclusion
Hammer is now setup for mapping. If you are new to mapping, it is best that you proceed to the User's Guide section to familiarize yourself with the basic functions of Valve Hammer Editor 3.4.