Channel API Basic Programming Model
When you use the Channel API, the first step is to initialize a list of channels with the same direction, such as input or output. You can then read or write this list of channels as a unit. The term task refers to a list of channels you read or write together. A common use of the task concept is to read/write all channels of a message.
The following figure shows a diagram describing the basic programming model for the NI-CAN Channel API. Within the application, you repeat this basic programming model for each task. The diagram is followed by a description of each step in the model.
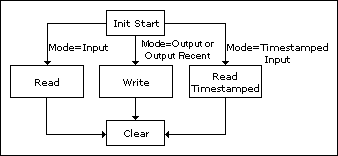
Basic Programming Model for Channel API
Init Start
The Init Start function initializes a list of channels as a single task, then starts communication for that task.
The Init Start function uses the following input parameters:
- channel list—Specifies the list of channels for the task, with one string for each channel.
- interface—Specifies the CAN interface to use for the task. The interface is an enumeration in which 0 specifies CAN0, 1 specifies CAN1, and so on. The baud rate is taken from the properties of the interface in MAX.
- mode—Specifies the I/O mode to use for the task. This determines the direction of data transfer for the task (that is, Input or Output). It also determines the type of Read or Write function you use with the task. For more information, refer to the following sections.
- sample rate—Specifies the rate of sampling for input and output modes. The sample rate is specified in Hertz (samples per second). For more information, refer to Read and Write.
The Init Start function simply calls the Initialize function followed by the Start function. This provides an easy way to start a list of channels.
There are a few scenarios in which you cannot use Init Start:
- Set Property—If you need to set properties for the task, you must call Initialize, Set Property, and Start in sequence. For example, use Set Property if you need to specify the baud rate for the interface within the application. For more information, refer to Set Property.
- Synchronization—If you need to synchronize multiple cards, you must call Initialize, then the appropriate functions to synchronize and start the cards. For more information, refer to Synchronization.
- Create Message—If you need to create channel configurations within the application, you must call Create Message and Start in sequence. For assistance is deciding whether Create Message is appropriate for the application, refer to Choose Source of Channel Configuration.
The Init Start function is CAN Init Start in LabVIEW and nctInitStart in other languages.
Read
If the mode of Init Start is Input, the application must call the Read function to obtain floating-point samples. The application typically calls Read in a loop until done.
The Read function is CAN Read in LabVIEW (all types that don't end in Time & Dbl) and nctRead in other languages.
The behavior of Read depends on the initialized sample rate:
sample rate = 0
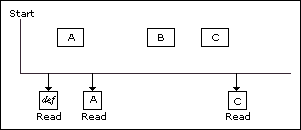
Read returns a single sample from the most recent message(s) received from the network. One sample is returned for every channel in the Init Start list.
The following figure shows an example of Read with sample rate = 0. A, B, and C represent messages for the initialized channels. If no message is received since the start of the application, the Default Value in MAX (def) is returned, along with a warning.
Example of Read with sample rate = 0
sample rate > 0
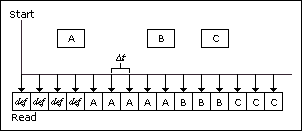
Read returns an array of samples for every channel in the Init Start list. Each time the clock ticks at the specified rate, a sample from the most recent message(s) is inserted into the arrays. In other words, the samples are repeated in the array at the specified rate until a new message is received. By using the same sample rate with NI-DAQ Analog Input channels or NI-DAQmx Analog Input channels, you can compare CAN and DAQ samples over time.
The following figure shows an example of Read with sample rate > 0. A, B, and C represent messages for the initialized channels. <delta-t> represents the time between samples as specified by the sample rate. def represents the Default Value in MAX.
Example of Read with sample rate > 0
Read Timestamped
If the Init Start mode is Timestamped Input, the application must call the Read Timestamped function to obtain floating-point samples. The application typically calls Read Timestamped in a loop until done.
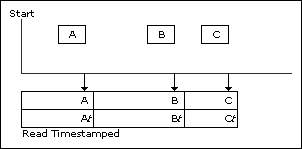
The Read Timestamped function returns samples that correspond to messages received from network. For each message, an associated sample is returned along with a timestamp that specifies when the message arrived. An array of timestamped samples is returned for every channel in the Init Start list.
The Read Timestamped function is CAN Read in LabVIEW (types that end in Time & Dbl) and nctReadTimestamped in other languages.
The following figure shows an example of Read Timestamped. A, B, and C represent messages for the initialized channels. At, Bt, and Ct represent the times when each message was received.
Example of Read Timestamped
Write
If the Init Start mode is Output (or Output Recent), the application must call the Write function to output floating-point samples. The application typically calls Write in a loop until done.
The Write function is CAN Write in LabVIEW and nctWrite in other languages.
The behavior of Write depends on the initialized sample rate:
sample rate = 0
Write transmits a message immediately on the network. The samples provided to write are used to form the data bytes of the message. One sample must be specified for every channel in the Init Start list. The Init Start mode must be Output for this behavior (not Output Recent).
The following figure shows an example of Write with sample rate = 0. A, B, C and D represent messages for the initialized channels. For each Write, the associated messages are transmitted as quickly as possible.
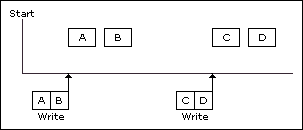
Example of Write with Sample Rate = 0
sample rate > 0, Output mode
You provide an array of samples for every channel in the Init Start list. Each time the clock ticks at the specified rate, the next message is transmitted. Each message uses the next sample from the array(s) to form the data bytes of the message. In other words, the samples from the array are transmitted periodically onto the network. By using the same sample rate with NI-DAQ Analog Output channels or NI-DAQmx Analog Output channels, you can output synchronized CAN and DAQ samples over time.
The following figure shows an example of Write with sample rate > 0 and Output mode. A, B, C and D represent messages for the initialized channels. <delta-t> represents the time between message transmission as specified by the sample rate.
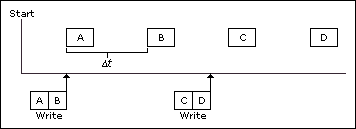
Example of Write with Sample Rate > 0, Output Mode
sample rate > 0, Output Recent mode
You provide a single sample for every channel in the Init Start list. Each time the clock ticks at the specified rate, the next message is transmitted using the most recent sample that you provided. The Output Recent mode is useful when you have multiple tasks running at different rates, because you can write samples for all tasks in a single loop.
The following figure shows an example of Write with sample rate > 0 and Output Recent mode.
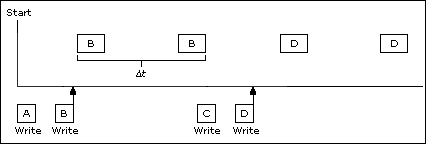
Example of Write with Sample Rate > 0, Output Recent Mode
Clear
The Clear function stops communication for the task, then clears the configuration.
For every task that you initialize, you must call Clear prior to exiting the application.
The Clear function is CAN Clear in LabVIEW and nctClear in other languages.