 | How to Find a Straight Edge |
Main Tab
- In the Step Name control, enter a descriptive name for the step.
- Choose one of the following methods to specify the region of interest for the step:
- Create a new region of interest.
- Select Constant from the Region of Interest listbox.
- Select a tool from the menu toolbar that matches the type of region of interest you want to specify.
- Draw a region of interest on the image.
- Select a previously defined region of interest from the Region of Interest listbox.
- Create a new region of interest.
- Verify that the Reposition Region of Interest option is enabled if you want to link the region of interest specified in this step to a previously defined coordinate system.

Tip Link the region of interest to a coordinate system if the position of the object under inspection changes from image to image, and you need to adjust the position of the region of interest to match the new location of the object. When you specify a region of interest, the step automatically tries to locate a straight edge in the region. If the automatically located edge corresponds to the edge you expected to find, proceed to step 5. Otherwise, proceed to step 4.
Settings Tab
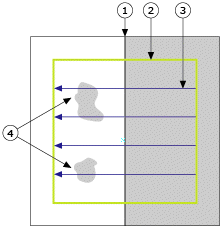
- Select the Direction property of the search lines. Select a search line orientation that is perpendicular to the edge. For example, the orientation of the edge in the following figure is vertical. Therefore, the search lines are horizontal.
Also, select the search direction along the lines that has the least number of obstacles between the edge of the region and the object edge you want to find. In the following figure, the search direction is right to left so that the step avoids detecting the edges of miscellaneous objects.

1 Edge to Locate 3 Search Lines 2 Search Region 4 Miscellaneous Objects in the Image - Select the Edge Polarity of the edges you want to locate.
- Choose the type of edges you want to detect from the Look For control. You can choose from First Edge or Best Edge.
- If the automatically located straight edge corresponds to the edge you expected to find, proceed to step 8. Otherwise, disable the Auto Setup control and manually adjust the edge location parameters. Use the edge information on the Advanced tab to determine appropriate settings for the edge location parameters.
If the Edge Strength Profile contains a strong peak that corresponds to the edge you want to find, adjust the blue edge strength line so that it lies slightly below the top of the edge peak but above all of the other peaks. Use the Search Line Index control to display edge profile information for each search line in the region of interest.
If the Edge Strength Profile does not contain peaks that correspond to all the edges, adjust the Kernel Size and Projection Width controls until distinct peaks appear. If the step still cannot find the edge or the location of the detected edge is inaccurate, adjust the Gap between the search lines until you achieve the expected result.
Limits Tab
- Set the limits that correspond to the specifications of the part under inspection.
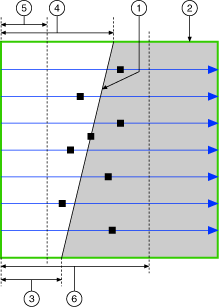
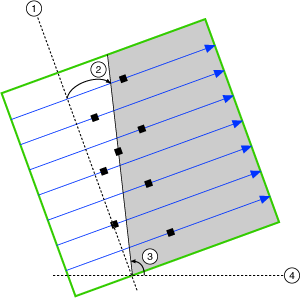
The following figures illustrate the calculations you can use to locate a straight edge within a region of interest.

Note The Short Distance and Long Distance measurements are not available for annulus regions of interest. 
1 Fitted Line 4 Long Distance 2 Region of Interest 5 Minimum Short Distance 3 Short Distance 6 Maximum Long Distance

1 Line Perpendicular to the Search Direction 3 Angle 2 Angle in Search Area 4 Horizontal Line