Lesson 3: Creating a Financial Report Specification
From Sage 300 ERP
Lesson 3: Creating a Financial Report Specification
This lesson introduces the FR Paste Function screen, and demonstrates how to use it to create a financial report specification and then generate a report that compares current assets to current liabilities in the sample General Ledger.
Enter a comment to explain the purpose of the report.
- In the Excel spreadsheet you used for the previous two lessons, click File > New > Blank workbook.
- Select cell A1.
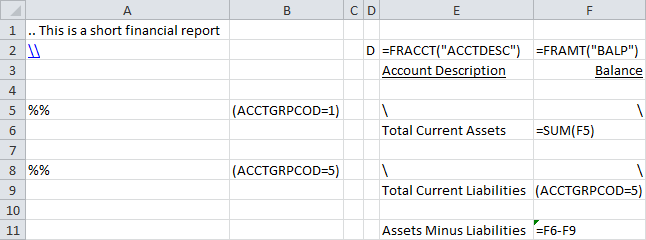
- Type ..This is a short financial report, and then press Enter.
Note: Information in column A preceded by two periods is treated as a comment and does not appear in financial reports.
Most financial reports contain the same kind of information in each row of the report. To make it easier to define statements in Financial Reporter, you can define a default row specification that will be used throughout the report. The default row specification stays in effect until you define another default row specification.
In this exercise, you will create a default row specification that will produce a report with two columns: one containing account descriptions, the other containing the current account balance.
- On the Formulas tab, in the Formula Auditing group, click the Show Formulas button.
Instead of calculated values, the spreadsheet now displays formulas you enter.
Tip: To toggle between showing formulas and calculated values, press Ctrl+` (the grave accent key, located to the left of the number 1 key at the top left corner of the keyboard).
- In cell A2, type \\.
Two backslashes indicate that the spreadsheet row contains default column functions to be used in subsequent rows.
- In cell D2, type D, and then press Enter.
D instructs Financial Reporter to print the details of each account on a separate row of the spreadsheet.
- Select cell E2.
- On the Add-Ins tab of the Excel ribbon, click the arrow beside FR, and then click FR Paste.
- On the FR Paste Function screen, select the account description.
- On the Functions list, select FRACCT.
- In the Field Name field, select ACCTDESC(Description).
- Click Paste, and then click Close.
Cell E2 displays this formula:
=FRACCT("ACCTDESC")
Note: This formula does not refer to a specific account number. Financial Reporter will add account references when it uses this default specification to view the report.
- Select cell F2.
- On the Add-Ins tab of the Excel ribbon, click the arrow beside FR, and then click FR Paste.
- On the FR Paste Function screen, select the current period balance.
- On the Functions list, select FRAMT.
- In the Field Name field, select BALP(Balance Current Period).
- Click Paste, and then click Close.
Cell F2 displays this formula:
=FRAMT("BALP")
You have now created the default specification row. Show Me.

To create column headings (or any text that you want in the final report), simply leave cell A of the row containing the headings blank. This row will appear "as is" on the report.
- In cell E3, type Account Description.
- In cell F3, type Balance.
- Select cells E3 and F3.
- On the Excel ribbon, on the Home tab, in the Font group, click the Underline button.
- Click the column heading for column F to select the column.
- On the Excel ribbon, on the Home tab, format the selected cells.
- in the Alignment group, click the Underline button.
- In the Number group, on the Number list, select Accounting.
Note: If you are viewing formulas, the content of the selected cells does not appear right aligned. You can press Press Ctrl+` to toggle between viewing formulas and calculated values (which appear right aligned).
Your report specification now includes default row formulas and column headings. Show Me.

In this exercise, you will add five reference rows to display the following information in the report:
- Current asset accounts
- Total current assets
- Current liability accounts
- Total current liabilities
- Net of assets and liabilities
To add reference rows:
- In cell A5, type %%.
%% is a "wildcard" account reference that instructs Financial Reporter to query all accounts.
- In cell B5, type (ACCTGRPCOD=1).
This expression restricts the accounts to the account group for Current Assets.
Note: The account group code for Current Assets is 1 in sample data, but may be different for your company.
- In cell E5, type \.
A backslash instructs Financial Reporter to use the current default formula for this column with the account number specified in column A (subject to the criteria specified in column B).
-
In cell F5, type \.
- In cell E6, type Total Current Assets.
- In cell F6, type =SUM(F5).
This instructs Financial Reporter to expand cell F5 on the report to include as many rows as there are Current Assets accounts.
This cell reference (F5) will refer to all of the generated rows.
- In cell A8, type %%.
-
In cell B8, type (ACCTGRPCOD=5).
This expression restricts the accounts to the account group for Current Liabilities.
Note: The account group code for Current Assets is 5 in sample data, but may be different for your company.
- In cells E8 and F8, type \.
- In cell E9, type Total Current Liabilities.
-
In cell F9, type =SUM(F8).
- In cell E11, type Assets Minus Liabilities.
-
In cell F11, type =F6-F9.
Your report specification now includes five reference rows. Show Me.
Financial Reporter processes all columns and rows of a spreadsheet within a range you specify, called the "Spec range." Before you can print a financial report, you must define the Spec range for the report.
To define the Spec range:
- Select cells A1 through cell F12.
The entire area of the specification you created is selected.
-
On the Formulas tab, in the Defined Names group, click Define Name.
The New Name screen appears.
-
In the Name field, type Spec.
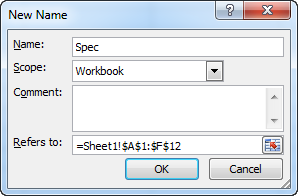
- Click OK.
- Save the report.
You have now created a simple statement specification and are ready to generate the report.
Use the FR View command to generate a financial statement from the specification you created.
You can use FR View to generate two kinds of final reports: one with values and one with formulas.
- Values. If you generate values, Financial Reporter uses the formulas in the specification to extract the appropriate data from the General Ledger, and inserts the data in the cells on the final report.
- Formulas. If you generate formulas (by selecting the Formulas check box), Financial Reporter creates all the rows required by the report, but places a formula in the spreadsheet for each piece of data required from the General Ledger.
This provides you with a report that is dynamically linked to your general ledger. At any time, you can see updated versions of a report with formulas simply by recalculating the spreadsheet.
To generate a statement:
- On the Excel ribbon, on the Add-Ins tab, click the arrow beside FR, and then click FR View.
The G/L Financial Statement Designer screen appears.
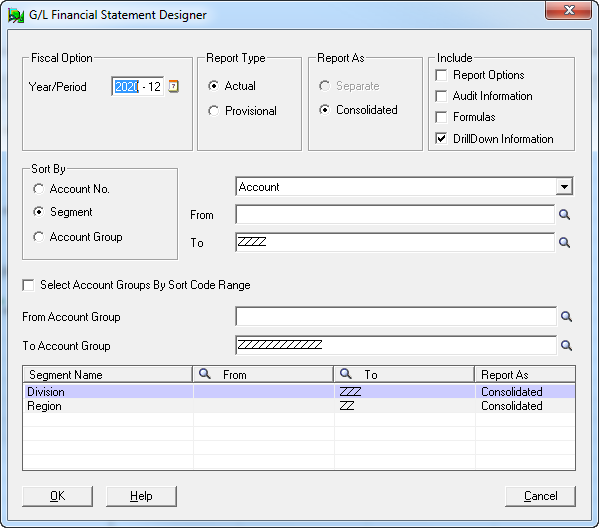
- Click OK to accept the default print options.
The report is generated and appears in the worksheet.
- To display values instead of formulas in the worksheet, on the Formulas tab, in the Formula Auditing group, click the Show Formulas button.
- To preview the document, click File > Print.
- Save your work and close the statement.
Now that you have produced a simple financial report, here are a few other ways to explore the capabilities of Financial Reporter:
- Restrict the range of accounts.
Use the FR View screen to restrict the range of accounts in the report.
- Specify a range of accounts.
On one of the rows of your report, enter a range of accounts "1000:3000".
- Use wildcards to specify criteria for accounts.
Use the % wildcard character to replace one or more characters in an account number, or use %% to replace one or more segments.
(Remember that you previously used %% to specify all accounts, and used column B of the report specification to restrict the range of accounts to a single group.)
Example: Try entering 4000%% to specify all accounts starting with 4000 (no matter how many segments they have), or try 4000-100-%.
- Add a new column.
Add an additional column G to the report. To do so, use FR Paste to insert a formula in the default row specification. SelectFRAMT, and remove all but the first parameter (including quotation marks) after pasting the formula in cell G2.
Note: Remember to type \ in the rows of your report specification (for example, G5, G8, and any other rows you have added).
- Explore options on the G/L Print Financial Statements screen.
Experiment with selecting different options. For example, you can:
- Change the fiscal year and period for the report.
- Specify whether to print actual or provisionally posted figures (unless one is specifically selected in the spec).
- Specify the order in which records are sorted in the report.
- Specify whether to create a consolidated report or separate reports by account segment.
- Select the Audit Information option so you can see which account numbers Financial Reporter selected.
- Restrict the report to ranges of accounts, based on account groups, account segments, or account numbers.