Lesson 2
The creation of a simple scene
Level: Beginner Version of the Xtreme3D: 3.0.x
Author: Gecko
Before starting the practical lessons, let something be clarified. Xtreme3D is a dynamic-link library (DLL). A DLL is nothing but a compiled set of instructions written in any programming language, with a view to using the programs in any other language that supports dlls. Xtreme3D, for example, written in Delphi, and it contains about 580 such instructions. Call from for ease of functions. Using the Game Maker we can create scripts, each of which will call a function from the library. This will cause the function through the GML code under names of scripts. This is a typical example of the functions of the Xtreme3D: ObjectSetMaterial(object,'material'). Some of the functions return different numeric and string values. For example, when an object is returned to its identifier (ID), which must be recorded in a variable for further work with the object.
The next important point: the constant. Many of the features used as arguments to the numerical codes, and it is not always easy to remember, what code is needed to achieve the desired effect or the desired mode. So you can code instead of entering the names of constants (the list of constants and their numeric values can be seen in the Global Game Settings tab, the constants). The TACIT tradition constants Xtreme3D look like: tmmCubeMapReflection. Lowercase letters at the beginning (TMM) indicate the property, which includes the constant. In this case, The TextureMappingMode and function, feeding it - MaterialSetTextureMappingMode('material',tmm), where instead of tmm populates the desired tmm-constant.
Remember that constants are part of the Game Maker/GML and to the Xtreme3D.dll files they have.
To start you will need a file *.gm6 (or *.gmk for Game Maker 7), with a ready set of functions and constants Xtreme3D. The file you can take from the official distribution engine. In preparation for the work of the sufficiently removed from all objects. Let's call it conditionally project.gm6. Copy it to a separate folder and add to the same xtreme files3d.dll and ode.dll.
Open the project.gm6. Create a new object of Game Maker and name it o engine. Add an event Create and drag the action Execute a piece of code with the tab Control. If you have already worked with GML, no problems. If not, we strongly recommend you to leave until the Xtreme3D and explore the language on the built-in graphics Game Maker.
The following code loads the functions from the library of xtreme3d.dll into memory and starts the operation of the engine:
Dll_init('xtreme3d.dll');
EngineCreate();
We go further:
View = ViewerCreate(window handle, 0, 0, 640, 480);
ViewerSetLighting(view, 1);
In order to observe anything in the window with the game, you will need a View (Viewer). A view is a rectangle, where the scene rendering Xtreme3D. All that outside this rectangle, "belongs" built-in graphics Game Maker. We have created a kind of resolution of 640x480, the size of the window, so that the Graphics Game Maker and will not be seen. The position of our species on screen - (0.0). This is essentially a coordinate of the upper left corner of the view, on the upper-left corner of the window.
Also in the function of the ViewerCreate transmitted window handle()function GML, which returns the id of the main window of the game. Thus, the appearance will be "tied" to the window of the game Game Maker that we need.
Strangely enough, the view - it is also an object, so when creating we ������� its id in the variable, in our case, the view. We can use the ID of the Kind to change its properties. At the moment we are interested only in one thing - the use of light (ViewerSetLighting). If you turn off the lights (0), all objects will look flat and �����������. Therefore, we include (1). However, in order that the lights worked, you have to create the light sources:
Light = LightCreate(lsOmni, 0);
ObjectSetPosition(light, 0, 18, 0);
LightCreate function creates a light source and returns its id as the light is also an object. In the Xtreme3D there are three types of light sources - spot (constant lsOmni) aimed (lsSpot) and parallel (lsParallel). Dot emits light equally in all directions (as, for example, the lamp), aimed shines within the cone (as a flashlight), parallel emits parallel beams in the direction of one axis (simulation of sunlight). We can assign to the light source of the parent, but, since there is no scenic sites we have not yet, ����������� instead of parents 0. Creating a point light source, you can clarify its position in space - the point (0,18,0).
We still do not see that as the light had nothing to cover. Create a simple visible object. But before that you need to create the root objects in our scene:
Global.back = DummycubeCreate(0);
Global.scene = DummycubeCreate(0);
Global.front = DummycubeCreate(0);
DummycubeCreate function creates a mannequin (Dummycube) and returns its ID. The object, this fun name, plays an important role in the formation of the hierarchy. The dummy is not visible, it is the object of a Ghost. But, at the same time, it has all the usual properties of objects, which we considered in the previous chapter - coordinates in space, the Direction vectors, Up, Left, and so on. You can freely move, rotate and scale. The dummy can have parents and descendants. In this case, we created three dummy root. The root - because it is above them in the hierarchy of the nothing will be. All of the other scenic objects will be the descendants of these three Mannequins:
Global.back - a parent for objects in the background (sky, background, etc.)
Global.scene - a parent for objects in the scenic plan (all 3D objects)
Global.front - a parent for objects on the screen (sprites, text, etc.)
It is important to keep this to create mannequins - first, then the scene, then the screen. This is necessary so that the engine can render the objects in the correct order. This procedure is called sorting: all of the objects in the redrawn in the order in which have been established, they themselves or their parents.
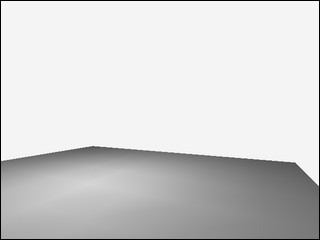
Create the first object of scenic plan - plane:
Plane = PlaneCreate(0,64,64,8,8,global.scene);
ObjectPitch(plane,90);
The plane is one of the entities of simple geometrical bodies, which are generated by the engine. PlaneCreate function creates a plane and returns its ID. Let's look at the arguments:
0 - Determines whether to submit to the plane of one square (abbreviated - ������), or split into several; us for the beautiful lights just a few, so point 0;
64,64 - the size of the plane;
8.8 - the number of ������. In total, the plane will be broken up into 8 * 8 = 64 ������;
Global.scene - parent.
We have created a plane by default, vertical, therefore have to rotate 90 degrees on the X-axis. If you remember, turn on the X-axis is called the pitch, so we need the function ObjectPitch.
We still do not see that as not created a camera. The camera is also object, invisible, as well as the dummy. Used for the projection of the 3d scene on the plane of the screen, rather, on the plane of the view. The projection is carried out from the standpoint of camera position in the direction of the vector Direction of the camera. Simply put, which looks at the camera, we see, as in real life.
CamPos = DummycubeCreate(global.scene);
ObjectSetPosition(camPos, 0, 10, 0);
Camera=CameraCreate(camPos);
ViewerSetCamera(view camera);
Before the creation of the cameras we created for her parents - one of the dummy. This is to ensure that the camera itself can rotate freely, and its movement controlled through this mannequin.
ViewerSetCamera function indicates the mean, what kind of camera used to transfer images.
As you can see, until all is simple enough. Only the last:
Set_automatic_draw(0);
This function we disable the automatic graphics drawing Game Maker - all the same kind of it completely closes, it makes no sense to spend system resources on its processing.
The scene we created is to make it work. Add an event Step and add the following code:
If the keyboard_check(vk_left) ObjectTurn(camPos,-2);
If the keyboard_check(vk_right) ObjectTurn(camPos,2);
If the keyboard_check(vk_up) ObjectMove(camPos,-1);
If the keyboard_check(vk_down) ObjectMove(camPos,1);
Now, when the user presses, say, "Up", the camera will move forward (respectively, and for the key "Back"). To swivel the camera uses the keys "Left" and "right". Rotate the Y-axis (Turn), and therefore uses the ObjectTurn. Note that the transformation we use not the camera, and its parent. Thanks to this then we will be able to rotate the camera using the mouse.
Update(1.0/room_speed);
ViewerRender(view);
These two functions should be cause, otherwise the engine will be "paralyzed". Update updates the status of the objects in the scene, ViewerRender commits the drawing of the specified type. In the function of the Update should be referred to the step time to update the animation. It is measured in seconds and can be equal to the time between two frames of the rendering. Usually in the Game Maker this time is limited in the settings of rooms - is set by the so-called "speed rooms", the maximum manpower frequency, measured in frames per second. It's usually set The ����� 60 - This value corresponds to the frequency of updating the monitor. We can calculate the time interval between frames, dividing the unit (1 second) on this value.
That is all! You can now put our object o engine in the room and run.
Congratulations, you have created its first working program Xtreme3D! Here is the complete source code:
In the event Create:
Dll_init();
EngineCreate(window handle());
View ViewerCreate =(0, 0, 640, 480);
ViewerSetLighting(view, 1);
Light=LightCreate(lsOmni, 0);
ObjectSetPosition(light, 0, 18, 0);
Global.back = DummycubeCreate(0);
Global.scene = DummycubeCreate(0);
Global.front = DummycubeCreate(0);
Plane PlaneCreate =(0, 64, 64, 8, 8, global.scene);
ObjectPitch(plane, 90);
CamPos = DummycubeCreate(global.scene);
ObjectSetPosition(camPos, 0, 10, 0);
Camera = CameraCreate(camPos);
ViewerSetCamera(view camera);
Set_automatic_draw(0);
In the event of the Step:
If the keyboard_check(vk_left) ObjectTurn(camPos, -2);
If the keyboard_check(vk_right) ObjectTurn(camPos, 2);
If the keyboard_check(vk_up) ObjectMove(camPos, -1);
If the keyboard_check(vk_down) ObjectMove(camPos, 1);
Update();
ViewerRender(view);