SekChek for Windows: Encryption Instructions
From SekChek
Encryption Instructions
Prerequisites
You should already have run the Scan process on the Windows server or Active Directory domain, which creates file SEKNTF.ZIP or SEK2KF.ZIP.
Outline of this Step
This step provides an additional layer of encryption of the Scan file.

|
|

|
|
SEKNTF.ZIP or SEK2KF.ZIP
|
Encrypt |
SEKNTF.SCK or SEK2KF.SCK |
1. Encrypt the Scan file with Public Key Encryption
The Encrypt button will only be enabled if you selected SekChek's Public Key Encryption option (Tools / Options / General tab).Copy file SEK2KF.ZIP (or SEKNTF.ZIP) to the desired directory on your PC. Note that the output PKI-encrypted file (SEKNTF.SCK or SEK2KF.SCK) will be written to the same directory.
Notes:
The downloaded files must have a .ZIP file extension in order to be recognised by the Encryption Software. The Public Key encrypted file, SEKNTF.SCK or SEK2KF.SCK, can only be decrypted with SekChek's Private Key.
SekChek will also recognise extended filenames (e.g. SEKNTF MyHost.ZIP and SEK2KF MyName 20070316.ZIP) as long as the filename begins with SEKNTF or SEK2KF.
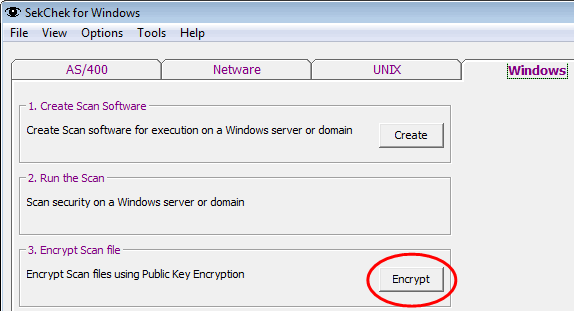
Select Encrypt in the SekChek for Windows application in the SekChek Client Software.
Follow the instructions on the screen… Select the Scan file you want to encrypt…
Click Encrypt…