Editing clips
You have several options for editing clips:
- Splitting a clip. You can split a video clip into two clips. This is useful if you want to insert either a picture or a video transition in the middle of a clip. You can split a clip that appears on the storyboard/timeline of a current project, or you can split the clip in the Contents pane.
- Combining clips. You can combine two or more contiguous video clips. Contiguous means the clips were captured together so that the end time of one clip is the same as the start time of the next clip. Combining clips is useful if you have several short clips and you want to view them as one clip on the storyboard/timeline. Similar to splitting a clip, you can combine contiguous clips in the Contents pane or on the storyboard/timeline.
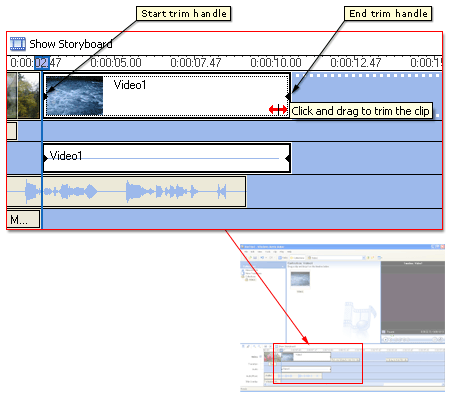
- Trimming a clip. You can hide parts of a clip you do not want in your project. For example, you can trim the beginning or end of a clip. Trimming does not remove the information from the source material; you can clear the trim points to return the clip to its original length at any time. Clips can only be trimmed after they have been added to the storyboard/timeline. You cannot trim clips in the Contents pane.
Drag the trim handles, which are shown in the following illustration, to trim the unwanted portions of the clip.

- Creating clips. You also create clips from video clips after they have been imported or captured in Windows Movie Maker. This lets you create clips at any time when working in Windows Movie Maker. By separating video clips into smaller clips, you can easily find a particular part of your captured or imported video to use in your movie.
Related topics
© 2000-2002 Microsoft Corporation. All rights reserved.