
About the timeline
You can use the timeline to review or modify the timing of clips in your project. Use the timeline buttons to perform tasks such as changing the view of your project, zooming in or out on details of your project, recording narration, or adjusting the audio levels. The time is displayed as hours:minutes:seconds.hundreths of a second (h:mm:ss.hs). To trim unwanted portions of your clip, use the trim handles, which appear when you select a clip. You can also preview all of the clips in your current project which are displayed on the timeline.
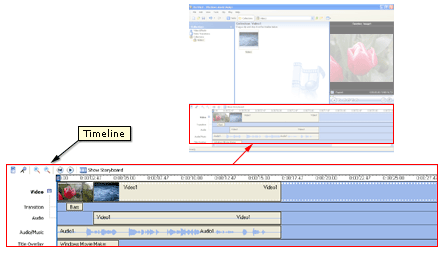
The following illustration shows the timeline. All the clips in the timeline define your project.
The timeline displays the following tracks to indicate what types of files you have added to your current project.
Video
The Video track lets you see what video clips, pictures, or titles you have added to the project. You can expand the Video track to show the corresponding audio accompanying the video, as well as any video transitions you have added. After a clip is added to the timeline, the name of the source file appears on that clip. If you add any video effects to the picture, video, or title, a small icon appears on the clips to indicate that a video effect has been added to that clip.
Transition
The Transition track lets you see any video transitions you have added to the timeline. This track only appears if you have expanded the Video track. Any video transitions you add from the Video Transitions folder appear on this track. When a transition is added to the timeline, the name of the transition is shown in the timeline. You can drag the start trim handle that appears when the transition is selected to increase or decrease its duration.
Audio
The Audio track lets you see the audio that is included in any video clips you have added to the project. Like the Transition track, you can only see the Audio track if you have expanded the Video track. If you select the audio clip on this track and delete it, the video portion is also removed from the Video track.
Audio/Music
The Audio/Music track lets you see any audio clips that you have added to the project. The name of the audio clip appears on the clip.
You can also add video clips to this track if you want the audio, but not the video, to play in your project and final movie.
Title Overlay
The Title Overlay track lets you see any titles or credits that you have added to the timeline. You can add multiple titles to this track at different points in your movie. The titles overlay the video that is displayed. You can drag the start or end trim handle that appears when the title is selected to increase or decrease its duration.
Related topics
© 2000-2002 Microsoft Corporation. All rights reserved.