|
TODO: To change the header's content go to Dr.Explain menu Options : Project Settings : HTML (CHM) Export : Setup HTML Template and Layout
|
|||||
|
|||||
|
TODO: To change the footer's content go to Dr.Explain menu Options : Project Settings : HTML (CHM) Export : Setup HTML Template and Layout
|

|
Perspective Viewport
|
   |
Coordinate System
Vanda Engine 1 uses the right-handed Cartesian Coordinate System. The X (red), Y (green) and Z (blue) axis are perpendicular and range from -infinity to +infinity on each axis. The positive X is to the right, the positive Y goes up and the positive Z goes forward.
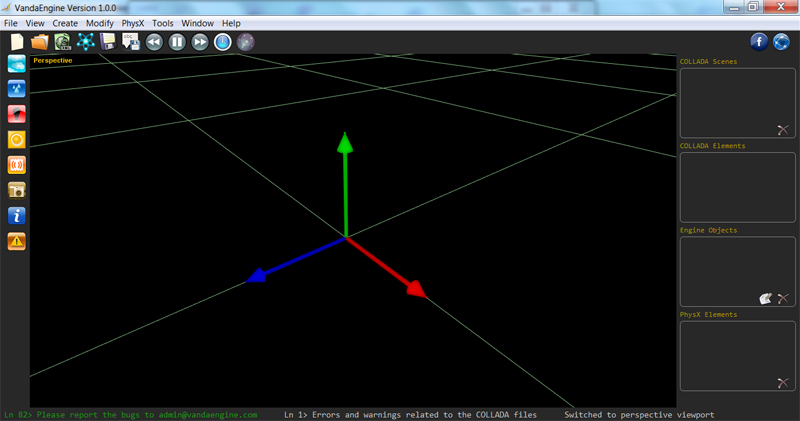
Right-handed Cartesian Coordinate System in Vanda Engine 1
Free Camera
By default, Vanda Engine 1's perspective viewport uses a Free camera. This camera does not interact with physics actors or triggers and lets you move and rotate around the current VScene.
Navigating the Free Camera
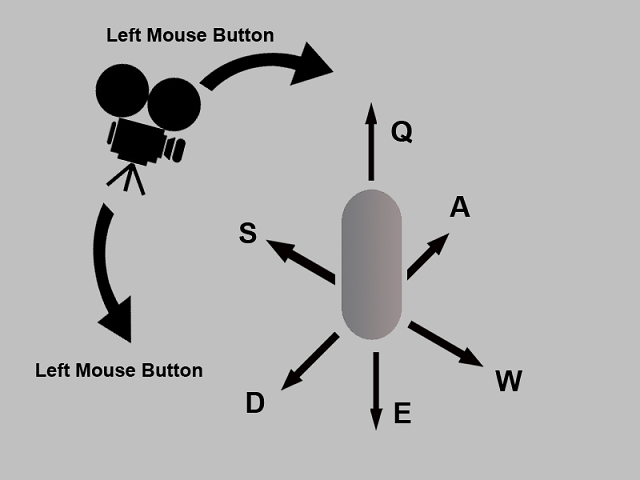
Use the following controls to navigate the default camera in your perspective viewport:
· Left Mouse Button: Drag to orbit the camera left, right, up and down.
· Right Mouse Button: Drag to zoom in and out.
You should hold the following keys while holding the Left Mouse Button to move the camera in your VScene. Note that forward direction of your movement is determined by the front direction of default camera. Other directions are determined relative to the forward direction.
· W Key: Hold to move forward.
· S Key: Hold to move backward.
· A Key: Hold to slide left.
· D Key: Hold to slide right.
· Q Key: Hold to move up (It does not work if you enable gravity).
· E Key: Hold to move down.
 Alternatively, you can push middle mouse button once to activate the perspective viewport. In order to deactivate the perspective viewport, push middle mouse button again.
3rd Person Controller System
Vanda Engine 1's perspective viewport uses a 3rd Person Controller system as well. This system consists of a PhysX capsule character controller and a perspective camera attached to it.
Character controller in Vanda Engine 1 acts as a collider and mainly used for character movement, while still letting it be affected by the game environment, i.e., sliding over surfaces, along walls, etc.
By default, there is no gravity applied to the PhysX controller and there is no PhysX static or dynamic actor in your scene. So by default, the character controller does not fall and is not affected by the environment.
If you enable gravity, the controller will fall onto and rest on a static rigid body (If there is any, otherwise it continues to fall until you disable gravity).
Fore more information about PhysX character controller in Vanda Engine 1, please visit this section.
The perspective camera attached to the controller follows its movements. It is supposed to be looking always to the head of character controller. So rotating with left mouse button orbits the camera around the head of character controller. This camera can interact with static and dynamic actors in your scene to prevent scene clipping.
Navigating the 3rd Person Controller System
Use the following controls to navigate the default camera in your perspective viewport:
· Left Mouse Button: Drag to orbit the camera left, right, up and down.
· Right Mouse Button: Drag to zoom in and out.
You should hold the following keys while holding the Left Mouse Button to move the character controller and camera in your scene. Note that forward direction of your movement is determined by the front direction of default perspective camera. Other directions are determined relative to the forward direction.
· W Key: Hold to move forward.
· S Key: Hold to move backward.
· A Key: Hold to slide left.
· D Key: Hold to slide right.
· Q Key: Hold to move up (It does not work if you enable gravity).
· E Key: Hold to move down.
When you are moving with the above keys, you can simultaneously drag Left Mouse Button to orbit the camera around character controller and change the direction of your movement.Alternatively, you can push middle mouse button once to activate the perspective viewport. In order to deactivate the perspective viewport, push middle mouse button again.
Active camera
The active camera is the camera that is currently used for rendering the scene. By default, the default Free camera is active. Only one camera can be in active state at a time. To activate a camera, go to Tools | Camera | Camera and Rendering... and in the new dialog that appears, select the camera you would like to make active. By default, external cameras are not active in perspective viewport. If you activate an external camera, its animation (if exists) is activated and it renders the scene from its point of view. However you have no control over its movement, zoom, etc. Due to that, external cameras are suitable for cut-scenes and capturing the videos. If you would like to navigate the camera and character controller in your perspective viewport, make sure that the Free or 3rd person camera is active.
We are planning to add a feature that lets you capture the videos and images from the perspective of current activel camera.
Icons
external lights and camera objects and each object created inside Vanda Engine 1 have an associated icon inside perspective viewport. These icons have three purposes:
· Show object position
· Show object type
· Help you move the object by selecting and moving its icon
You are not allowed to move the external lights and cameras.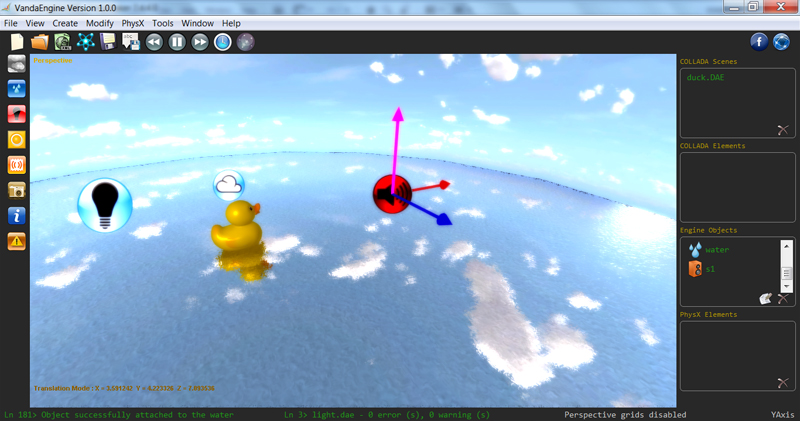
Icons in this image show three different objects: A point light, a sky dome, and a static sound. As you see, Static sound's icon has been selected.
Selection
To select 3D instanced geometries or skins and edit the textures or of their geometries, follow these instructions:
· There are two types of selection for 3D instanced geometries or skins: 1. Geometry based selection, and 2. Material based selection. Default selection method is geometry based selection which means that your selection is done based on the polygon meshes of your instanced geometries or skins. Select the method that suits your needs from the main menu.
· Left click on the instanced geometry or skin that you want to view/change its geometry textures. The selected instanced geometry is shown in pink and its name appears in the Name area which is located at the lower left of the editor.
· The Map area is activated and shows the associated textures of the geometry of selected instanced geometry or skin and lets you manage its textures.
Although selection is based on instances of geometries, textures are assigned to geometries (not to instanced geometries). Vanda Engine assumes that texture data relates to the geometry of currently selected instance or skin and is shared among all of the instances of that geometry.
To edit the physics attributes of instanced geometries or skins, select your desired instanced geometry and go to Skin and instanced Geometry... menu. PhysX section of the Skin and instanced Geometry dialog lets you assign physics actors and triggers to instanced geometries and skins.
PhysX data is assigned to instanced geometries and skins.
To select and translate Engine Objects such as lights, sounds, sky and so on, follow these instructions:
· Left click on the icon of your desired object. The selected icon is shown in red and the red (x), green (y) and blue (z) handles appear.
· Select red, green, or blue handles and drag Left Mouse Button to translate the object in X, Y, or Z directions respectively.