Apart from regular RGB scheme of representing colors, colors may also be represented using a Color Look Up Table (CLUT) also called Palette table, where there is a table of colors and the color is specified by the index of the table. Depending on the size of the table, the bits used to represent the index will vary. For example 256 entries of RGB (8 bit index), 16 entries of RGB (4 bit index), 4 entries of RGB (2 bit index) and 2 entries of RGB (1 bit index). This scheme is mainly used to save memory. See Figure-1 for an example of 16-entry (4-bit) CLUT where a shade of Green is represented by an index value of 3 consuming 4-bits. To figure the memory requirement for a give screen size at a color depth, bits per pixel, the follow equations is used: total number of pixels x bits per pixel / 8 bits per byte. For example the memory required for a 320x240 with 16 BPP screen; (320 x 240) x (16 / 8) = 153,600 Bytes. If only 16 different colors are used in the screen, then instead of using raw RGB, a 16-entry (4-bit) CLUT may be used requiring a memory of (320 x 240) x (4/8) = 38,400 bytes; thereby saving 75% of memory.
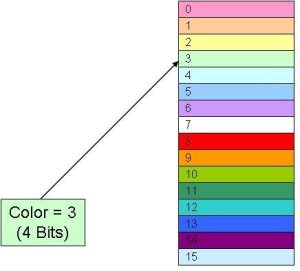
Figure 1. A 16-Entry (4-bit) Color Look Up Table
If the display driver hardware supports CLUT, the index values are translated to the RGB values by the hardware automatically when the signals are sent out to the display.
If the CLUT is enabled, since a CLUT affects the whole screen, all the color patterns like basic shapes and images which are displayed on the screen must use the same CLUT. It means that color defines like RED, GREEN, etc… must use the index values instead of the absolute RGB values. The bitmap images used must also use the same CLUT in order to appear properly on the screen. Note that the chosen CLUT length (1, 4, 16, or 256) must accommodate all the different colors needed by a screen. The following section explains how to create such a CLUT for a screen.
Creating CLUT has 2 steps:
- Creating a part of CLUT manually.
- Filling the remaining part with the colors of the images used.
- Using the Graphics Resource Converter to generate a CLUt based on the images to convert.
GIMP Palette
Name: 16_colors
Columns: 4
#
  0   0   0    BLACK
  0   0   128  BLUE
  128 0   0    RED
  0   0   0    Unused
  0   0   0    Unused
The second line specifies the name of the palette which must be unique. The palette table data starts with line 5 which represent index 0 with the RGB values and a caption. The number of such data lines must be equal to the length of the CLUT. In the example, only 3 colors are used.
Filling the remaining part with the colors of the images used - Suppose 256 entries CLUT is being used, since 3 colors are manually set, only 256 – 3 = 253 entries are available for the images to be displayed on the same screen. If more than one image is used on the screen, it further implies that
- All images on the screen must use the same CLUT table.
- Different colors used for all the images along with the fixed colors must not exceed the size of the CLUT table being used.
The following steps shows how to convert the images using GIMP:
Step 1:
Create a new image with sufficient size to paste all the images required on the screen using File->New in the GIMP (see Figure-2).
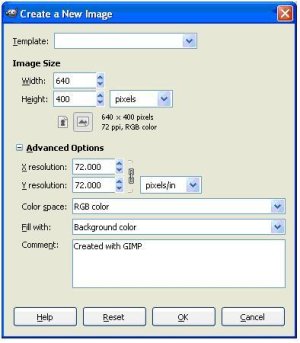
Figure 2. Creating New File in GIMP
Step 2:
Copy and paste all the images to be displayed on the screen into this image like in Figure 3. If 256 colors is enough for the entire application, a single CLUT can be used. If not multiple CLUT can be used. Each CLUT can be configured to use one or more screens. In this case, switching from one screen to another may require re-initializing the hardware CLUT entries before the screen is displayed.

Figure 3. Images Used in One Screen
Step 3:
Set the mode to CLUT by selecting Image->Mode->Indexed in the GIMP. Select to generate optimum palette with 256 – 3 = 253 entries (because we already have 3 fixed entries) as shown in Figure 4 and save it as a BMP (e.g. Collage.bmp) image by selecting File->SaveAs menu.

Figure 4. Generate a Palette Table (CLUT)
Step 4:
The next step is to extract the CLUT from the generated image. To do that, go to the palette selection mode by selecting Image->Mode->RGB and then again Image->Mode->Indexed. Select Use Custom Palette and open the palette selection dialog as shown in Figure 5 and import the previously saved bitmap image (Collage.bmp) as shown in Figure 6 and Figure 7. The palette file will be created in the [Home Folder]\.gimp-x.y\palettes folder as a *.gpl file.

Figure 5. Palette Selection Dialog

Figure 6. Import Palette Dialog

Figure 7. Import Collage Bitmap
Step 5:
Manually edit this and add the fixed color entries from the previously stored fixed palette file. (Manual step). Now a master palette file is created which has to be used in the application.
Step 6:
Open individual images in GIMP and apply this master palette to all of them through Image->Mode->Indexed and selecting Use Custom Palette. Select the master palette which was generated and save the images. This will make all the images palette ready.
Step 7:
The next step is to convert this Palette.gpl and the images into the format recognizable by the Microchip Graphics Library. Start the Microchip’s Graphics Resource Converter tool and enable the C30 Build (palette support is currently on selected PIC24F devices only) mode as shown in Figure 8. Open the master palette file previously generated by pressing Add Palette button and save it as a .c file (for storing in internal flash) or as a .hex file (for storing in external memory) similar to bitmap or font conversion as shown in Figure 10.

Figure 8. Load Palette

Figure 9. Convert Palette
Step 8:
Convert all the palette ready images to C file (*.c) or Hex file (*.hex) by pressing the Add Images button.
Step 9:
Import the palette with the extern statement like in “extern const PALETTE_FLASH _GOL_Palette_Demo;” in the application. See MainDemo.c in “Graphics Object Layer Palette Demo”. Set the palette using the APIs SetPaletteBpp() and SetPalette() and then enable the palette using the API EnablePalette() as shown in the below code example.
GOLInit();
SetPaletteBpp(8);
SetPalette((void*)&_GOL_Palette_Demo, 0, 256);
EnablePalette();
Step 10:
Import the images as usual and use them after setting and enabling the palette.
See “Graphics Object Layer Palette Demo” as a practical example.
Using the Graphis Resource Converter to generate a CLUT based on the images to convert - The Graphics Resource Converter will generate a CLUT based on the images to be converted. Please refer to the Graphics Resource Converter help file for more information.