The following is a step by step instruction to create a New Project from scratch with the Microchip Graphics Library
Step 1: Install the Microchip Application Libraries to get the Microchip Graphics Library. The Microchip Application Library installer can be downloaded from  www.microchip.com/MLA. Once installed the Microchip Graphics Library files will be located in the directory structure shown below.
 <MyProjects>
    |
    Board Support Package
    Graphics
    GraphicsProjects1
    Microchip
        |
        Help
        Graphics
            |
            Drivers
        Include
            |
            Graphics
- MyProjects can be any name and is the directory name that you chose when you installed the Microchip Application Libraries.
- Graphics directory will contain demos distributed with the Graphics Library.
- Board Support Package directory will contain drivers for components on Microchip Development Boards that are used by the demos.
- GraphicsProject1 directory can be any directory name that you specify later for your own project.
- Microchip directory will contain all the library files.
- Under Microchip directory, the Help directory will contain the "Graphics.chm" file.
- Under Microchip directory, the Graphics directory under the Microchip directory will contain all the source (C) files for the Graphics Library except the actual display driver files. Under the Drivers directory, all the supported driver files released with the library is located.
- Under Microchip directory, the Include directory will have another Graphics directory that will contain all the header files for the Graphics Library. All other header files will be located under Microchip/Include directory.
Step 2: Creating the MPLAB project
- Open MPLAB Project.
- Go to Project tab and select New
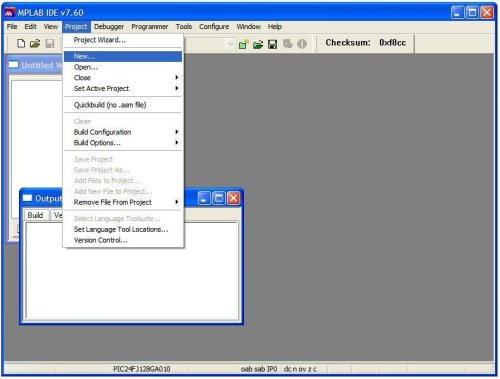
- New Project dialog box will appear. In this dialog box enter your Project Name and Project Directory. Click OK. Project will be created or prompted to create the directory if your project directory does not exist (refer to figure below).

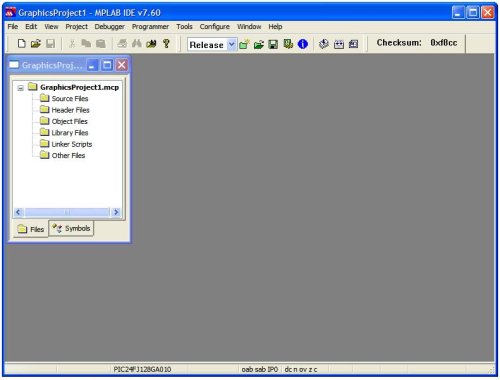
- The MPLAB Project view will appear as soon as the project is created. If it does not appear go to View tab and click Project.
- Right click on the Source Files and click Add Files. Browse to MyApplication->Microchip->Graphics directory. Select appropriate c files and click Open. The C files that you select will depend on the application that you will be creating. The following tables shows the minimum files required for each layer of the Graphics Library.
|
Display Driver Layer |
|
|
DisplayDriver.h |
Header that contains required APIs for display driver to be compatible with Microchip Graphics Library. |
|
gfxepmp.c gfxepmp.h |
Required if using display drivers for external display controller that will use the Enhanced Parallel Master Port (EPMP) for display controller communications. |
|
gfxpmp.h |
Required if using display drivers for external display controller that will use the Parallel Master Port (PMP) for display controller communications. |
|
gfxtcon.h |
Required if using Microchip supplied display drivers that requires timing controller initialization. If creating your own display controller driver, you may integrate the timing controller initialization into your display driver file. |
|
Display Driver c and h files |
These are the display driver files needed. These can be your own created display driver or Microchip supplied display drivers distributed with the Graphics Library. |
|
Primitive Layer |
|
|
Primitive.c Primitive.h |
These two files implements the Primitive Layer of the Microchip Graphics Library. |
|
Transitions.c Transitions.h Transitions_weak.c |
Implements the extended primitive functions for screen transitions. The Screen Transition features are only supported by the Epson driver (S1D13517.c and S1D13517.h) and the PIC24FJ256DA210 driver (mchpGfxDrv.c and mchpGfxDrv.h) |
|
Graphics Object Layer |
|
|
GOL.c GOL.h |
These two files along with the individual widget files implements the Graphics Object Layer of the Microchip Graphics Library. |
|
GOLFontDefault.c |
This is the default font used for the Graphics Object Layer. |
|
GOLSchemeDefault.c |
This is the default style scheme used for the Graphics Object Layer. |
|
Widget files (example: Button.c Button.h) |
Required files when using the widgets in the Graphics Object Layer. |
|
Configuration |
|
|
Graphics.h |
Required file that loads the different components of the Graphics Library. |
|
GraphicsConfig.h |
Required file to determine the features and modes that are enabled in the Graphics Library. |
|
HardwareProfile.h |
Required file when running demos distributed with the Microchip Graphics Library or using drivers distributed in "Board Support Package". |
- Right click on the Header Files and click Add Files. Browse to MyApplication->Microchip->Include directory. Select GenericTypeDefs.h file and click Open.
- Right click on the Header Files and click Add Files. Browse to MyApplication->Microchip->Include->Graphics directory. Select all the h files and click Open. The header files to include will depend on the application as described in 5.
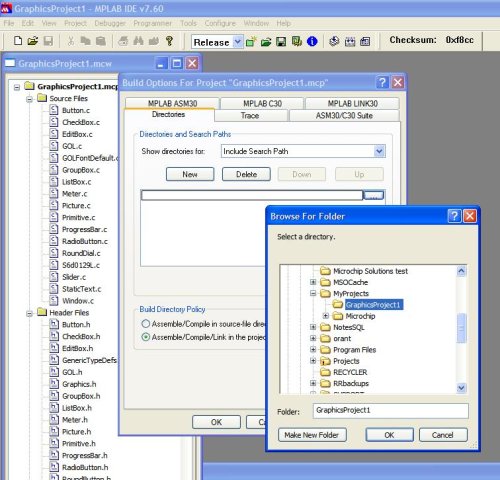
Step 3: Setting the project directories.
- In MPLAB Project, go to Project tab and point to Build Options.
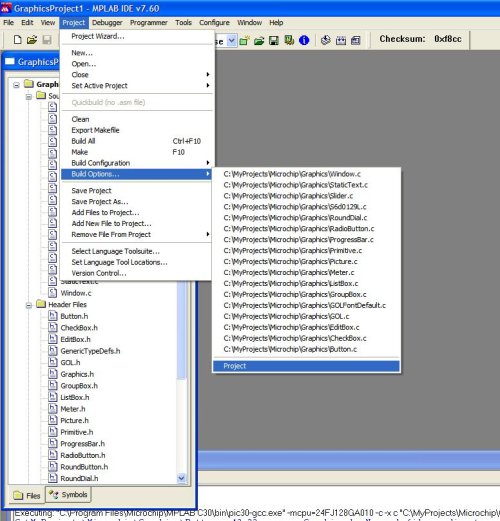
- A menu will appear showing all your files and the Project option. Select the Project option. The Build Options window will open.
- Select the Directories tab.
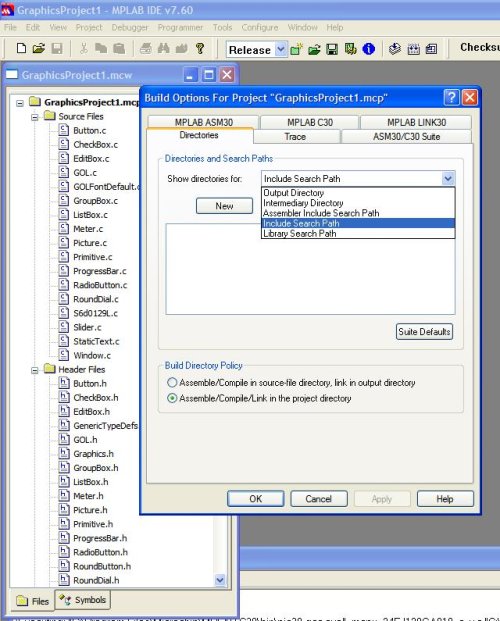
- In the Directories tab, Directories and Search Paths group box and Show directories for: select Include Search Path. Click New.
- Click the button with (…) and browse and select your project directory. Click OK. This will add your project directory.
- Click New again for each of the following paths:
- .
- ..\..\Microchip\Include
- ..\..\Board Support Package (do this only if you are using the drivers supplied in the "Board Support Package" director_)
- Directories and Search Paths group box and Show directories for: select Library Search Path. Click New.
- Enter the path to the MPLAB C30 lib. For example: C:\Program Files\Microchip\MPLAB C30\lib. Click OK.

- Change from the Directories tab to MPLAB LINK 30 tab. In the Generate Command Line group box enter 3000 in the Heap Size setting.
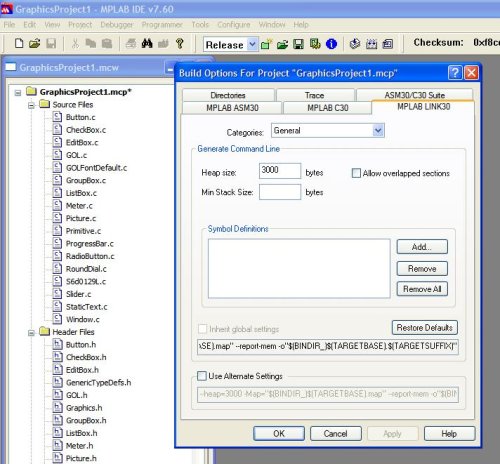
10. Click Apply and then OK.
Step 4: Create your application files.
- In MPLAB Project, select File tab and click New. The file editor will open.
- Create your GraphicsConfig.h file. For now add the following lines:
#define USE_NONBLOCKING_CONFIG // Comment this line to use blocking configuration
#define USE_BUTTON             // Enable Button Object.
#define USE_SLIDER             // Enable Slider or Scroll Bar Object.

#define USE_FONT_FLASH         // Support for fonts located in internal flash
#define USE_BITMAP_FLASH       // Support for bitmaps located in internal flash
The file name is important. If the file name is changed, library will not compile properly.
- Save the file into your GraphicsProject1 directory.
- Similarly, create your application header file code by following steps 1 and 2. For simplicity just use this code for now:
#define SYSCLK 32000000        // 8MHz x 4PLL Oscillator frequency
// includes
#include <p24Fxxxx.h>
#include "GenericTypeDefs.h"
#include "Graphics.h"
- Save the file in your GraphicsProject1 directory.
- After saving the two header files, add these files to your project.
- Create your application code. For simplicity just use this code for now:
#include "GraphicsProject.h"        // header file you saved earlier
// Configuration bits
_CONFIG2(FNOSC_PRIPLL & POSCMOD_XT) // Primary XT OSC with PLL
_CONFIG1(JTAGEN_OFF & FWDTEN_OFF)   // JTAG off, watchdog timer off

int main(void){

    GOL_MSG msg; // GOL message structure to interact with GOL
GOLInit(); // initialize graphics library &BtnCreate( 1, // object’s ID 20, 160, 150, 210, // object’s dimension 0, // radius of the rounded edge BTN_DRAW, // draw the object after creation NULL, // no bitmap used "LEFT", // use this text NULL); // use alternative style scheme
    BtnCreate( 2,
               170, 160, 300, 210,
               0,
               BTN_DRAW,
               NULL,
               "RIGHT",
NULL);SldCreate(3, // object’s ID 20, 105, 300, 150, // object’s dimension SLD_DRAW, // draw the object after creation 100, // range 5, // page 50, // initial position NULL); // use default style scheme
    while(1){
        if (GOLDraw()) {            // Draw GOL object
        }
    }
}

WORD GOLMsgCallback(WORD objMsg, OBJ_HEADER* pObj, GOL_MSG* pMsg){
    return 1;
}

WORD GOLDrawCallback(){
    return 1;
}
- Save the file in your GraphicsProject1 directory.
- After saving the application file, add the file to your project.
Step 5 Now build your project. To build go to MPLAB Project tab and click Build All. Notice there will be some warnings that may come out in the build log. This is due to the fact that we have not used most of the Objects. We only used the Slider and Button.
Step 6: Downloading your application - To download your generated code to the Explorer 16 board follow the steps below.
- In the MPLAB Programmer tab click Select Programmer.
- Select MPLAB ICD2 or REAL ICE depending on your setup.
- After connection and testing is done go to Programmer tab and click Program.