|
Embedded TCP/IP stack
4.1.0
|
FNET Shell Demo Quick Start
Requirements
Tools used during this quick start:
- Supported IDE.
- Terminal program (Tera Term Pro v4.63 http://ttssh2.sourceforge.jp).
- WEB browser.
- Telnet client (PuTTYtel v0.62 http://www.chiark.greenend.org.uk/~sgtatham/putty/).
- FNET project source code, coming with this document.
Step by step
Follow these steps to run the FNET Shell demo application:
- Prepare your evaluation board according to your board User Manual.
- Use USB or RS-232 male/female DB-9 serial cable to connect your PC (through COM port) to the evaluation board.
- Connect the evaluation board to an Ethernet network.
- Power the board up.
- Invoke the terminal program on the PC to which the evaluation board is connected and configure it to:
- Bits per second: 115200.
- Data bits: 8.
- Parity: none.
- Stop bits: 1.
- Flow control: None.
 Serial port setup
- Launch IDE.
- Open the project:
fnet\fnet_demos\boards\<board_name>\shell\<compiler_name>\
- In the IDE, choose a project target you want to compile.
- Compile, load (or flash) the application to the board and run the project.
- In your terminal program window you should see the FNET application Shell welcome message:
************************************************
 FNET Shell Application
************************************************
 FNET TCP/IP Stack for MK64FN1
 Version 4.0.0
 Built Oct 26 2017 at 13:14:08 by IAR

 Enter '?' for command list.
************************************************
[FAPP] Application parameters loaded from Flash.
SHELL>
- The Shell application monitors the network interface connection status using the Link-Detection service (enabled by FNET_CFG_LINK). Whenever a network interface indicates that it has been connected, the application begins the auto-configuration process using DHCPv4. If the DHCPv4 server has not been discovered on local network, the application starts the Auto-IP service. Whenever the network interface indicates that it has been disconnected, the application disables all bound protocols on this interface.
- Note
- On connect/disconnect scripts are defined by
FAPP_CFG_LINK_CONNECT_SCRIPTandFAPP_CFG_LINK_DISCONNECT_SCRIPTin fapp_user_config.h
[LINK] eth0: connected => Script: dhcpc autoip -n eth0; mdns -n eth0; llmnr -n eth0;
************************************************
 DHCPv4 Client started.
 Interface            : eth0
************************************************
Press [Ctr+C] to cancel.
[DHCP] Discovering...

************************************************
 IPv4 parameters updated :
************************************************
Ethernet Interface <default>:
 Name                 : eth0
 ScopeID              : 1
 Media State          : connected
 IPv4 Address         : 192.168.0.102 <dhcp>
 IPv6 Address         : fe80::211:22ff:fe33:4455 <autoconfigurable>
 IPv4 Subnet mask     : 255.255.255.0
 IPv4 Gateway         : 192.168.0.1
 IPv4 DNS             : 192.168.0.1
 DHCP Client          : on
 DHCP Server Address  : 192.168.0.1
 AUTOIP Service       : off
 LLMNR Server         : off
 MDNS Server          : off

************************************************
 mDNS server started.
 Interface            : eth0
 Host Name            : fnet
************************************************
************************************************
 LLMNR server started.
 Interface            : eth0
 Host Name            : fnet
************************************************
SHELL>
- There is an additional possibility to start any other service (http, telnet etc.) automatically during power-up by setting the
FAPP_CFG_STARTUP_SCRIPTparameter to a command line string. - You may start the mDNS server (if not started already during start-up), which allows the name resolution for hosts on the same local link. It is natively supported by Apple OSs and named "Bonjour".
If HTTP server is enabled, the application registers the "_http._tcp.local" service in mDNS server. So the HTTP server can be discoverable by in MacOS Safari browser using Bonjour.SHELL> mdns ************************************************ mDNS server started. Interface : eth0 Host Name : fnet ************************************************
- You may start LLMNR server (if not started already during start-up), which allows the name resolution for hosts on the same local link. It is natively supported by Windows OSs.
SHELL> llmnr
************************************************
 LLMNR server started.
 Interface            : eth0
 Host Name            : fnet
************************************************
So you can use the host name "fnet" instead of an IP address to find this node on the local network. - The Main Shell is now ready to accept user commands. Try
? command to display a list of all the commands available within the shell:> ? - Display this help message > set [<parameter> <value>] - Set parameter > get [<parameter>] - Get parameters > bind [-n <if name>] <IP6 address> - Bind IPv6 Address > unbind [-n <if name>] <IP6 address> - Unbind IPv6 Address > info [-n <if name>] - Show interface info > stat [-n <if name>] - Show interface statistics > dhcpc [-n <if name>] [release|autoip] - Start DHCPv4 client > autoip [-n <if name>] [release] - Start Auto-IP service > http [release] - Start HTTP server > exp - File Explorer submenu... > telnet [release] - Start Telnet server > dns <host name> 4|6 [<server ip>] - Resolve IPv4|6 address of <host name> > llmnr [-n <if name>] [release] - Start LLMNR server > mdns [-n <if name>] [release] - Start MDNS server > sntp <server ip> - Resolve time over SNTP > save - Save parameters to the FLASH > reset - Reset the board > ping [-c <count>][-i <seconds>] [-p <pattern>][-s <size>] [-h <hoplimit/ttl>] <ip> - Send ICMP ECHO requests SHELL> - All computers, connected to an Ethernet network running the IPv4 protocol, need several network-specific parameters:
- IPv4 address for the system;
- IPv4 address of the Gateway for non-local traffic;
- IPv4 network mask (netmask) for the system to distinguish between local or non-local traffic;
- You are able to change the default network parameters manually:
- By using Shell commands:
set address <default-if IPv4 address>
set gateway <default-if IPv4 gateway address>
set netmask <default-if IPv4 netmask address>
set mac <default-if Ethernet address>
- By changing the default values in the fapp_user_config.h source file.
Your local system administrator is able to assign a unique IPv4 address for the board, and also provide you with the IPv4 addresses of the gateway and the netmask.
- By using Shell commands:
- You may start the DHCP IPv4 client (if not started already during start-up) to obtain the address parameters automatically from your network DHCPv4 server:
SHELL> dhcpc
************************************************
 DHCPv4 Client started.
 Interface            : eth0
************************************************
Press [Ctr+C] to cancel.
[DHCP] Discovering...

************************************************
 IPv4 parameters updated :
************************************************
Ethernet Interface <default>:
 Name                 : eth0
 ScopeID              : 1
 Media State          : connected
 IPv4 Address         : 192.168.0.102 <dhcp>
 IPv6 Address         : fe80::211:22ff:fe33:4455 <autoconfigurable>
 IPv4 Subnet mask     : 255.255.255.0
 IPv4 Gateway         : 192.168.0.1
 IPv4 DNS             : 192.168.0.1
 DHCP Client          : on
 DHCP Server Address  : 192.168.0.1
 AUTOIP Service       : off
 LLMNR Server         : off
 MDNS Server          : off

SHELL>
- You may also start (if not started during start-up) the Auto-IP service to obtain automatically the IPv4 link-local address within the 169.254/16 prefix that is valid for communication with other devices connected to the same physical (or logical) link:
SHELL> autoip
************************************************
 Auto-IPv4 service started.
 Interface            : eth0
************************************************
Press [Ctr+C] to cancel.
[AUTOIP] Probing...
[AUTOIP] Probing...
[AUTOIP] Probing...

************************************************
 IPv4 parameters updated :
************************************************
Ethernet Interface <default>:
 Name                 : eth0
 ScopeID              : 1
 Media State          : connected
 IPv4 Address         : 169.254.67.77 <autoconfigurable>
 IPv6 Address         : fe80::211:22ff:fe33:4455 <autoconfigurable>
 IPv4 Subnet mask     : 255.255.0.0
 IPv4 Gateway         : 192.168.0.1
 IPv4 DNS             : 192.168.0.1
 DHCP Client          : off
 AUTOIP Service       : on
 LLMNR Server         : on
 MDNS Server          : on

SHELL>
- Note
- You may start Auto-IP service automatically, if no DHCPv4 server was discovered, by adding the
autoipparameter to thedhcpccommand.
- You may enter the
savecommand to save the all run-time parameters to non-volatile memory (it is located in the last erase page of the on-chip flash memory).SHELL> save Application parameters saved SHELL>
- Note
- The
savecommand does not save theipparameter in case it was allocated by a DHCP server to avoid IPv4 address conflict during the system startup.
- You may get an information about all initialized network interfaces by typing the
infocommand into your terminal program window.
In your terminal program window you should see:SHELL> info Ethernet Interface <default>: Name : eth0 ScopeID : 1 Media State : connected IPv4 Address : 192.168.0.102 <dhcp> IPv6 Address : fe80::211:22ff:fe33:4455 <autoconfigurable> IPv4 Subnet mask : 255.255.255.0 IPv4 Gateway : 192.168.0.1 IPv4 DNS : 192.168.0.1 DHCP Client : on DHCP Server Address : 192.168.0.1 AUTOIP Service : off LLMNR Server : on MDNS Server : on Services: HTTP Server : off HTTPS Server : off TELNET Server : off SHELL>
- You should now be able to "ping" the board from one of your workstations. The ping program is a very useful diagnostic tool used to check that the board`s IP information is properly configured.
- The ping tool can be used from the command-line environment on the host PC:
ping <your_board_IP_adress>
By default the ping routine will send a test ICMP frame to the board four times and will write a summary message on the screen. If everything works as expected, you should see an output similar to this:C:\Temp>ping 192.168.0.22 Pinging 192.168.0.22 with 32 bytes of data: Reply from 192.168.0.22: bytes=32 time=10ms TTL=64 Reply from 192.168.0.22: bytes=32 time<1ms TTL=64 Reply from 192.168.0.22: bytes=32 time<1ms TTL=64 Reply from 192.168.0.22: bytes=32 time<1ms TTL=64 Ping statistics for 192.168.0.22: Packets: Sent = 4, Received = 4, Lost = 0 (0% loss), Approximate round trip times in milli-seconds: Minimum = 0ms, Maximum = 10ms, Average = 2msC:\Temp>ping fe80::204:9fff:fe12:4938%19 Pinging fe80::204:9fff:fe12:4938%19 with 32 bytes of data: Reply from fe80::204:9fff:fe12:4938%19: time<1ms Reply from fe80::204:9fff:fe12:4938%19: time<1ms Reply from fe80::204:9fff:fe12:4938%19: time<1ms Reply from fe80::204:9fff:fe12:4938%19: time<1ms Ping statistics for fe80::204:9fff:fe12:4938%19: Packets: Sent = 4, Received = 4, Lost = 0 (0% loss), Approximate round trip times in milli-seconds: Minimum = 0ms, Maximum = 0ms, Average = 0ms - The PING application can be started also from the board, by typing the command
pinginto your terminal program window.
In your terminal program window you should see:SHELL> ping 192.168.0.1 ************************************************ PING ************************************************ Remote IP addr : 192.168.0.1 Message Size : 63 Num. of messages : 4 Pattern : 0 Hoplimit (TTL) : 64 Press [Ctr+C] to cancel. ************************************************ Reply from 192.168.0.1 Reply from 192.168.0.1 Reply from 192.168.0.1 Reply from 192.168.0.1 SHELL>
- In the next step, you can run the HTTP Server on the board, by typing the command
httpinto your terminal program window.
In your terminal program window you should see:SHELL> http ************************************************ HTTP server started. IPv4 Address : 192.168.0.22 IPv6 Address : fe80::204:9fff:fe12:4938 ************************************************ SHELL>
- Then run your Web browser and navigate to the server address (the address you have assigned to the system or obtained from the DHCP server):
http:// 192.168.0.22
orhttp:// [fe80::204:9fff:fe12:4938]
- You should see a Web page served by the FNET HTTP server:
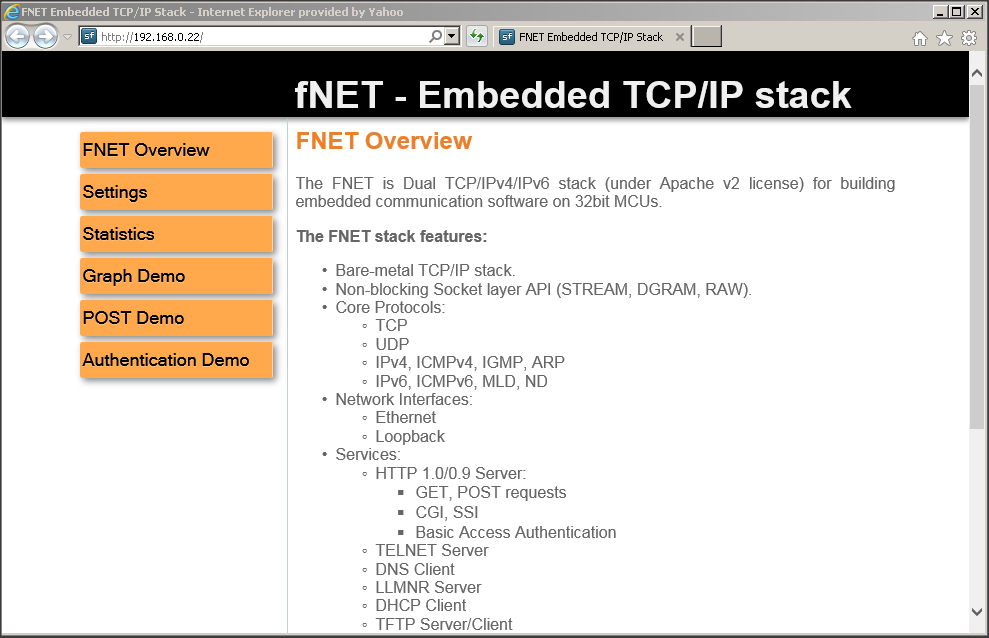 Demo Web Page
 - Also you can run the Telnet Server on the board, by typing the command
telnetinto your terminal program window.
In your terminal program window you should see:SHELL> telnet ************************************************ Telnet server started. IPv4 Address : 192.168.0.22 IPv6 Address : fe80::204:9fff:fe12:4938 ************************************************ SHELL>
- Then run your Telnet client. Start PuTTYtel application and enter the Telnet server IP address (the address you have assigned to the system or obtained from the DHCP server):
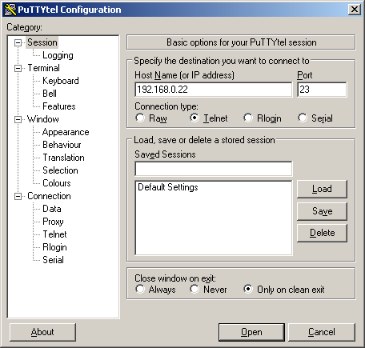 PuTTYtel Configuration
 - Press [Open] to open a telnet session. In your telnet program window you should see the FNET application Shell welcome message:
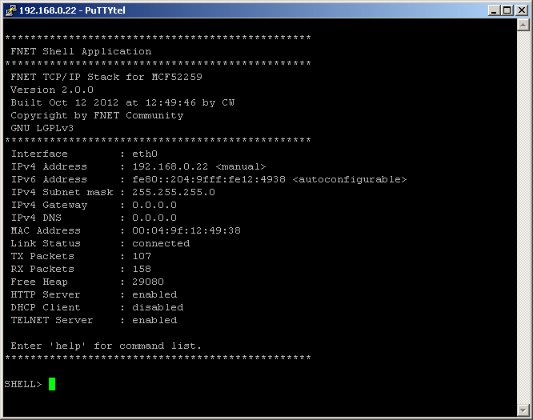 Telnet session
 - If you need to get know an IP address of the domain/host name (like www.google.com or others), you may use DNS client/resolver, by typing the command
dns<host_name>4|6into the command shell window.
For example, if you want to get know the IPv4 address of www.google.com, enterdnswww.google.com4in your terminal program window:SHELL> dns www.google.com 4 ************************************************ Resolving : www.google.com DNS Server : 192.168.0.1 Press [Ctr+C] to cancel. ************************************************ Resolved address : 216.58.208.100 TTL=1241513984
For example, if you want to get know the IPv6 address of www.google.com, enterdnswww.google.com6in your terminal program window:SHELL> dns www.google.com 6 ************************************************ Resolving : www.google.com DNS Server : 192.168.0.1 Press [Ctr+C] to cancel. ************************************************ Resolved address : 2a00:1450:4017:802::2004 TTL=167772160
- Note
- Be sure that the
dnsparameter is set to correct IP address of the DNS server on your network. It can be set manually by thesetcommand or can be obtained automatically by the DHCP IPv4 client service.
- If you need to get know the current date and time, you may use SNTP client, by typing the command
sntp<serverip>4|6into the command shell window.
For example, you may use public pool of NTP servers addressed by "pool.ntp.org". Use the "dns" command to resolve its IP addresses.SHELL> dns pool.ntp.org 4 ************************************************ Resolving : pool.ntp.org DNS Server : 192.168.0.1 Press [Ctr+C] to cancel. ************************************************ Resolved address : 52.209.118.149 TTL=1627389952 Resolved address : 89.163.241.149 TTL=1627389952 Resolved address : 213.251.53.187 TTL=1627389952 Resolved address : 108.59.2.24 TTL=1627389952 Resolved address : 207.171.17.42 TTL=4100195584 Resolved address : 212.25.19.23 TTL=1427308544 Resolved address : 174.127.124.192 TTL=1427308544 Resolved address : 193.243.171.138 TTL=1427308544 Resolved address : 89.36.18.22 TTL=1427308544 Resolved address : 199.249.224.53 TTL=1427308544 Resolved address : 85.214.25.217 TTL=1427308544 Resolved address : 178.63.120.205 TTL=1427308544 Resolved address : 199.188.48.59 TTL=1427308544 SHELL> sntp 89.163.241.149 ************************************************ SNTP Resolving SNTP Server : 89.163.241.149 Press [Ctr+C] to cancel. ************************************************ UTC: 2017-6-8 8:38:14.886
- Note
- If one SNTP server is failed, try another one from the resolved address list.
- If you do not have access to public NTP servers, for testing you may use a local SNTP server provided by the http://tftpd32.jounin.net/ application.
© 2005-2018 by Andrey Butok. http://fnet.sourceforge.net