|
Embedded TCP/IP stack
4.1.0
|
FNET TFTP Bootloader Quick Start
Requirements
Tools used during this quick start:
- Supported IDE.
- Terminal program (Tera Term Pro version 4.63 http://ttssh2.sourceforge.jp/).
- TFTP Server and Client (Tftpd version 4.0 http://tftpd32.jounin.net/).
- FNET project source code, coming with this document.
Step by step
Follow these steps to run the FNET Bootloader:
- Prepare your evaluation board according to your board User Manual.
- Use USB or RS-232 male/female DB-9 serial cable to connect your PC (through COM port) to the evaluation board.
- Connect the evaluation board to an Ethernet network.
- Power the board up.
- Invoke the terminal program on the PC to which the evaluation board is connected and configure it to:
- Bits per second: 115200.
- Data bits: 8.
- Parity: none.
- Stop bits: 1.
- Flow control: None.
 Serial port setup
- Start TFTP Server:
- Start TFTP Server application. Go to
[Start]->[Programs]->[Tftpd32]->[Tftpd32] - Press the [Settings] button and set the TFTP server base directory (for example
C:\TFTP-Root):
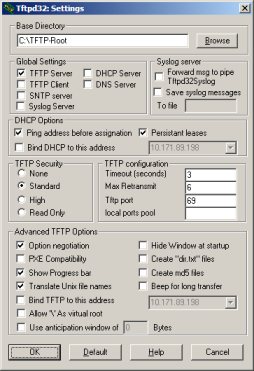 Tftpd32 Settings
 - Press [OK]:
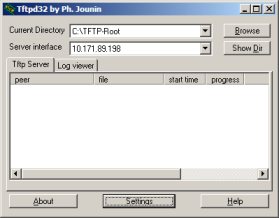 Tftpd32
- Start TFTP Server application. Go to
- Prepare the example-application image file that is to be downloaded by the TFTP Bootloader:
- Open the project:
fnet\fnet_demos\boards\<board_name>\shell_boot\<compiler_name>\
- In the IDE choose the Release target.
- Compile the project.
- The fnet_firmware.srec file should appear in directory with binaries.
Copy this S-record file to the TFTP Server Base Directory (by default, it isC:\TFTP-Root). - Close the project.
- Prepare the FNET TFTP Bootloader:
- Open the project:
fnet\fnet_demos\boards\<board_name>\boot\<compiler_name>\
- In the IDE choose Release target.
- Compile the project.
- Flash the program to the board.
- Now the TFTP Bootloader is ready to be used.
You may update or backup the firmware with help of TFTP firmware client or TFTP firmware server.
TFTP firmware client
- Reset the board, press the RESET button on the board.
- In your terminal program window you should see the FNET Bootloader welcome message:
************************************************
 FNET Bootloader
************************************************
 FNET TCP/IP Stack for MK64FN1
 Version 4.0.0
 Built Oct 26 2017 at 16:32:22 by IAR

 Enter '?' for command list.
************************************************
[FAPP] Application parameters loaded from Flash.
Startup script: tftp
************************************************
 TFTP Server started.
 IPv4 Address         : 192.168.0.22
************************************************
BOOT>
- Look at the network interface parameters using the
infoshell command:BOOT> info Ethernet Interface <default>: Name : eth0 ScopeID : 1 Media State : connected IPv4 Address : 192.168.0.22 <manual> IPv4 Subnet mask : 255.255.255.0 IPv4 Gateway : 0.0.0.0 DHCP Client : off Services: TFTP Server : on BOOT>
- The Bootloader is now ready to accept user commands. Enter the
? command to display a list of all commands available within the shell of the Bootloader:BOOT> ? > ? - Display this help message > set [<parameter> <value>] - Set parameter > get [<parameter>] - Get parameters > info [-n <if name>] - Show interface info > dhcpc [-n <if name>] [release|autoip] - Start DHCP client > tftpc [<image name>[<server ip>[<type>]]]- TFTP firmware loader >tftpcup [<image name>[<server ip>[<type>]]]- TFTP firmware uploader > tftp [release] - TFTP firmware server > mem - Show memory map > erase all|[0x<erase address> <bytes>] - Erase flash memory > save - Save parameters to the FLASH > go [0x<address>] - Start application at address > reset - Reset the board BOOT>
- Check Bootloader parameters. Enter the
getcommand to see the parameter values:get ip : 192.168.0.22 netmask : 255.255.255.0 gateway : 0.0.0.0 mac : 00:11:22:33:44:55 boot : stop delay : 5 script : dhcpc; erase all; tftpc; set boot go; save; go tftp : 192.168.0.200 image : fnet_firmware.srec type : srec go : 0x0 BOOT>
- To change the default parameters the
setcommand should be used. To understand its syntax, enter thesetcommand without parameters:BOOT> set Valid 'set' options: ip : <default-if IPv4 address> netmask : <default-if IPv4 netmask address> gateway : <default-if IPv4 gateway address> mac : <default-if Ethernet address> boot : <stop|go|script> delay : <seconds> script : <command script> tftp : <TFTP server IP address> image : <Image-file name to load with TFTP> type : <srec|hex|bin|raw> go : 0x<entry point address> BOOT>
- Brief description of the Bootloader parameters:
ip: Default IPv4 address of the board.netmask: Default IPv4 Network netmask.gateway: Default IPv4 address of the gateway.mac: Ethernet MAC address.boot: Bootloader booting modes:stop= the bootloader stops at the shell prompt.go= the bootloader jumps to the entry point address defined by thegoparameter.script= the bootloder executes a command script located in thescriptparameter.
delay: After the bootup, the bootloader will wait specified number of seconds before it executes the boot-mode defined by thebootparameter. During this time a countdown is printed, which can be interrupted by pressing any key. It is ignored for thestopbooting mode.script: The command script is automatically executed when thebootparameter is set to thescriptvalue and the initial countdown is not interrupted. This script may contain any command supported by the application shell. The commands must be split by semicolon operator.go: Default entry point address to start execution at. It is used by the bootloader in thegobooting mode as the default entry point. Also it is used as the default address for thegoshell command if no address is provided as an argument.
NOTE: This parameter is updated by the TFTP loader automatically if the type parameter is set to thesrecvalue. The S-record file format contains the entry point information.tftp: This is the default TFTP server IP address to be used for network download if no address is provided for thetftpcshell command.image: This is the default file name to download if no file name is provided for thetftpcshell command.type: Type of the file to download by the TFTP loader:srec= S-record file (default type). This file format contains both the address data as well as the entry point information.hex= Intel HEX file. This file format does not contain the entry point, sogoparameter must be set additionally.bin= CodeWarrior binary file. This file format does not contain the entry point, sogoparameter must be set additionallyraw= Raw binary file. For this type of file, therawparameter (load address) must be set before the TFTP loader start.
raw: Load address for a raw-binary file used by the TFTP loader. It's used only if the type parameter is set to therawvalue.
- Check if the parameter values are set correctly to suit your needs. Most probably, you will have a different TFTP server IP address. For example, to change it to the 10.171.89.219 address, enter:
BOOT> set tftp 10.171.88.219
 tftp    : 10.171.88.219
BOOT>
- For example, to change the
scriptparameter (use the backslash-escape symbol before each semicolon):BOOT> set script 'erase all\; tftpc\; set boot go\; save\; reset' script : erase all; tftpc; set boot go; save; reset BOOT>
- When all parameters are set correctly for your system, set the
bootparameter to thescriptvalue.BOOT> set boot script boot : script BOOT>
- Enter the
savecommand to save all run-time parameters to a non-volatile memory (it is located in the last erase page of the on-chip flash memory).BOOT> save Application parameters saved BOOT>
NOTE: Thesavecommand does not save theipparameter in case it was allocated by a DHCP IPv4 server to avoid IPv4 address conflict during the system startup. - Reset the board, press the RESET button on the board. On reset, the Bootloader will start in
scriptbooting mode.
Let`s analyze the script parameter value of the example provided above:dhcpc; erase all; tftpc; set boot go; save; go
This script has the following steps:dhcpc= starts DHCP client service on the default interface and tries to update the IPv4 parameters (ip,gatewayandnetmask) from DHCP server. If the DHCP service will fail to retrieve the IP parameter from a DHCP server, the bootloder will continue with the old IP settings.eraseall= erases all Flash memory blocks. To see the memory map enter thememcommand:BOOT> mem Memory type Start End ---------------------------------------- FLASH 0x00000000 0x0007FFFF BOOT>
- tftpc = downloads the image-file (the file name defined by the
imageparameter) from the TFTP server (the server ip address defined by thetftpparameter), loads it to the Flash memory, checks if the written data are correct. Also, it checks a checksum and updates thegoparameter if the type is set to thesrecvalue.
If the TFTP loading is failed, the bootloader will print an error message, stop script execution, and stay in the bootloader shell waiting for user actions (reset or parameters change). setbootgo= Changes the bootloder booting mode to thegomode.save= Saves all run-time parameters to persistent memory to be available during the next startup.
NOTE: Thesavecommand does not save theipparameter in case it was allocated by a DHCP server to avoid IP address conflict during the system startup.- go = Jumps to the application entry-point. As we use S-record image file the entry-point
goparameter is updated automatically.
- On reset, in the terminal window you should see:
************************************************
 FNET Bootloader
************************************************
 FNET TCP/IP Stack for MK64FN1
 Version 4.0.0dev
 Built Oct 26 2017 at 16:48:56 by IAR

 Enter '?' for command list.
************************************************
[FAPP] Application parameters loaded from Flash.
Press any key to stop (script):   0

dhcpc; erase all; tftpc; set boot go; save; go
************************************************
 DHCPv4 Client started.
 Interface            : eth0
************************************************
Press [Ctr+C] to cancel.
[DHCP] Discovering...

************************************************
 IPv4 parameters updated :
************************************************
Ethernet Interface <default>:
 Name                 : eth0
 ScopeID              : 1
 Media State          : connected
 IPv4 Address         : 192.168.0.102 <dhcp>
 IPv4 Subnet mask     : 255.255.255.0
 IPv4 Gateway         : 192.168.0.1
 DHCP Client          : on
 DHCP Server Address  : 192.168.0.1

Erasing...
 0x0000d000 to 0x000fefff erased
Press [Ctr+C] to cancel.
TFTP downloading 'fnet_firmware.srec' (srec) from 192.168.0.200 : \
Entry point set to 0x0002703d

TFTP completed (307618 bytes)
 boot    : go
Application parameters saved
go 0x0002703d

************************************************
 FNET Shell Demo (bootloader aware)
************************************************
 FNET TCP/IP Stack for MK64FN1
 Version 4.0.0dev
 Built Oct 26 2017 at 16:17:57 by IAR

 Enter '?' for command list.
************************************************
[FAPP] Application parameters loaded from Flash.
SHELLB>
[LINK] eth0: connected => Script: dhcpc autoip -n eth0; mdns -n eth0; llmnr -n eth0;
************************************************
 DHCPv4 Client started.
 Interface            : eth0
************************************************
Press [Ctr+C] to cancel.
[DHCP] Discovering...

************************************************
 IPv4 parameters updated :
************************************************
Ethernet Interface <default>:
 Name                 : eth0
 ScopeID              : 1
 Media State          : connected
 IPv4 Address         : 192.168.0.102 <dhcp>
 IPv6 Address         : fe80::211:22ff:fe33:4455 <autoconfigurable>
 IPv4 Subnet mask     : 255.255.255.0
 IPv4 Gateway         : 192.168.0.1
 IPv4 DNS             : 192.168.0.1
 DHCP Client          : on
 DHCP Server Address  : 192.168.0.1
 AUTOIP Service       : off
 LLMNR Server         : off
 MDNS Server          : off

************************************************
 mDNS server started.
 Interface            : eth0
 Host Name            : fnet
************************************************
************************************************
 LLMNR server started.
 Interface            : eth0
 Host Name            : fnet
************************************************
SHELLB>
- Now the Bootloader is in the
gomode and every time on the system reset it will start the loaded application automatically.
- Note
- The
tftpcupcommand is useful for the firmware backup before it gets overwritten in the Flash memory. This feature enables to restore the system in case the new firmware has issues.
This command uploads content of the on-chip Flash memory, except FNET Bootloader reserved blocks, to the TFTP server. The TFTP server IP address is defined by thetftpparameter. The image-file name on the remote TFTP server is defined by theimageparameter. Format of the created file (S-record, CodeWarrior binary or raw binary) is defined bytypeparameter. - The Bootloder is able to run in IPv6 mode, by disabling IPv4 and enabling IPv6 in
fnet_user_config.h.
- The
TFTP firmware server
The TFTP server is started automatically during the bootloader start-up in normal boot mode. It allows to update or backup the firmware from a remote TFTP client running on host PC without the serial-console command line interface. Format of the image file (S-record, CodeWarrior binary or raw binary) is defined by type parameter.
- You may check TFTP server status, enter
infocommand:BOOT> info Ethernet Interface <default>: Name : eth0 ScopeID : 1 Media State : connected IPv4 Address : 192.168.0.22 <manual> IPv4 Subnet mask : 255.255.255.0 IPv4 Gateway : 192.168.0.1 DHCP Client : off Services: TFTP Server : off
- If the TFTP server is stopped, you may enter the
tftpcommand to start it:BOOT> tftp ************************************************ TFTP Server started. IPv4 Address : 192.168.0.22 ************************************************
- Start TFTP client on your PC:
- Start TFTP Client application. Go to
[Start]->[Programs]->[Tftpd32]->[Tftpd32] - Press the [Settings] button and set the "TFTP client" check-box
 Tftpd32 Settings
 - Press [OK]:
- Start TFTP Client application. Go to
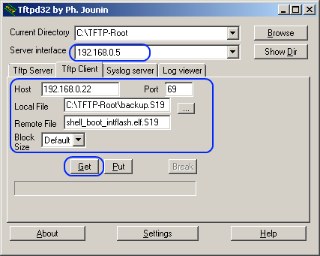
- You may now update firmware:
- Be sure that the Bootloader TFTP server is started.
- Set parameters of the TFTP Client:
- Host: the IP address of your evaluation board.
- Port: it should be set to the standard TFTP server port number
69. - Local File: the full path of the image file that will be uploaded to the board.
- Remote File: set to the value of the bootloader-parameter
image. By default it is set to the shell_boot_intflash.elf.S19 value. - Block size: set to
Defaultor512.
- Start firmware update by pressing the [Put] button.
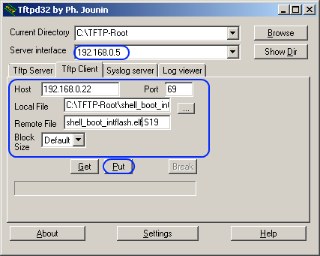 Tftpd32 TFTP client
 - The TFTP server receives the write request, checks if the requested file name corresponds to the value of the
imageparameter, starts the erasing of the flash memory, downloads and writes image file to the flash memory, updates thegoparameter to the new entry point, sets thebootparameter to thegovalue, saves changed parameters to the flash, and finally starts application. In the terminal window you should see:BOOT> TFTP downloading 'fnet_firmware.srec' (srec) from 192.168.0.5: Erasing... 0x00000000 to 0x0000BFFF skipped 0x0000C000 to 0x0007EFFF erased 0x0007F000 to 0x0007FFFF skipped BOOT> Entry point set to 0x00019638 TFTP completed (234244 bytes) boot : go Parameters saved go 0x00019638 ************************************************ FNET Shell Demo (bootloader aware) ************************************************ FNET TCP/IP Stack for MK64FN1 Version 4.0.0dev Built Oct 26 2017 at 16:17:57 by IAR Enter '?' for command list. ************************************************ [FAPP] Application parameters loaded from Flash. SHELLB> [LINK] eth0: connected => Script: dhcpc autoip -n eth0; mdns -n eth0; llmnr -n eth0; ************************************************ DHCPv4 Client started. Interface : eth0 ************************************************ Press [Ctr+C] to cancel. [DHCP] Discovering... ************************************************ IPv4 parameters updated : ************************************************ Ethernet Interface <default>: Name : eth0 ScopeID : 1 Media State : connected IPv4 Address : 192.168.0.102 <dhcp> IPv6 Address : fe80::211:22ff:fe33:4455 <autoconfigurable> IPv4 Subnet mask : 255.255.255.0 IPv4 Gateway : 192.168.0.1 IPv4 DNS : 192.168.0.1 DHCP Client : on DHCP Server Address : 192.168.0.1 AUTOIP Service : off LLMNR Server : off MDNS Server : off ************************************************ mDNS server started. Interface : eth0 Host Name : fnet ************************************************ ************************************************ LLMNR server started. Interface : eth0 Host Name : fnet ************************************************ SHELLB>
- Finally you should receive message about successfully transmitted image file:
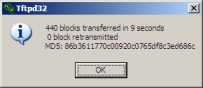 File was uploaded
- Also you may backup the firmware. The TFTP firmware server can upload content of the on-chip Flash memory, except FNET Bootloader reserved blocks, to a TFTP client:
- Be sure that the TFTP server is enabled:
BOOT> info
Ethernet Interface <default>:
 Name                 : eth0
 ScopeID              : 1
 Media State          : connected
 IPv4 Address         : 192.168.0.22 <manual>
 IPv4 Subnet mask     : 255.255.255.0
 IPv4 Gateway         : 192.168.0.1
 DHCP Client          : off

Services:
 TFTP Server          : on
BOOT>
- Set parameters of the TFTP Client:
- Host : the IP address of your evaluation board.
- Port : should be set to the standard TFTP server port number
69. - Local File : the file that is used for firmware backup (for example backup.srec).
- Remote File : set to the value of the bootloader-parameter
image. By default it is set to the shell_boot_intflash.elf.S19 value. - Block size : set to
Defaultor512.
- Start firmware download by pressing the [Get] button.
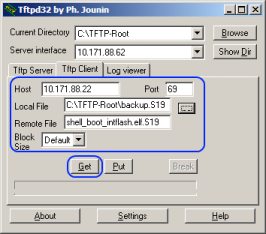 Tftpd32 TFTP client
 - The TFTP server receives the read request, checks if the requested file name corresponds to the value of the
imageparameter, generates image file and uploads it to the remote TFTP client. In the terminal window you should see:BOOT> TFTP uploading 'fnet_firmware.srec' (srec) to 10.198.0.5: TFTP completed (1211274 bytes)
- Finally you should receive message about successfully transmitted image file :
 File was downloaded
- Note
- The Bootloder is able to run in IPv6 mode, by disabling IPv4 and enabling IPv6 in fnet_user_config.h.
- Be sure that the TFTP server is enabled:
© 2005-2018 by Andrey Butok. http://fnet.sourceforge.net