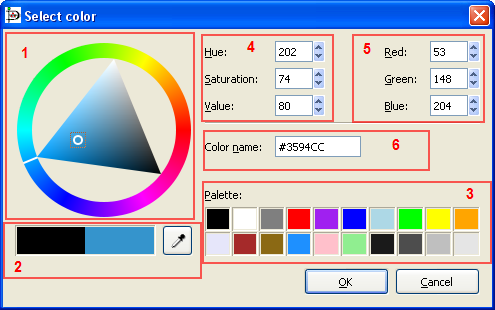
The Colors selector box contains 6 zones:
The colors wheel allows you to select a color using the mouse. Select the color you want from the outer ring. A white or black line shows the current position on the ring. Select the darkness or lightness you want using the inner triangle. A white or black circle shows the current position in the triangle. You can click or drag on either surface. The currently-selected color displays in the right side of the rectangle just below the circle.
Below the color wheel there are two rectangles. The left one displays the current color of the object, the right one the new color (i.e., the one you currently have chosen using the colors wheel). Pressing the OK button will set the object to the new color.
Just to the right of these rectangles, there is a pipette button. When you click this button, the mouse pointer changes to a pipette. When the pipette is active, you can click on the canvas or any open application window (Like The Gimp), and select any color!
![[Note]](note.png)
Note On Windows, you can only select from colors on the Dia canvas.
In the lower right there is a predefined color palette. Click on any of these to choose the color.
In the upper center there are settings for Hue, Saturation, and Value (HSV). You can select a color by typing a numeric value or by using the increment / decrement controls. Note that when you enter a value here, the color wheel selection changes to reflect the new color.
To the right, there are settings for Red, Green, and Blue. These work the same as the HSV controls.
In the middle of the box is a place to enter a Color name. This supports standard color names or HTML-style hexadecimal color values. (See HTML4.01 colors on http://www.w3.org), and hexadecimal values (0-9A-F) on 3 or 6 octets.