Step 2—Communicating with the PXI Device
The final two steps in eseriesInit.vi are specific to the PXI-6070E initialization. A property node obtains the base address of the BAR1 register. This value is then compared with the value 0x80 using a logical OR. The result is written to BAR0 space at offset 0xC0. To do this, you call the High-Level Register-Access function VISA Out 32, which writes a 32-bit value to the specified memory space at the specified offset. You use the decimal value 11 as an input to this VI to specify BAR0 as the address space to write to. As shown in the LabWindows/CVI example, the same operations are performed using the viGetAttribute and viOut32 functions in a text-based language. There are several High-Level Register-Access functions for writing data to registers/memory space in NI-VISA. Some of these functions are introduced below. For details about using high-level and low-level functions to access registers on a device, refer to Register-Based Communication.
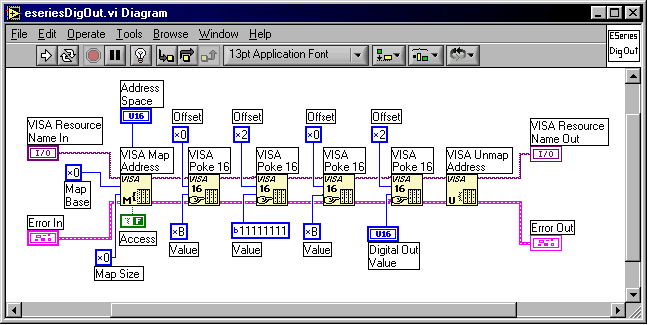
After you initialize and open a session to the PXI device, register peeks and pokes turn on a few of the digital lines on the device. The following figure shows a LabVIEW block diagram demonstrating how to use VISA to write data to the registers of a PXI device. This LabVIEW example turns on some of the digital lines on the PXI-6070E. Because the register values in the example are specific to the PXI-6070E, this example does not go into detail as to why the specific register accesses are used.
In this VI, the Low-Level Register-Access operation VISA Poke writes a 16-bit value to a register. When using low-level access operations, you must set up a hardware window using VISA Map Address or viMapAddress() to obtain a pointer to access the specified address space. You must specify the address space, the offset, and the window size within this space you would like to access. In the example, the address space is BAR1, the offset is 0, and the size is 0x1000. Refer to the LabWindows/CVI example for a text-based example of this function.

eseriesDigOut.vi
After the window is properly mapped, the Poke function can write the appropriate values to the desired registers. Notice in the figure above that the address space is set once using VISA Map Address, but is not set in any of the VISA Poke functions. This information is passed from VISA Map Address to VISA Poke 16. The text-based example is slightly different, because the pointer returned from viMapAddress() must be passed to each viPoke16 function. Notice the fourth call to VISA Poke 16 in the LabWindows/CVI example. Here the example specifies the value to be written to the eight digital lines of the PXI-6070E. The binary value provided to the variable Digital Out Value is written to these lines. The preceding example shows only a few of the Low-Level-Register-Access VISA functions. Refer to Register-Based Communication for more information about Low-Level Register-Access functions.