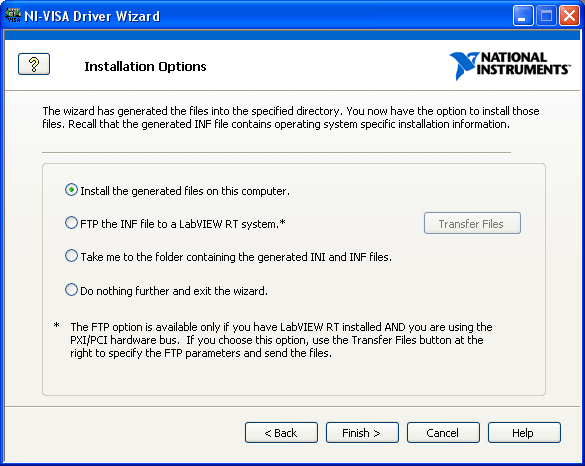
Installation Options
You now should have all required Windows Setup Information (.inf) files for each applicable Windows OS. Before a device is visible to NI-VISA, you must use the .inf files to update the Windows system registry.
The NI-VISA Driver Wizard can automatically install the .inf file for your device. To automatically install the required files, select Install the generated file(s) on this computer and click Finish.

Installation Options
The procedure for using a .inf file to update the registry is Windows version dependant. To manually install a .inf file on any machine, including the one on which it was generated, open the appropriate .inf files in a text editor such as Windows Notepad and follow the instructions on the first few lines at the top.
 |
Note Choosing the Install the generated file(s) on this computer option requires administrator/root privilege. On Vista, you will be prompted for credentials after choosing this option. On Linux, you must run the NI-VISA Driver Wizard as the root user for this to work properly. Otherwise, it will fail because you are not prompted for credentials at this point. |
 |
Note Only one driver should be associated with any particular PXI/PCI, USB, or FireWire device in your system. If you are following the PXI-6070E example, for Windows to recognize NI-VISA as the driver for your device, you must make sure that NI-DAQ is not installed on the system. You also must be sure that any registry information about the old driver is removed. |
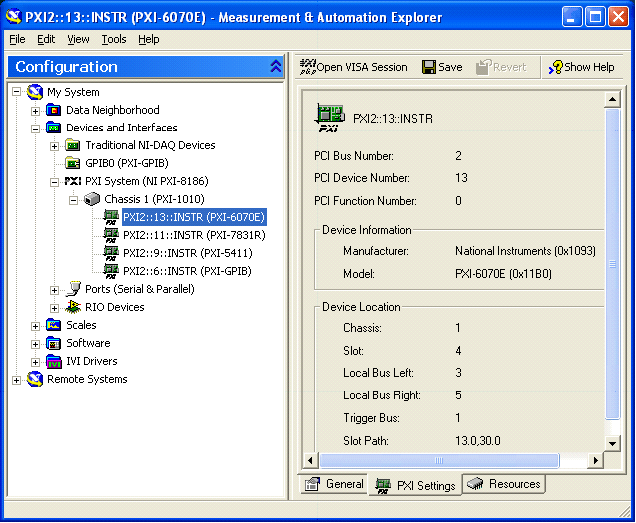
You can now install your hardware in the system. Depending on your OS, this process may be slightly different. Once the hardware and setup information is properly installed, you should see the device through Measurement & Automation Explorer (MAX). Open MAX and press <F5> to refresh. The following figure shows what is visible in MAX after you properly install the .inf file you created using the wizard under Windows XP for your PXI-6070E.

PXI-6070E as an NI-VISA Device in MAX
 |
Note If you have disabled the Passport for PXI devices in VISA, you must reenable the Passport for VISA to recognize PXI devices. |
In the figure above, notice that several attributes are specified to the right of the PXI device listing in MAX. The NI-VISA Driver Wizard set the attributes listed under Device Information in the .inf file.
Now that the PXI device is visible to VISA, it is considered a VISA PXI resource. A PXI resource is uniquely identified in the system by three characteristics:
- The PCI bus number where it is located
- The PCI device number it is assigned
- The device function number
For single-function devices, the function number is always 0 and is optional; for multifunction devices, the function number is device specific, but is in the range of 0–7. The device number is associated with the PXI or PCI slot number, but these numbers usually differ from one PC to another. The bus number of a device is consistent from one system boot to the next, unless bridge devices are inserted somewhere between the device and system CPU. The VISA resource descriptor you pass to the VISA function viOpen() or VISA Open in LabVIEW to access a PCI or PXI device is "PXI<bus>::<device>::<function>::INSTR". Based on the previous explanation, this can be difficult to determine until the device is installed and detected by NI-VISA in the system. As seen in the figure above, the PXI device in this example has the resource name PXI2::13::INSTR. This name indicates that the PXI device is on PXI bus 2, assigned PXI device number 13, and a single function device, because the function parameter is not explicitly listed.
You can determine the resource string programmatically by using the NI-VISA function viFindRsrc() or VISA Find Resource in LabVIEW. This function can determine the available NI-VISA resources in your system and return them to your program. Because these functions return all VISA resources in your system including GPIB and VXI devices, you may narrow down the VISA resources returned by these functions by supplying the viFindRsrc() or VISA Find Resource functions with a regular expression that directs it to recover only PXI resources. For example, you can use the regular expression "?*(PXI)?*" to tell the VISA driver to return only PXI device resources. You may even recover specific devices by supplying a regular expression that includes VISA attributes. For example, the regular expression "?*(PXI)?*{VI_ATTR_MANF_ID == 4243}" tells the VISA driver to return only PXI devices with a manufacturer ID of decimal value 4243. The National Instruments manufacturer ID is hexadecimal 1093, which equals decimal 4243.
Because developing the appropriate regular expression to return the specific devices you require can be very complicated, you can use VISA Interactive Control to develop the regular expression you need. The VISA Interactive Control is installed with VISA, and you can access it at Start»Programs»National Instruments»VISA. After opening the interactive control panel, left-click on the pull-down menu under the Resources to Find textbox and select Create Query. Here you check the resources or attributes you want to specify in your regular expression, and VISA Interactive Control creates the regular expression for you.