Create the .inf File Using the NI-VISA Driver Wizard
To use NI-VISA, you must first tell Windows to use NI-VISA as default driver for the device. In the Windows environment, you can do this with a .inf file. NI-VISA includes the NI-VISA Driver Wizard to create a .inf file for your USB device.
- To open the DDW, run the NI-VISA Driver Wizard, available via the Start menu under National Instruments»VISA. The following figure shows the open screen.
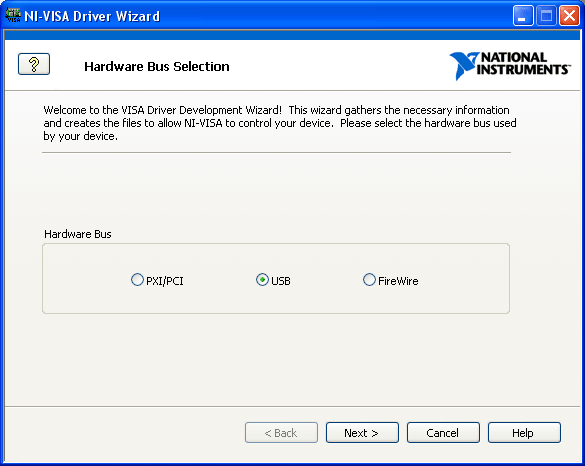
VISA DDW Hardware Bus Window
You can use this wizard to create a .inf file for a PXI/PCI, USB, or FireWire device. Because you are creating the driver for a USB device, click USB and Next. The VISA DDW Basic Device Information window opens as shown in the following figure.
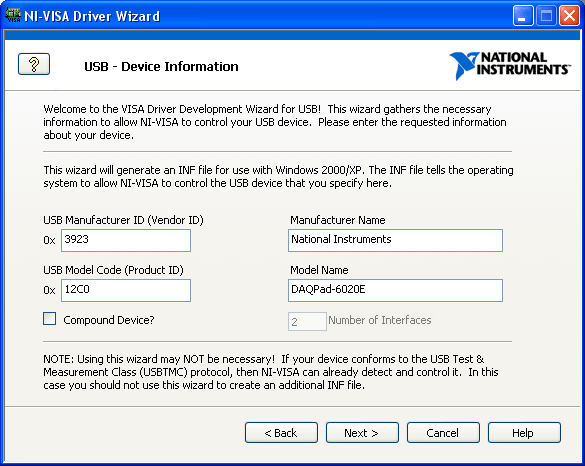
VISA DDW Basic Device Information Window
- For this step, you must know the USB vendor ID and product ID for your USB instrument. These numbers identify your USB device when you install it and address your device when you want to communicate with it. According to the USB specification, both numbers are 16-bit hexadecimal numbers, and the device manufacturer should provide them.
If you do not know the USB vendor ID and product ID, follow these steps to get them:
- Plug the device into the computer and allow the computer to recognize the new device. Cancel out of the Found New Hardware Wizard if it starts.
- Open the Device Manager from the Control Panel and find your device on the list, usually under Other Devices. It may show a yellow exclamation mark, indicating it is an unknown device.
- Double-click the device to open the properties.
- Select the Details tab and ensure that Device Instance Id shows in the attribute dropdown box. A string of characters is displayed similar to the following figure. The four characters to the right of VID_ and PID_ are your vendor ID and product ID, respectively.
- Write down the characters for your device, close the Device Manager, and unplug the device from the computer.
Alternately, you can contact your device vendor to obtain this information.
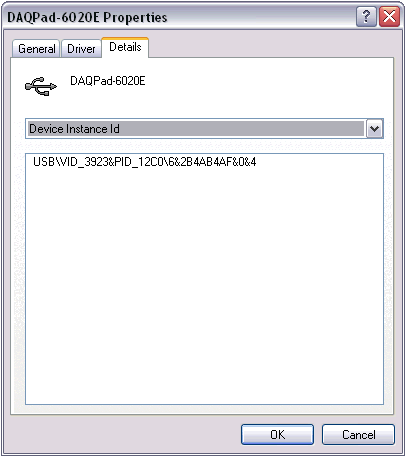
Finding the Vendor ID and Product ID from the Device Manager
For the DAQPad-6020E, the vendor ID and product ID are 0x3923 and 0x12C0, respectively. The vendor ID and product ID are different for your device if it is not a National Instruments DAQPad-6020E.
Enter the vendor ID, product ID, manufacturer name, and model name for your device in their respective fields.
Click Next. The Output Files Generation window is displayed as shown in the following figure.
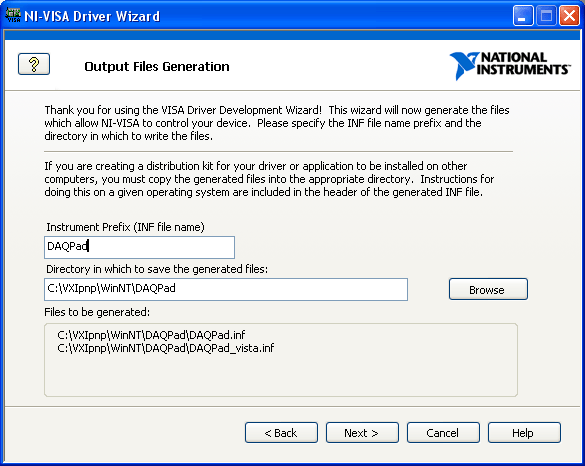
VISA DDW Output Files Generation Window
- The USB Instrument Prefix is a descriptor for identifying the files used for this device. Enter a USB instrument prefix, select the desired directory in which to place these files, and click Next. The next window displays installation options. The default selection is to install the setup information for the operating system and is usually the best option. Once you select an option, click Finish to exit the wizard. The .inf file is created in the directory you specified in the output file directory field in the previous window.
 |
Note There are two .inf files. Choosing the Install the generated file(s) on this computer option in the next topic installs the correct file based on the OS. However, if you are installing the file manually, be sure to choose the correct file. For more information, refer to Using LabWindows/CVI to Install Your Device .inf Files. |
Proceed to the next step, Installation Options.