File Outgoing Emails
| File Outgoing emails |
|
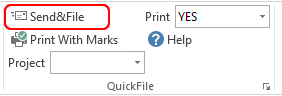
Filing outgoing emails is as easy as filing your incoming emails. When you have finished writing your email, Click 'Send&File' button on the QuickFile ribbon:
The following Send&File screen will be shown:
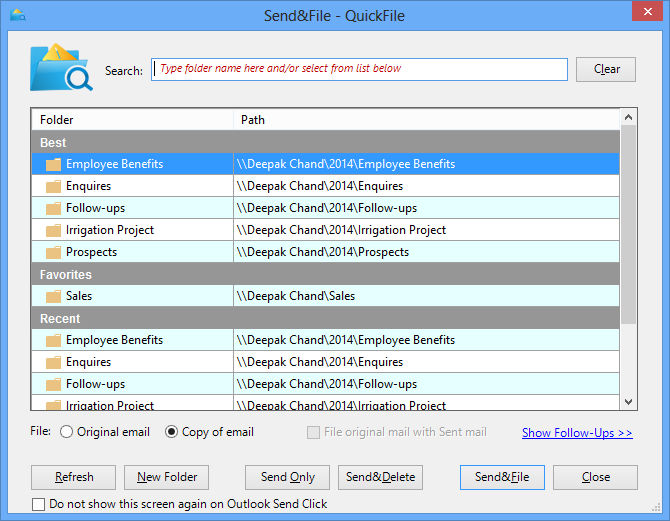
QuickFile displays suggestions where you might file your emails. If the folder is not in the suggestions, you can search for the folder by typing in part of the folder name in the search box or select the folder from the list. The following table describes the actions/options available on the above screen:
| Options | Description |
| Right-click folder list options | You can perform the following actions on the selected
folder: - Add the folder to QuickFile Favorites list - Remove the folder from the QuickFile Favorites list (Note: the folder will not be deleted from your Outlook) - Go to the selected folder - Open the selected folder in a new window - Rename the selected folder - Move the selected folder - Create a new folder under the selected folder |
| File: Original email or Copy of email | File to move the sent email or to file a copy of the sent email |
| File original mail with sent mail | If you were responding to an email (i.e. you did a Reply/Reply-All/Forward), also file the original email on which you just responded to, together with the sent email. |
| Refresh | Re-load the folders list in QuickFile again (if you do not find your folder in the list) |
| New Folder | Create a new folder under the selected folder |
| Send Only | The email will not be filed when sending. However, if any settings under 'Advanced Options' is set then it will be applied. |
| Send&Delete | The email will be deleted after sending. If any settings under 'Advanced Options' is set then it will be applied. |
| Send&File | Send and file the email along with any settings applied under 'Advanced Options'. |
| Close | Exit QuickFile screen without doing anything |
For advanced users, you can click on the 'Advanced Options' link to view more options.
* eeminders (Follow Up): If you want to work on or follow up on this sent email( email that you are currently sending) at a later time, setup an eeminder on it. The sent email will appear on top of your Inbox at the specified time. Under Advanced Options' on the Send&File screen, click on the 'eeminders (Follow Up)' tab:
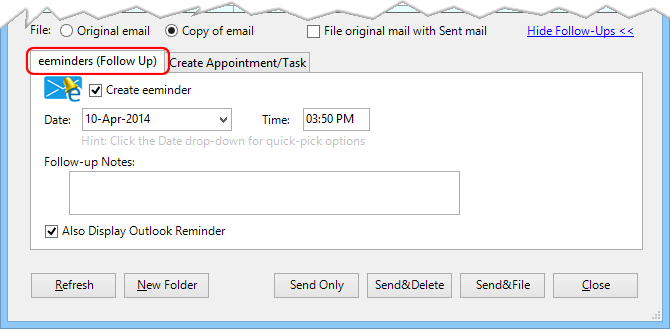
| Options | Description |
| Date & Time | Date and time when the email will appear in your Inbox |
| Follow-up Notes | A short note that you may add to your eeminder. This note will appear at the top of your email. |
| Also Display Outlook Reminder | An Outlook reminder will be display when the email returns back to your Inbox |
* Create Appointments/Task: You can do Send&Appointment and Send&Task while sending your email. Under Advanced Options' on the Send&File screen, click on the 'Create Appointment/Task' tab:
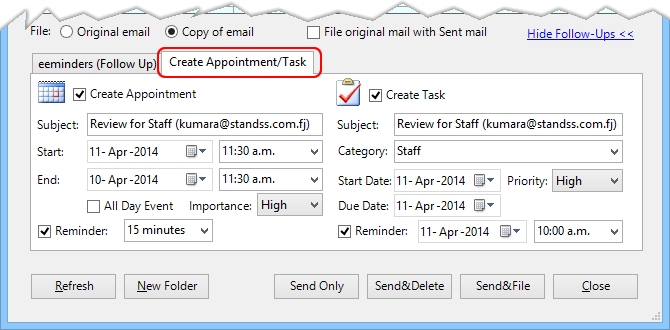
| Options | Description |
| Create Appointment | |
| Subject | Subject of Appointment |
| Start Date & Time | Start date and time of the Appointment |
| End Date & Time | End date and time of the Appointment |
| Importance | Importance of the Appointment |
| Reminder | Set up a reminder for the Appointment |
| Create Task | |
| Subject | Subject of the Task |
| Category | Assign a category to the Task |
| Start Date | Start date of the Task |
| End Date | End date of the Task |
| Priority | Priority of the Task |
| Reminder | Setup a reminder for the Task |
* This feature is available in QuickFile PRO and Ultimate version only.
|
Copyright © 2014 Standss (South Pacific) Limited.
All rights reserved. |
Didn't find what you were looking for or having suggestions? |