Move SharePoint to New Hardware for TFS
From Visual Studio Team Foundation Server 2012 v4
 How to set up a new SharePoint site
New for this version of TFS, you can install SharePoint Foundation using the TFS extensions for SharePoint wizard. The TFS wizard will install a fresh copy of SharePoint using the installation of SQL Server you just set up, and then configure the TFS extensions for the new installation of TFS. After you install SharePoint, you'll detach its content database to prepare for the migration of the data from your previous SharePoint installation in step 4, Back up and Restore Data.
Required Permissions
To perform these procedures, you must be a member of the Administrators security group on Windows Server and a member of the Farm Administrators group in Windows SharePoint Services 3.0.
Install SharePoint and the TFS extensions
Run the TFS installation program from the product DVD and then use the Configure Extensions for SharePoint Products wizard.
To run the Team Foundation Server installer
Insert the Team Foundation Server DVD in the drive and launch the tfs_server.exe file to begin the installation.
On the license terms dialog box, accept the license terms and then choose Install Now.
If you want to install Team Foundation Server to a specific location in the file system, choose the browse button (...) next to the default install location.
To install SharePoint
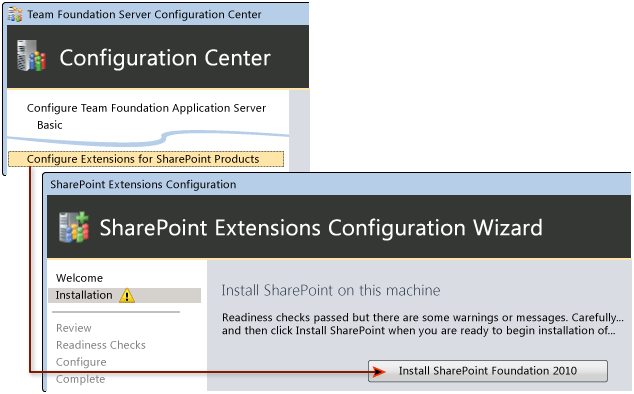
In the Team Foundation Server Configuration tool, choose Configure Extensions for SharePoint Products and then choose Start Wizard.
The Team Foundation Server SharePoint Extensions Configuration wizard appears.
Read the Welcome screen, and choose Next.
Take these steps to install SharePoint:
Choose the big Install SharePoint Foundation 2010 button. Once the install completes, choose Next.
Type the name of the SQL Server or named instance that will host the configuration databases for SharePoint Foundation 2010 and choose Next.
Type a user account and password for the service account forSharePoint Foundation 2010 (WSSSERVICE) and then choose Next.
For more information, see Accounts Required for Installation of Team Foundation Server
On the Review page, review the settings and choose Next.
The wizard validates your configuration.
Choose Configure.
The wizard applies configuration settings. This process might take several minutes.
Choose Next.
Choose Close.
Choose Close.
The Team Foundation Server Administration Console appears.
Add the TFS service account to the Farm Administrator group
If you're using the same SharePoint site from your previous deployment, you may already have the TFS service account in the Farm Administrators group. If so, you can skip this step. Otherwise, you should follow the steps below to ensure the service account that you will use for TFS is added to the Farm Administrators group on SharePoint.
How do you know if this step is necessary? Here are two potential scenarios that would requrie you to perform this step.
If you're planning to change the account you're using for the TFS service account during TFS upgrade, you should add the new account to the Farm Administrators group.
If you are using Network Service and you're planning to migrate the TFS application tier to new hardware, you should add the name of the new hardware followed by a $ symbol (Domain\ServerName$) to the Farm Administrators group.
To add the service account to the Farm Administrators group
In a web browser, open the SharePoint 2010 Central Administration site.
Under Security, choose Manage the farm administrators group.
Choose New.
In the Users/Groups box, enter the name of the service account for Team Foundation Server.
If you're using Network Service, add the server name followed by a $ symbol. For example, domain\servername$.
Choose OK.
Detach the SharePoint content database
When you installed SharePoint, a brand new content database was created for SharePoint. You need to detach this database to prepare for the migration of data from your previous SharePoint installation in step 4, Back up and Restore Data.
To detach the content database
In a web browser, open the SharePoint 2010 Central Administration site.
Under Application Management, choose Manage Content Databases.
Choose WSS_Content.
 Note
NoteWSS_Content is the default name. Your installation might use a custom name for this database.
The Manage Content Database Settings page opens.
Select the Remove content database check box, and then choose OK.
NoteThis step detaches the database but does not delete any content.
In the warning dialog box that appears, choose OK.
In Manage Content Database Settings, choose OK to confirm your changes.
Next Step: Back up and restore data
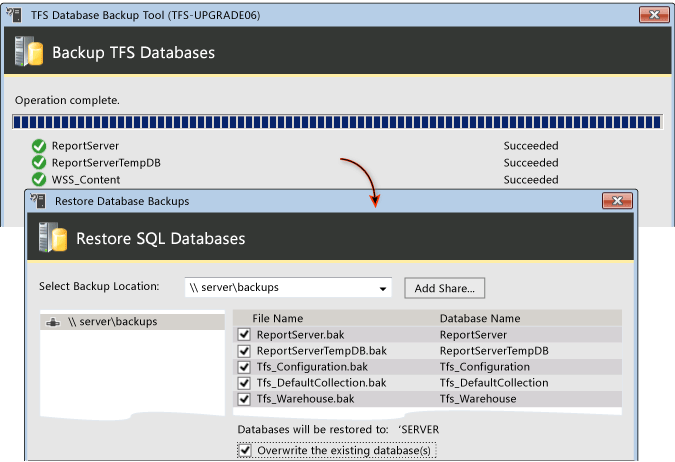
New for this version of TFS, you can use custom backup and restore tools to manage your data. First you're going to back up your data, including the encryption key on the report server. Next, you're going to restore your data to the SQL Server instance you set up in step 2. With the restore complete, you'll use the SQL Server Reporting tool to restart the database, restore the encryption key, and then verify access to the report server. If you installed SharePoint, you'll use a SharePoint command line tool to attach and upgrade your content database
For more information, see Back up and Restore Data for TFS