Back up and Restore Data for TFS
From Visual Studio Team Foundation Server 2012 v4
 How to back up and restore TFS data to new hardware
If you haven't installed TFS on the new hardware yet, you'll want to do that now. New for this version of TFS, you can use custom backup and restore tools to manage your data.
First you're going to back up your data, including the encryption key on the report server that you used with the previous version of TFS. Next, you're going to restore your data to the SQL Server instance you set up in step 2. With the restore complete, you'll use the SQL Server Reporting tool to restart the report server database, restore its encryption key, and then verify access to the report server. If you installed SharePoint, you'll use a SharePoint command line tool to attach and upgrade your content database.
Required Permissions
To perform this procedure, you must be a member of the Administrators security group on Windows server of the new hardware and the old.
If you plan to configure reporting, you must also be a member of the Administrators security group on the server that is running SQL Server Reporting Services. If you plan to configure SharePoint Products, you must be a member of the Farm Administrators group on the SharePoint Products administration site. If you did not install the Database Engine that will host the configuration database or a database administrator manages the instance of SQL Server that you are using, you must be a member of sysadmin Server role in SQL Server.
Back up your data
If you haven't installed TFS on the new hardware yet, you'll want to do that now to access the custom backup and restore tools. You're going to back up all of your TFS data, including the encryption key for the report server.
Migrating from Windows SharePoint Services 3.0? Your SharePoint site must be running at service pack 2 or higher to migrate the content database to SharePoint Foundation on the new hardware. If you're not at service pack 2 or higher, you should update SharePoint before you back up your data. |
To run the Team Foundation Server installer
Insert the Team Foundation Server DVD in the drive and launch the tfs_server.exe file to begin the installation.
On the license terms dialog box, accept the license terms and then choose Install Now.
If you want to install Team Foundation Server to a specific location in the file system, choose the browse button (...) next to the default install location.
To back up the encryption key for reporting services
Launch Reporting Services Configuration Manager.
For example, on Windows Server 2008 R2, you would choose Start, All Programs, Microsoft SQL Server, Configuration Tools, and then choose Reporting Services Configuration Manager.
The Reporting Services Configuration Connection dialog box opens.
Specify the name of the report server you used with the previous version of TFS and then choose Connect.
In the navigation bar on the left side, choose Encryption Keys, and then choose Backup.
The Encryption Key Information dialog box opens.
In File Location, specify the location where you want to store a copy of this key.
Consider storing this key on the new hardware, so that it's easily accessible when you restore the Reporting Services databases.
In Password, specify a password for the file.
Don't forget the password! You'll need it later on to restore the Reporting Services databases.
In Confirm Password, specify the password for the file again.
Choose OK.
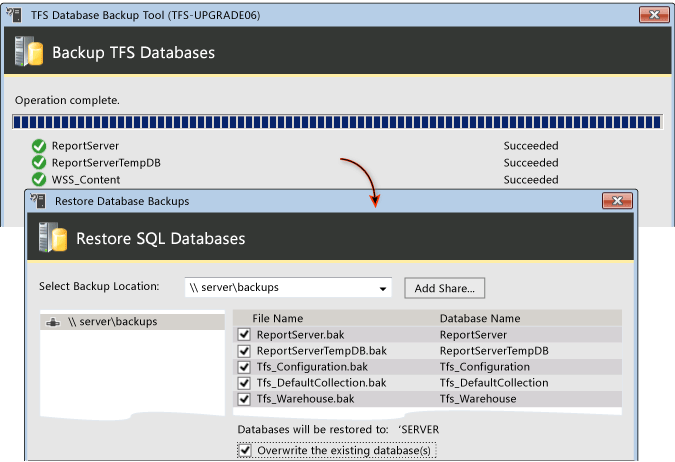
To back up your databases
Launch TFSBackup.exe.
The TFSBackup.exe tool is in the Tools folder where you installed Team Foundation Server. The default location is C:\Program Files\Microsoft Team Foundation Server 11.0\Tools.
In Source SQL Server Instance, enter the name of the SQL Server instance that hosts the TFS databases you want to back up and choose Connect.
In Select databases to backup, choose the databases to back up.
Need help? List of TFS 2010 databases on MSDN; List of TFS 2008 databases on MSDN.
In Backup Databases to, enter the name of a network share that is configured with read/write access for Everyone, or accept the default location in the file system of the SQL Server you connected to in step 2.
 Note
NoteIf you want to overwrite backups stored in this network location, you can choose Overwrite existing database backups at this location.
Choose Backup Now.
The Backup tool reports progress on each database being backed up.
Choose Close.
Restore your data
To restore your TFS data
Launch TFSRestore.exe.
The TFSRestore.exe tool is in the Tools folder where you installed Team Foundation Server. The default location is C:\Program Files\Microsoft Team Foundation Server 11.0\Tools.
In Target SQL Server Instance, enter the SQL Server instance you will use as the data tier and choose Connect.
Choose Add Share and enter the UNC path to the network share that is configured with read/write access to Everyone where you stored the backups of your TFS data. For example, \\servername\sharename\.
If the backup files are located on the file system of the server that is running TFSRestore.exe, you can use the drop down box to select a local drive.
NoteThe service account for the instance of SQL Server you identified at the start of this procedure have read access to this share.
In the left hand navigation pane, choose the network share or local disk you identified in the previous step.
The TFS Restore Tool displays the database backups stored on the file share.
Select the check boxes for the databases you want to restore to the SQL Server you identified at the start of this procedure.
 Important
For SharePoint, you must only restore the WSS_Content database. Do not restore the WSS_AdminContent or WSS_Config databases. You want the new SharePoint Foundation versions of these databases, not the ones from the previous version of SharePoint or from a SharePoint installation running on any other server.
Choose Overwrite the existing database(s) and then choose Restore.
The Database Restore Tool restores your data and displays progress reports.
Choose Close.
Fix up the report server
To restart the Reporting Services database and restore its encryption key
Launch the Report Server Configuration tool and restore the original reporting database and its encryption key to your new instance of SQL Server Reporting Services.
For SQL Server 2008 R2, choose Start, All Programs, Microsoft SQL Server R2, Configuration Tools, and then Reporting Services Configuration Manager.
In Reporting Services Configuration Connection, specify the name of the server where you installed Reporting Services for TFS 2012 and choose Connect.
On the Database page, choose Change Database.
The Report Server Database Configuration Wizard appears.
On the Action page, choose Choose an existing report server database and then choose Next.
In Server Name, type the name of the SQL server you used in the TFS Database Restore Tool to restore your report server databases and choose Next.
Choose Test Connection to test the connection.
Choose the report server database you restored with the TFS Database Restore Tool and then choose Next.
If you haven't changed the name, the default database name is ReportServer.
On the Credentials page, choose Next.
On the Summary page, review the information and then choose Next.
The wizard configures the database and displays progress reports.
On Encryption Keys page, choose Restore.
The Restore Encryption Key window opens.
In File Location, specify the location of the backup file for the encryption key. In Password, specify the password you used when you backed up the encryption key, and then choose OK.
The status of the restoration appears in Results.
On the Scale-out Deployment page, choose the previous report server from the scale-out deployment status page and choose Remove Server.
On the Report Manager URL page, use the hyperlink in URL to launch the Report Manager site.
The report manager site appears. Your report server has been restored.
Choose Exit to close Reporting Services Configuration Manager.
Fix up SharePoint server
To run the STSADM command line tool for SharePoint
Open a Command Prompt as an administrator on the new hardware that is running SharePoint Foundation.
Change directories to this location:
Drive:\Program Files\Common Files\Microsoft Shared\Web Server Extensions\14\bin\
Where Drive is the drive letter.
In the command prompt, type the following command:
stsadm.exe -o addcontentdb -url http://WSSServerName/sites -databasename contentdatabase -databaseserver SQLServerName
Where:
WSSServerName is the name of the SharePoint server;
contentdatabase is the name of the content database;
SQLServerName is the name of the SQL Server that hosts the content database.
In the command prompt, type the following command:
stsadm.exe -o addpermissionpolicy -url http://WSSServerName -userlogin Domain\UserName -permissionlevel "full control"
Where:
WSSServerName is the name of the SharePoint server;
Domain\UserName is the user name and domain of the account used to run the TFS SharePoint configuration wizard and install SharePoint.
Next Step: Run the TFS Upgrade Wizard
Run the Team Foundation Server install from the product DVD and then use the Upgrade Configuration wizard to upgrade your installation.
For more information, see: Run the TFS Upgrade Wizard
