Add
From VIA RAID
Add/Remove Spare Disk
Spare disk is the auto-selected replacement disk when repairing a broken Mirror (RAID 1) array. Only Mirror array can have a Spare disk. A Spare disk can be added when Creating a Mirror array, it can also be added or removed after a Mirror array is created.
To add/remove a Spare disk to/from an
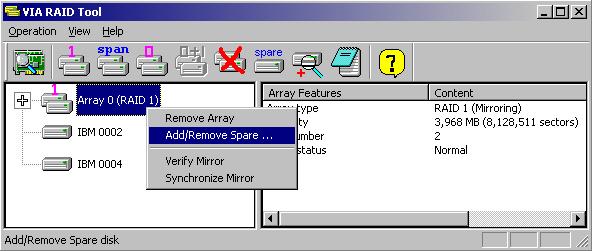
existing Mirror array, select the Mirror array's root node in Array View
mode, click
toolbar button  or menu item
Operation => Add/Remove Spare . You can also right click the
Mirror array node and click Add/Remove Spare on the shortcut menu, refer
to following:
or menu item
Operation => Add/Remove Spare . You can also right click the
Mirror array node and click Add/Remove Spare on the shortcut menu, refer
to following:
If the Mirror array has no Spare disk yet, an Add Spare Disk dialog will then appear:
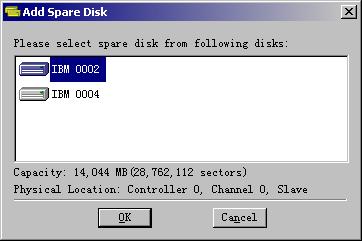
All qualified free disks attached on the RAID controller will be listed in this dialog. (Note: In order to be a qualified Spare disk, a free disk's data capacity must be larger than or equal to the smaller capacity of the Source and Mirror disk in the current Mirror array. Application will pick out all qualified free disks automatically). Click OK button to add selected free disk into current Mirror array as Spare disk. Message boxes will then pop up to ask for confirmation and prompt system reboot. System must be rebooted to enable the newly added Spare disk.
If the Mirror Array already has a Spare disk, the result of executing Add/Remove Spare command will have the Spare disk removed from the Mirror array. Message boxes will pop up to ask for removal confirmation and prompt system reboot. System must be rebooted to enable the newly removed Spare disk.
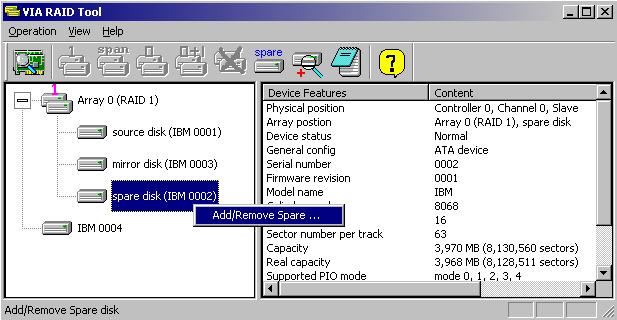
To remove a Spare disk, you can also right click the Spare disk in Array View, then click Add/Remove Spare on the shortcut menu, as following picture shows: