Functions Overview
From VIA RAID
Functions Overview
Create Disk Array:
You can click on toolbar button, menu item or press corresponding shortcut key to create a type of RAID disk array. When free disks (disks not in any disk array) are selected to create a disk array, original data on these disks maybe lost, so be sure these data will never be needed or conduct necessary back-ups. Click following links to get the details for creating specific type of disk array:
note: You can only use disks attached on the same RAID controller to create a disk array. If there are more than one RAID controllers on current system, this VIA RAID Tool will firstly prompt you to select a host RAID controller before creating any new disk array.
Remove Disk Array:
To
remove a disk array, shift the left pane of main application window to Array View,
select the upper-most level tree node of the to be removed disk array and click
toolbar button  or menu item Operation => Remove Array . You can also remove a
disk array by right click the upper-most level array node and click Remove
Array on the pop-up shortcut menu.
or menu item Operation => Remove Array . You can also remove a
disk array by right click the upper-most level array node and click Remove
Array on the pop-up shortcut menu.
For more details, please refer to Remove Disk Array.
Add/Remove Spare Disk:
This function is specified for RAID1(Mirroring) disk array. A Spare disk is a special array disk that will be used to replace the Source or Mirror disk when one of them meets disk failure.
To Add a Spare disk
to or Remove Spare from a RAID1 disk array , shift the left pane of main application window to Array
View ,select the upper-most level tree node of the RAID 1
array and click the toolbar button  or menu item Operation => Add/Remove Spare . You can also call
the function by right click the array node and click Add/Remove Spare on the pop-up shortcut menu.
or menu item Operation => Add/Remove Spare . You can also call
the function by right click the array node and click Add/Remove Spare on the pop-up shortcut menu.
For more details, please refer to Add/Remove Spare Disk .
Verify Mirror Disk:
Synchronize Mirror Disk:
Mark Mirror Disk as Synchronized:
The three functions mentioned above are specific to RAID1(Mirroring) and RAID0+1 disk arrays. To initiate these functions, please right click the mirror disk to be operated in the Array View:
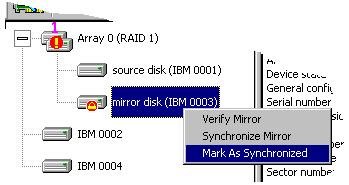
Verify Mirror Disk check if within the same disk array, the data on the mirror disk is identical(synchronized) with the data on the corresponding source disk.
Synchronize Mirror Disk forces data on the mirror disk to be identical with the source disk by copying the data from the one with newer data to the other disk. Note that the source disk does not always have the latest data.
Mark Mirror Disk as Synchronized allows system to deal with a source and mirror disk pair as if they are synchronized, despite the fact that data on the source and mirror disk may not be totally identical. This function is useful when user knows all useful data on the source and mirror disk are identical although some unused data blocks on them are different.
For more details, please refer to Verify Mirror Disk , Synchronize Mirror Disk and Mark Mirror disk as Synchronized .
Repair Broken Disk Array:
If some disk(s) in a
disk array can not work any more (due to disk failure or disk absence), the disk
array will be in broken status. At this time, the array's icon in the Array View
will looks like  . To repair the broken disk array, right click the array icon and click Repair Broken Array
on the pop-up shortcut menu.
. To repair the broken disk array, right click the array icon and click Repair Broken Array
on the pop-up shortcut menu.
Note that the Spare disk in a RAID1 array is only a replacement disk in case of a Source or Mirror disk failure. So the failure or absence of a Spare disk does not affect the RAID1 array.
For more details, please refer to Repair Broken Array.
Check All Disks:
You can check if all hard disks work normally by executing the Check All Disks command.
To execute the
command, please click
toolbar button  or menu item Operation =>
Check All Disks. For more details, please refer to Check
All Disks .
or menu item Operation =>
Check All Disks. For more details, please refer to Check
All Disks .
View Event Log:
Main application events such as Create Disk Array, Remove Disk Array... etc., will be recorded in a log file.
To
view the log, please click
toolbar button  or menu item Operation =>
View Event Log, and user can double click any log item to view further details.
or menu item Operation =>
View Event Log, and user can double click any log item to view further details.
For more details, please refer to View Event Log.