As your business changes, you might want to split a single team project collection into multiple team project collections. For example:
You want the projects in a collection to align with business units in your organization, and the projects in the collection are now owned by separate units.
You upgraded from an earlier version of TFS, you have only one collection, and you want to organize your projects into separate collections for security or business alignment reasons.
You want to change ownership of some of the projects in the collection to a remote office that has its own deployment of TFS. This scenario requires that you first split a collection and then move one of the resulting collections to the remote office deployment.
 Note
NoteThe procedures in this topic support only splitting a team project collection. If you want to move a collection after you split it, see Move a team project collection.
In this topic
To split a team project collection, follow these steps:
Prepare to split the collection:
Split the collection:
Configure the split collections:
Q: My deployment uses reporting. Are there any additional steps I need to take when splitting collections?
Q: Can I split a collection that uses SharePoint Products to support one or more team projects in the collection?
Q: Are there any special considerations or actions to take if I split a team project collection that has projects integrated with Project Server?
Q: How do I split a collection configured for Lab Management?
Before you begin
Make sure that you're an administrator on the servers and in SQL Server and TFS. If you're not an administrator, get added as one.
 1-a. Detach the collection
First detach the collection from the deployment of TFS on which it is running. Detaching a collection stops all jobs and services as well as the collection database itself. In addition, the detach process copies over the collection-specific data from the configuration database and saves it as part of the team project collection database.
To detach a team project collection
Open the administration console for Team Foundation on the server that hosts the collection that you want to split.
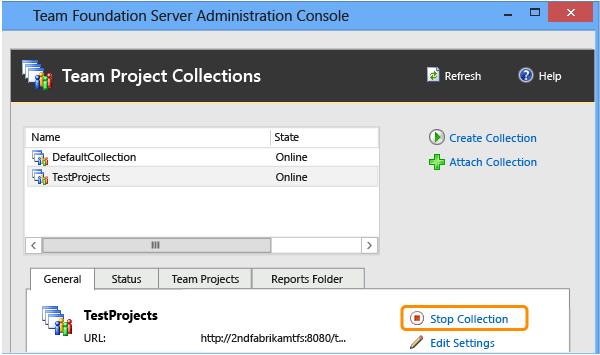
Choose Team Project Collections, and in the list of collections, choose the collection that you want to split.
In this example, the administrator chooses "TestProjects."
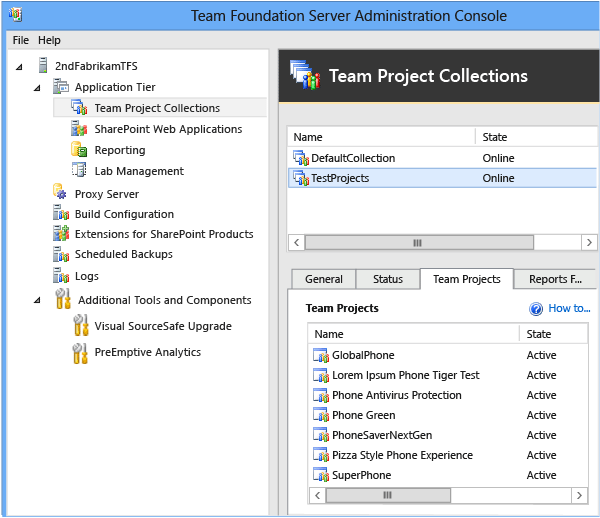 Tip
TipThe default name for a team project collection is "DefaultCollection." If you are splitting this database, make sure to give the second collection a distinctly different name, because this is the default choice at connection.
On the General tab, choose Stop Collection.
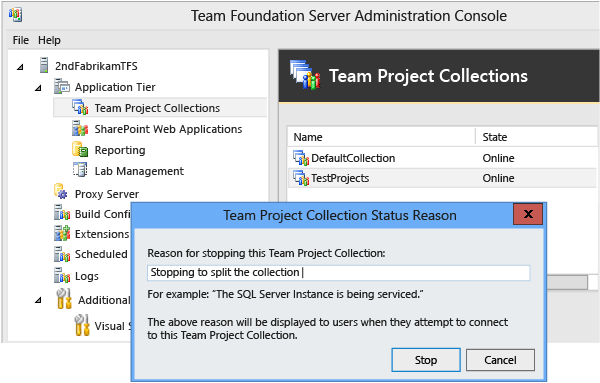
The Team Project Collection Status Reason dialog box opens. The text you enter will be displayed to your users. Choose Stop, and wait for the collection to stop. When it is stopped, its status will show as Offline.
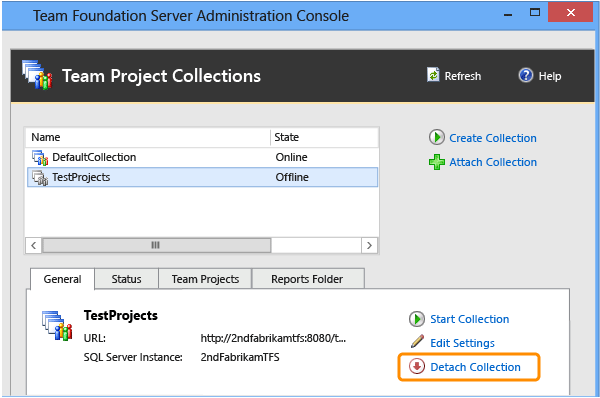
On the General tab, choose Detach Collection.
The Detach Team Project Collection Wizard opens.
(Optional) On the Provide a servicing message for the team project collection page, in Servicing Message, provide a message for users who might try to connect to projects in this collection.
On the Review settings that will be used to detach team project collection page, review the details. If you want to changes any settings, choose Previous. If they appear to be correct, choose Verify.
When all the readiness checks have completed successfully, choose Detach.
On the Monitor the team project collection detach progress page, when all processes have completed, choose Next.
(Optional) On the Review supplemental information for this team project collection page, choose or note the location of the log file, and then close the wizard.
The team project collection no longer appears in the list of collections in the administration console.
1-b. Back up the collection database
After you have detached the collection, you must back up its database before you can restore a copy to the server with a different name. That copy will become the database for the part of the original collection that you want to split into another collection. To perform this task, you must use the tools that are provided with SQL Server.
To back up a collection database
For information about how to manually back up and restore individual databases, see the following pages on the Microsoft Web site, and make sure to choose the version of SQL Server that matches your deployment:
 Important Important |
|---|
If your original deployment used the Enterprise or Datacenter editions of SQL Server, and you want to restore the database that you want to split to a server running Standard edition, you must use a backup set that was made with SQL Server compression disabled. Unless you disable data compression, you will not be able to successfully restore Enterprise or Datacenter edition databases to a server running Standard edition. To turn off compression, follow the steps in the Microsoft Knowledge Base article. |
2-a. Restore the collection database
When you split a collection, you must restore the backup of the collection database to an instance of SQL Server that is configured to support the deployment of TFS. When you restore the database, you must give it a different name from the name of the original collection database.
| Tip |
|---|
The steps below give a general overview of how to restore a team project collection database in SQL Server 2012 using SQL Server Management Studio. For more information about how to manually back up and restore individual databases, see the following page on the Microsoft Web site, and make sure to choose the version of SQL Server that matches your deployment: |
To restore the collection database with a new name
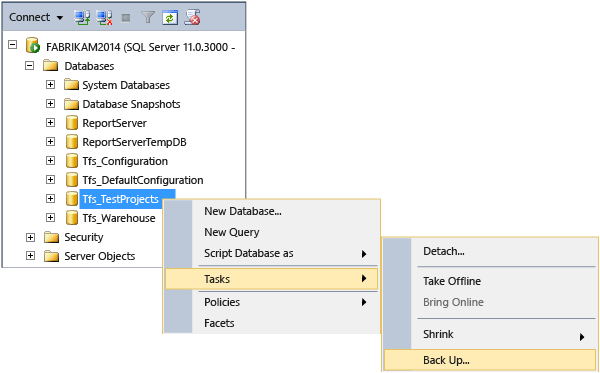
Open SQL Server Management Studio and connect to the instance that hosts the database for the team project collection that you want to split.
In Object Explorer, expand Databases, open the sub-menu for the database you want to split, and then choose Tasks, choose Restore, and then choose Database.
The Restore Database window opens on the General page.
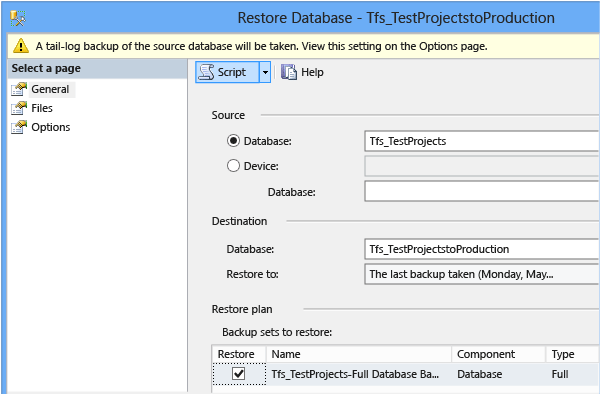
In Source, make sure that the team project collection database is chosen. In Destination, provide a name for the copy of the database. Keep the Tfs_ prefix, but give it a distinct name after that prefix. Ideally that name will be the name of the split team project collection. In Restore plan, make sure that the backup sets to restore are the ones you want to restore to. To make sure that these are valid sets, choose Verify Backup Media and then, in Select a page, choose Options.
In Restore options, leave all the check boxes blank. Make sure that Recovery state is set to RESTORE WITH RECOVERY. In Tail-Log Backup, clear the Leave source database in the restoring state check box, and then choose OK.
TipIf the restore operation fails with an error message indicating that the database is in use and cannot be overwritten, you might need to manually configure all the logical file names to reflect the new name for the database. In Select a page, choose Files, choose the ellipsis button next to each file being restored, and make sure that the names of the files reflect the new name for the database, not the old one. Then try the restore operation again.
2-b. Attach the original collection database
After you have restored the database with a different name, you must reattach the original collection database to the deployment of TFS.
| Note |
|---|
If your deployment uses SharePoint Products and the service account for TFS is not a member of the Farm Administrators group, warnings will appear when you attach the collection. This behavior is expected. |
To attach the collection
Open the administration console for Team Foundation.
Choose Team Project Collections, and then choose Attach Collection.
The Attach Team Project Collection Wizard opens.
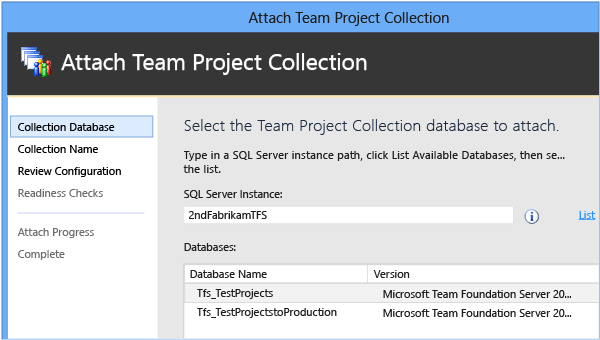
On the Select the team project collection database to attach page, in SQL Server Instance, provide the name of the server and the instance that hosts the collection database, if it is not already listed.
In the Databases list, choose the collection database that you want to attach.
On the Enter the team project collection information page, provide a name for the collection in Name if one is not already present. Since this is the original collection, you can choose to leave the name the same as it was before. In Description, optionally provide a description of the collection.
On the Review settings that will be used to attach the team project collection page, review the information.
If you must change any settings, choose Previous. If all the settings are correct, choose Verify.
When all the readiness checks have completed successfully, choose Attach.
On the Monitor the team project collection attach progress page, when all processes have completed, choose Next.
(Optional) On the Review supplemental information for this team project collection page, choose or note the location of the log file, and close the wizard.
The team project collection appears in the list of collections in the administration console. If the collection state is listed as Online, you must stop it before continuing. Choose the collection from the list, and on the General tab, choose Stop Collection.
2-c. Attach the renamed collection database
After you attach the original collection database, you must attach the renamed collection to the deployment of TFS. When this collection is attached, it will remain stopped. You will not be able to start it until all duplicate projects have been removed.
| Note |
|---|
Warnings will appear when you attach the collection if your deployment uses SharePoint Products and the service account for TFS is not a member of the Farm Administrators group. This behavior is expected. |
To attach the renamed collection database
Open the administration console for Team Foundation.
Choose Team Project Collections, and then choose Attach Collection to open the wizard.
On the Select the team project collection database to attach page, in SQL Server Instance, provide the name of the server and the instance that hosts the renamed collection database, if it is not already listed.
In the Databases list, choose the renamed collection database.
On the Enter the team project collection information page, type a name for the renamed collection in Name that differs from the name of the original name of the collection. Ideally, this should match the name you gave the renamed database without the Tfs_ prefix.
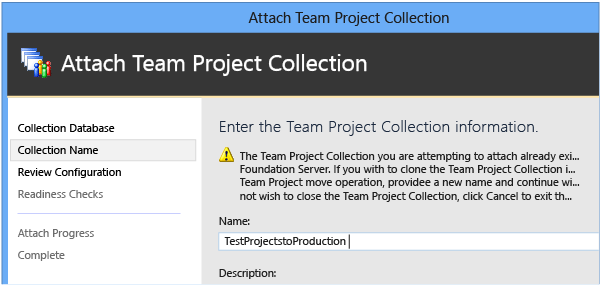
(Optional)In Description, type a description of the collection.
On the Review settings that will be used to attach the team project collection page, review the information. If you must change any settings, choose Previous. If all the settings are correct, choose Verify.
When all the readiness checks have completed successfully, choose Attach.
On the Monitor the team project collection attach progress page, when all processes have completed, choose Next.
NoteIf the collection is supported by a SharePoint Web application, a warning icon will appear for the attach status of the SharePoint Web application. Similarly, if the original collection included reporting, a warning icon will appear for the attach status for reports. This behavior is expected, and you can ignore it.
(Optional) On the Review supplemental information for this team project collection page, choose or note the location of the log file, and then close the wizard.
The name of the collection appears in the list of collections in the administration console, and its status should display as Offline.
To ensure that both collections have attached with unique IDs, in the administration console, go to Event Logs and open the log files for both collection attach operations. The GUIDs for CollectionProperties should not match.
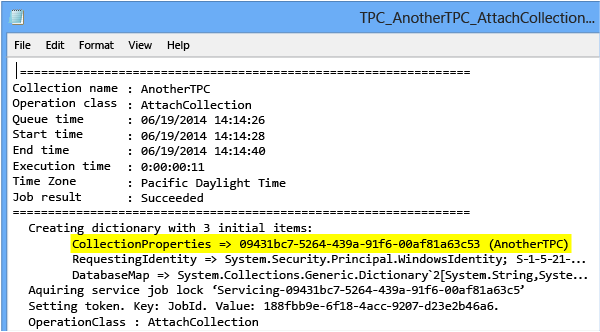
In the unlikely event that the CollectionProperties GUIDs do match, you must change the ID to a unique ID before continuing by running the TFSConfig
2-d. Delete projects on the split collections
Now that you have two copies of the collection attached to TFS, you must delete each project from either the original collection or the renamed collection so that no project remains in both collections.
| Important |
|---|
A project cannot exist in more than one collection. Until you delete all duplicated projects between the split collections, you will not be able to start the renamed collection. |
To delete projects from the collections
Open the administration console for Team Foundation.
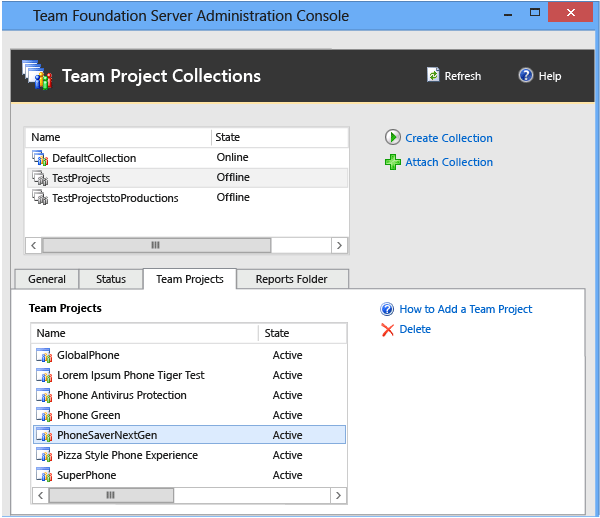
Choose Team Project Collections, and in the list of collections, choose the original team project collection that you stopped in order to split it.
On the Team Projects tab, in the list of team projects, choose a project that you want to delete from the collection, and then choose Delete.
TipYou can select more than one project to delete at a time.
Select the Delete workspace data check box, leave the Delete external artifacts check box cleared, and then choose Delete.
If the Delete external artifacts check box is not cleared and your team project is configured to use Lab Management, the virtual machines and templates that are associated with the project will be deleted from System Center Virtual Machine Manager. They will no longer be available to the team project in the renamed collection.
When you have finished deleting the projects you do not want hosted in the original team project collection, choose the renamed team project collection from the list of collections. Then, on the Team Projects tab, delete the projects you do not want hosted on the new collection.
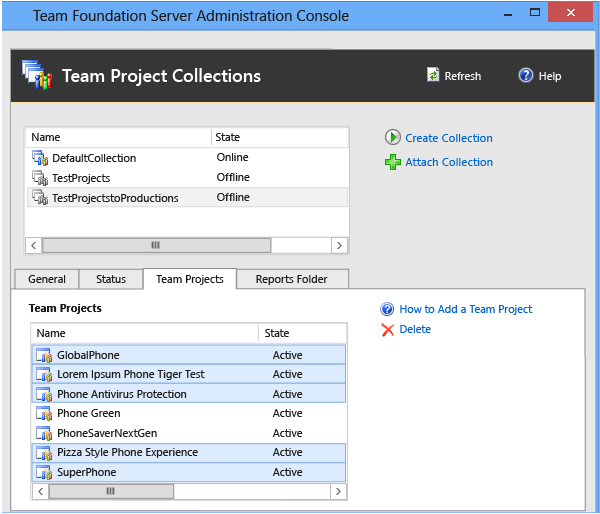
Repeat these steps until both collections contain a set of unique projects.
2-e. Start the team project collections
After you delete projects, you must restart both collections.
To start a team project collection
Open the administration console for Team Foundation.
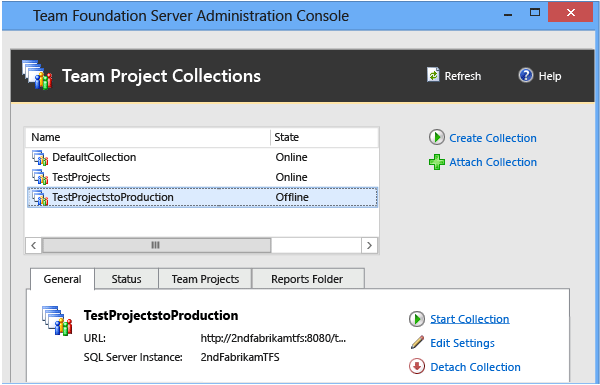
Choose Team Project Collections, and in the list of collections, choose the collection that you stopped in order to split it.
On the General tab, choose Start Collection.
Repeat step 2 for the collection that you attached with a new name.
3-a. Configure users and groups for the split collections
You can skip this procedure if both split collections will remain in the same domain and you want to allow access for the administrators of the original collection to both collections.
After you have split a collection, you must update the permission groups for both collections with users and groups that will administer those collections.
To configure administrators for both collections
For more information, see
3-b. Configure users and groups for projects
You can skip this procedure if the split collections will remain in the same domain and you want to allow access for the users of projects in the original collection to both collections.
After you configure administrators for both collections, either you or those administrators must configure access for users and groups to the projects in each collection. Depending on your deployment, you might also need to configure permissions for those users in SharePoint Products and Reporting Services.
To configure access for users to team projects
For more information, see
Q & A
Q: My deployment uses reporting. Are there any additional steps I need to take when splitting collections?
A: Yes, you'll need to split reports after you've finished deleting team projects so that both collections have a unique set of projects. You'll also need to rebuild your data warehouse.
After you delete projects, you must move the reports that the split collection uses into a different folder, and you must delete them from the original folder.
| Important |
|---|
The report folders exist in both locations. Make sure that you move all reports appropriately before you delete any report folders. |
To split reports into separate folders
In Report Manager, move the reports that support the split collection into the appropriate folders for that collection.
For more information, see the following topic on the Microsoft Web site:
If your deployment utilizes a SharePoint Web application, you might need to repair the connection again after you move the reports before they will appear correctly. If reports do not appear correctly, follow the steps in the previous procedure to repair the connection.
Once you've split the reports and started both collections, you must rebuild the warehouse for Team Foundation and the database for Analysis Services. You must perform this step to ensure that reports and dashboards work correctly for the deployment after you split the collection and that no conflicts occur with other collections in the deployment.
To rebuild the data warehouse and the Analysis Services database
Open the administration console for Team Foundation.
In the navigation bar, choose Reporting.
In Reporting, choose Start Rebuild.
In the Rebuild the Warehouse and Analysis Services Databases dialog box, choose OK.
NoteThe warehouses will continue to be rebuilt and the data will continue to be repopulated after the Start Rebuild action finishes. Depending on the size of your deployment and the amount of data, the whole process might take several hours to complete.
Q: Can I split a collection that uses SharePoint Products to support one or more team projects in the collection?
A: Yes, but you'll need to perform additional steps for the split collection.
After you attach the renamed collection and remove all duplicate projects, you must repair the connection to the SharePoint Web application. Repairing the connection ensures that all connections are correctly set between the Web application and the original and renamed collections.
If your deployment uses SharePoint Products, it is strongly recommended that the service account for TFS be a member of the Farm Administrators group.
| Note |
|---|
You can split a team project collection without granting this membership to the service account for TFS. However, you will see errors when you attach the collection, and you will need to perform additional steps to reconnect projects with their portals. Even if your operational requirements generally restrict granting this membership to the service account, you should consider adding the service account to the Farm Administrators group for the duration of the split operation. |
To repair the connection to a SharePoint Web application
Open the administration console for Team Foundation on the server that hosts the application tier for the deployment to which you want to move the collection.
Choose SharePoint Web Applications, and in the list of Web applications, choose the Web application that supports the collections that you just attached.
The Repair Connection button appears after you select a Web application in the list.
Choose Repair Connection, and in the Repair the connection to a SharePoint Web Application dialog box, choose Repair.
When the Status window reports Reconnect operation succeeded, choose Close. This might take a few minutes. In addition, you might see some errors as part of this process, since the two collections are still using the same SharePoint default site location for their team project portals. This is expected behavior.
After you have repaired the connection and started both collections, you must reconfigure the team project portals for projects in each collection so that those portals reflect the correct data for those projects.
To reconfigure team project portals
Open Team Explorer, connect to each team project collection, and for each team project, configure the URL for the SharePoint site. For each team project, choose Settings, choose Portal Settings, and make sure that the Reports and dashboards refer to data for this team project check box is selected.
You can continue to use the same site collection in SharePoint Products to support both split collections. Team projects in both collections will use the same team project portals as before. All portals are hosted on the site collection that supported the original team project collection. However, this configuration not only complicates the one-to-one relationship between a team project collection and a site collection but also makes restoring your deployment potentially more difficult. To avoid this complexity, you can split the site collection that supported the original team project collection to reflect the split that you made for the team project collections.
To split the site collection and redirect the split team project collections to use the split site collections
For information about how to split a site collection, see Move site collections between databases or the latest guidance for your version of SharePoint Products.
TipMake sure that you configure user permissions and access to the site collections to match the user access to the team project collections, as detailed earlier in this topic.
Configure any affected team project collection to utilize the split site collection by opening the administration console, choosing the collection from the list of the team project collections, and on the SharePoint Site tab, choosing Edit Default Site Location.
Reconfigure the team project portals for team projects in each collection so that those portals reflect the correct data for those projects.
For more information, see Reconfigure Team Project Portals earlier in this topic.
Q: Are there any special considerations or actions to take if I split a team project collection that has projects integrated with Project Server?
A: After you split your team project collection, you must wait for the metadata to update as part of the synchronization between TFS and Microsoft Project Server. After synchronization, your data should appear correctly in Project Server. For more information, see Change your deployment configuration.
To verify synchronization
After you have split a collection, wait for the data to synchronize. This process happens automatically on a predetermined schedule. For more information, see Synchronization process overview for TFS-Project Server integration.
If one of the split collections will no longer synchronize with Project Server, unmap it by using the TFSAdmin ProjectServer /UnmapPWAFromCollection command with the /force option.
For more information, see Map a team project collection to an instance of PWA, Change your deployment configuration, and Remove a component from participating in data synchronization.
You do not need to take any steps to continue synchronizing data between the collection and Project Server after you have split the collection unless you also plan to move the collection to a different server. In that case, you must follow the steps for moving a collection after you split the collection. For more information, see Move a team project collection.
Q: How do I split a collection configured for Lab Management?
A: You'll need to perform several additional steps to split the collection. Before you start the split, you'll need to delete the Lab Management resources from the collection, and then, after the split, you'll have to individually configure Lab Management resources for each of the split collections.
Before you start the split, delete the resources that Lab Management uses from the collection database. These resources include virtual machines, templates, team project host groups, and team project library shares. You will need to re-create the Lab Management assets after you restore and attach the collection.
To delete the Lab Management resources
For information about how to remove all group hosts, library shares, and environments from a specified team project collection, see TFSConfig Lab /Delete Command with the /External option.
Once you've completed the split, you must recreate team project host groups. You must also recreate team project library shares in TFS and the virtual machines, templates, and environments in Microsoft Test Manager.
To configure Lab Management resources
Configure the application tier for Team Foundation.
For more information, see Configure Lab Management for SCVMM environments.
Recreate the golden master virtual machines and templates in the new SCVMM and import virtual machines and templates into the team project collection.
For more information, see Create and store virtual machines and templates ready for Lab Management.
Recreate the environments for each team project.
For more information, see Creating an SCVMM Environment Using Stored Virtual Machines and Templates.
