You can move or clone your deployment of Team Foundation Server (TFS) software. You move TFS from one machine to another by restoring it to new hardware (also known as a restoration-based move). For example, you might want to move TFS to a server with greater capacity or improved processing speed, or you have concerns about the reliability of the hardware on which TFS is currently running. Moving TFS to a new server allows you to change the hardware that runs TFS without losing any of your project history.
To clone your TFS deployment, you perform the same steps as a move plus a few additional ones. You perform a move when you plan to discontinue use of the original hardware and TFS deployment. You perform a clone when you intend to continue using the original TFS instance after moving it.
 Important Important |
|---|
In some situations you might want to change the domain of a TFS deployment as well as its hardware. Changing the domain is an environment-based move, and you should never combine the two move types. First complete the hardware move, and then change the environment. |
To move or clone TFS, perform these steps:
Back up databases and install software
Restore TFS databases to the new hardware
Update the configuration of the new application-tier server
Verify permissions, notify users, and configure backups
 1. Check your permissions
You need to be an administrator on both sets of hardware (the old and the new). In addition, you need to be an administrator (or have the equivalent permissions) for TFS and all of the software on which your deployment depends: SQL Server, reporting, SharePoint Products (if your deployment uses reporting or SharePoint), and any other software with which your deployment interoperates, such as Project Server.
Make sure you are a member of the following groups:
Servers: Administrators (local Administrators group or equivalent)
TFS: Team Foundation Administrators and Admin Console Users
SQL Server: sysadmin
SharePoint Products: Farm Administrators (if your TFS deployment integrates with SharePoint Products)
If you aren't a member of one or more of these groups, get permissions now.
2. Back up and install
First, make a backup of your TFS databases, and then install software on the new hardware.
2-a. Back up the databases and the SQL Server Reporting Services encryption key
Open the administration console for TFS and on the Scheduled Backups page, take a full backup. The backup will back up everything you configured for backup in your backup plan, but it will do so immediately, not according to the time scheduled in the plan. If your deployment uses reporting, you can back up the encryption key as part of this backup set.
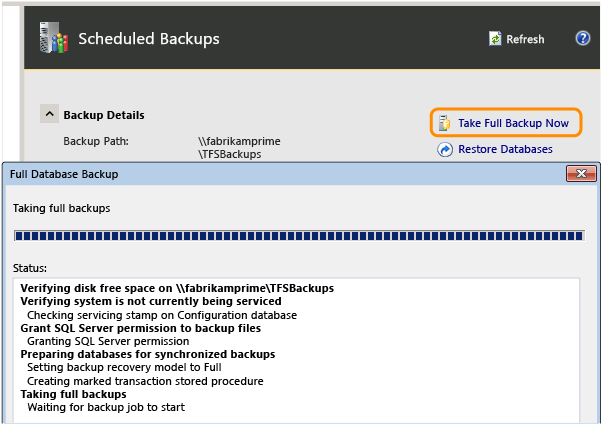
(If you don't have backups configured, you'll have to create a plan before you can take a full backup.)
Once the backup completes, verify that the backup is available on the storage device or network share, and that you can access this backup from the new hardware.
2-b. Install and configure SQL Server on the new data-tier server
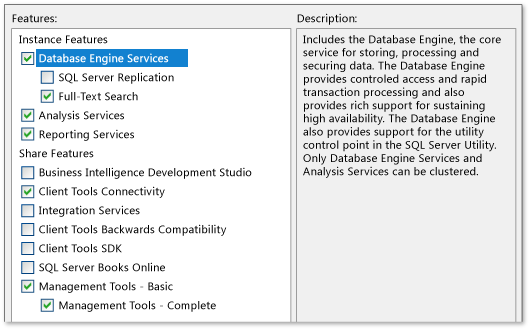
Install SQL Server on the new server and make sure that it is operational. If your previous deployment used reporting, make sure that you include the reporting and analysis services components. You must install the same version and edition that you used previously, including service pack and cumulative update levels.
As an alternative, you can create an instance of SQL Server on a server that already has a matching version installed and restore the TFS databases to that instance, but that will require more post-restoration configuration.
For more information about options for installing and configuring SQL Server, go here.
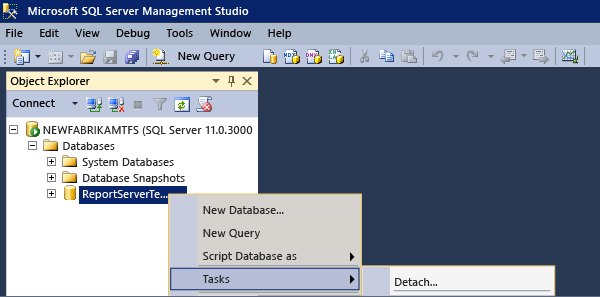
After installing SQL Server, if your deployment includes reporting, open SQL Server Management Studio and detach the ReportServer and ReportServerTempDB databases. Otherwise you might not be able to restore these databases with the backup you created for the TFS databases.
2-c. Install and configure software on the new application-tier server
To configure a new server or servers for TFS, you must first install and configure the software that is required to support it. This software includes the following components:
a supported operating system for your deployment configuration
a supported version of SharePoint Products (if your deployment is integrated with SharePoint Products and you want to move it to the same server as TFS)
 Note Note |
|---|
Unlike installing a new deployment of TFS, you will not be able to install SharePoint Products as part of the Standard Single-Server or Advanced options when moving to a new server. You must manually install the same version and edition of SharePoint Products that you used in your previous deployment, or follow the guidance for your version and edition of SharePoint Products to move its deployment to the new hardware separately. |
Install and configure Windows, IIS (if not configured by default), and SharePoint (if using) in the new environment, and make sure that the server and its software are operational.
For more information, see the system requirements for Team Foundation Server and Move SharePoint to new hardware for TFS.
3. Restore TFS databases to the new hardware
In order to restore the TFS databases using the restore tool, you must install but not configure TFS on the new data-tier server, and then use the restore function in the Scheduled Backups node.
If you want to restore TFS databases manually using SQL Server restoration tools, you can, but that is a more difficult procedure. In addition, you will have to manually unquiesce the databases in the new deployment. The restore wizard in TFS automatically does this for you as part of its restoration process, but that functionality is not part of SQL Server's restoration tools.
If you installed SharePoint Foundation 2013 using the steps in Move SharePoint to new hardware for TFS, and you plan on using that server as the server for TFS, the installation bits and administration console will already be present on the server and you can skip the first two steps in this next procedure.
3-a. Restore the TFS databases
Launch the TFS installation media. On the Team Foundation Server Setup page, choose Install.
When the installation completes, the Team Foundation Server Configuration Center opens. Close it.
The administration console opens automatically in an unconfigured state. This is expected.
To start the Restore wizard, open the administration console for TFS and open Scheduled Backups.
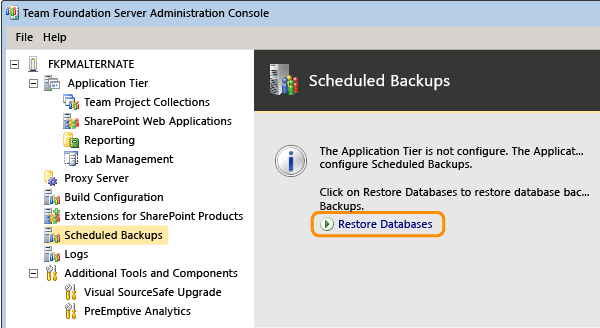
Specify the path to the backup set and choose the set you created after quiescing the old deployment.
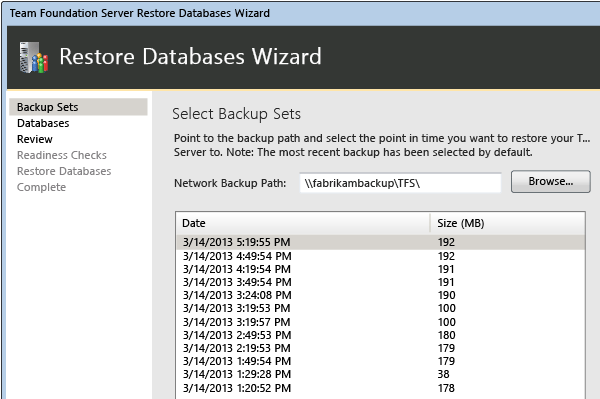
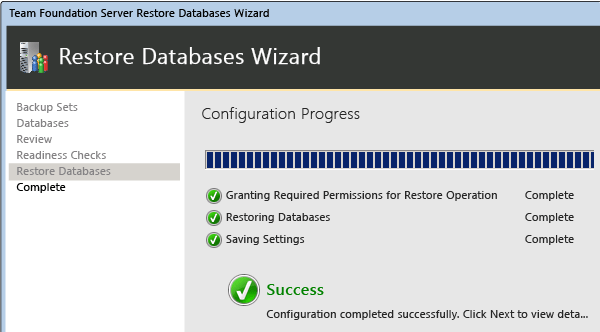
Complete the wizard and restore the databases to the new instance of SQL Server.
3-b. Redirect SharePoint Products to the new location of the content database
If your deployment uses SharePoint Products, you've already installed the same version and edition of SharePoint Products that you used in your previous deployment by following the steps in Move SharePoint to new hardware for TFS, as mentioned above. Now, after you have restored the old deployment's content database (WSS_Content) to the new server as part of the restoration set, you must redirect the server that is running SharePoint Products to the new location of that database. This database must be operational before you can reconfigure Team Foundation Server with the new locations of its databases.
Open a Command Prompt as an administrator on the new hardware that is running SharePoint Foundation.
Change directories to Drive:\Program Files\Common Files\Microsoft Shared\Web Server Extensions\15\bin and run stsadm.exe with the following parameters, where SharePointFoundationServerName is the name of the server where you installed SharePoint Foundation 2013, and SQLServerName is the name of the server where you restored the WSS_Content database as part of restoring TFS databases:
 Copy Code
stsadm.exe -o addcontentdb -url http://SharePointFoundationServerName/sites -databasename WSS_Content -databaseserver SQLServerNameAfter that command completes successfully, type the following command, where Domain\UserName is the account you used to install and configure SharePoint Foundation 2013 for use with TFS:
Copy Codestsadm.exe -o addpermissionpolicy -url http://SharePointFoundationServerName -userlogin Domain\UserName -permissionlevel "full control"
3-c. (Clone option) Reconfigure server IDs and remap databases
Perform the next set of steps on the new application-tier server if you intend to continue using the original TFS instance. These steps are necessary to avoid the risk of corruption of one or both deployments. If both servers are live, you could end up with corruption, particularly if they are pointing to the same SharePoint or reporting resources.
Open a Command Prompt window as an administrator and change directories to Drive:\%programfiles%\Microsoft Team Foundation Server 12.0\Tools. Open a Command Prompt window and enter:
Run the TFSConfig PrepareClone command to remove information about scheduled backups, SharePoint, and reporting resources.
TFSConfig PrepareClone /SQLInstance:ServerName /DatabaseName:DatabaseName /notificationURL: ApplicationTierURL
Run the TFSConfig ChangeServerID command to change the server GUIDs that are associated with the databases. GUIDs must be unique within TFS deployment.
TFSConfig ChangeServerID /SQLInstance:ServerName] /DatabaseName:ConfigurationDatabaseName [/ProjectCollectionsOnly] [/ConfigDBOnly] [/usesqlalwayson]
Run the TFSConfig RemapDBs command to redirect the cloned TFS to its databases.
TFSConfig RemapDBs /DatabaseName:ServerName;DatabaseName /SQLInstances:ServerName1,ServerName2 [/AnalysisInstance:ServerName] [/AnalysisDatabaseName:DatabaseName] [/preview] [/continue] [/usesqlalwayson]
4. Update the configuration of the new application-tier server
Perform these steps on the new application-tier server.
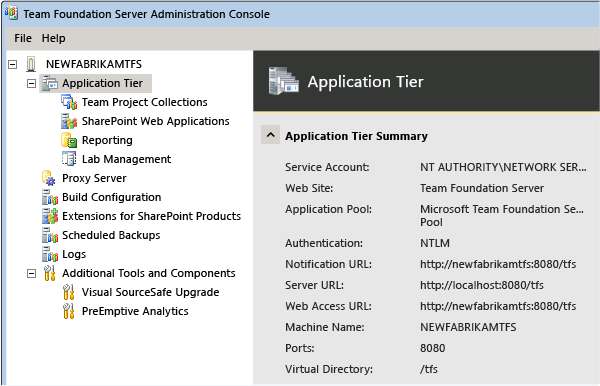
4-a. Configure the new application-tier server
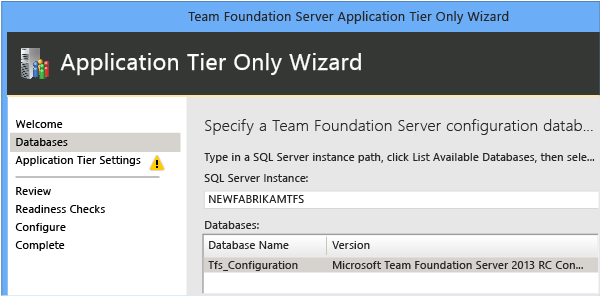
From the administration console for TFS, choose Configure Installed Features to launch the configuration center.
Launch the Application-Tier Only wizard, and in Databases, specify the new SQL Server instance where you restored the TFS databases. Choose the Tfs_Configuration database from the list.
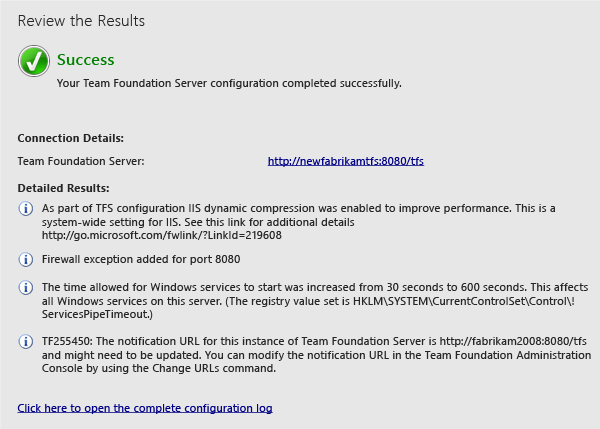
Before you close the final page of the wizard, look for the "i" symbol. It signifies information that you might want for future reference. The final page also includes the location of the configuration log.
4-b. Update TFS URLs
Go to the application-tier node and look at the notification and Team Web Access URLs. Note that they still point to the location of the old deployment. Update them.
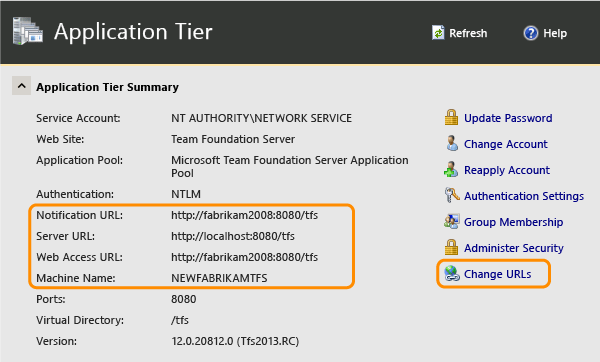
After updating the URLs with the name of the new server, review the information to make sure that it is correct.
4-c. Update all service accounts
You must update the TFS service account (TFSService) and the data sources account (TFSReports). Even if these accounts have not changed, you must update the information to help ensure that the identity and the format of the accounts are appropriate for the new server.
Open a Command Prompt window as an administrator and change directories to Drive:\%programfiles%\Microsoft Team Foundation Server 12.0\Tools.
At the command prompt, type the following command to add the service account for Team Foundation, where DatabaseName is the name of the configuration database (by default, TFS_Configuration):
TfsConfig Accounts /add /AccountType:ApplicationTier /account:AccountName /SQLInstance:ServerName /DatabaseName:DatabaseName
At the command prompt, type the following command to add the data sources account:
TfsConfig Accounts /add /AccountType:ReportingDataSource /account:AccountName /SQLInstance:ServerName /DatabaseName:DatabaseName
For more information, see
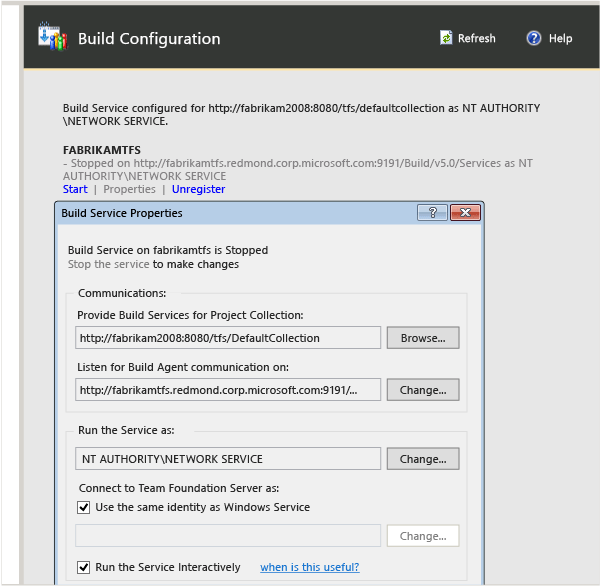
4-d. Update build servers
Now you'll need to redirect your build servers to point to the moved TFS deployment.
On each build server, open the administration console and stop the build service.
In the properties for the build service, update the communications properties.
4-d. Configure SharePoint Web Applications
If your deployment uses SharePoint Products and you moved SharePoint Foundation 2013 as part of the TFS move, you might need to redirect TFS to the new web application. Even if you don't, you should still repair the connection to help ensure proper performance.
If you're not using SharePoint Products as part of your deployment, or if your deployment will continue to use the old SharePoint server, you can skip this procedure.
Open the administration console and navigate to SharePoint Web Applications. If the web application still refers to the old site, or if your new deployment uses a different web application than the one listed, choose Change and update the settings.
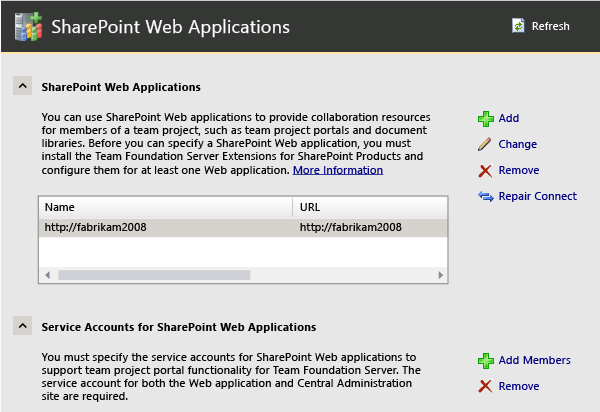
If the information is correct, or after you have corrected it, choose Repair Connection. This helps ensure that everything is working properly.
4-e. Configure Reporting and Analysis Services
If your deployment uses a report server, you must redirect Team Foundation Server to its location, restart the warehouse, and manually rebuild the database for Analysis Services. If you don't use reporting, skip this procedure.
Go to the Reporting node. The listed report server values are the old ones, not the new, so edit them.
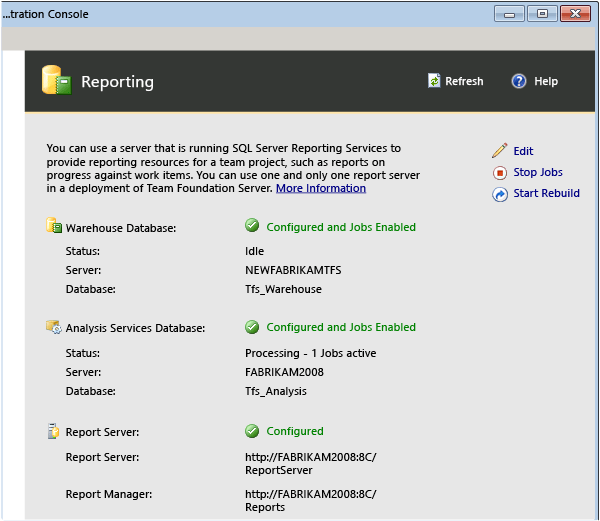
Change the values on all three tabs to point to the new server. Make sure that you provide the correct information for the data sources account in the new deployment.
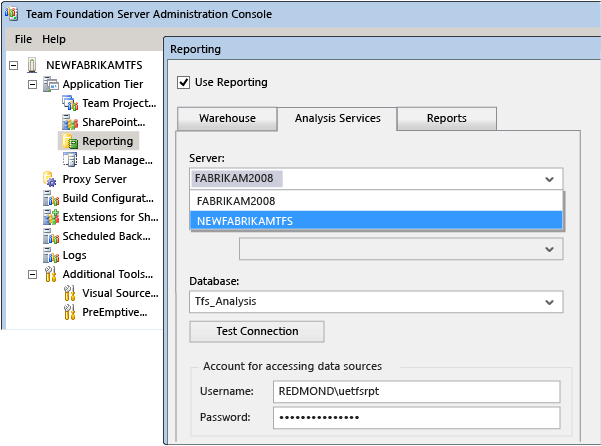
Choose Start Jobs to restart reporting.
Choose Start Rebuild to rebuild the warehouse.
5. Verify permissions, notify users, and configure backups
After you move to new hardware, make sure that all users, groups, and service accounts for your deployment are configured with the permissions that they require to function correctly on each server. Some permissions, such as additional permissions in SQL Server or on the local computer, cannot be automatically migrated. For example, Team Foundation administrators must be members of the local Administrators group on the application-tier server to open the administration console, so you must add manually them to that group.
5-a. Verify permissions for users, groups, and service accounts
Log on to the server and make sure that users, groups, and service accounts are configured with the permissions required for operation. Manually spot-check membership in project groups and teams, and verify that those groups and teams have the permissions you expect.
Browse to a team project collection and make sure that all projects in that collection appear as expected, and that users in those projects can appropriately access their work items.
Open Team Web Access and verify that team sites and teams appear as expected.
Not sure what groups and permissions to expect? For more information, see
5-b. Refresh the data cache on client computers
Log on to the server and use the ClientService Web service to force clients to update the cache for tracking work items and for Team Foundation version control.
Copy Codehttp://ServerName:8080/tfs/WorkItemTracking/v3.0/ClientService.asmxFor more information, see
If you want to refresh the entire cache for all users the next time they log on, use the witadmin rebuildcache command.
| Note |
|---|
If you restored your databases to a different point in time, you will also need to refresh the version control cache as documented in Refresh the data caches on client computers. |
5-c. Notify users
Now that you've moved TFS, you'll need to tell your users how to connect to the moved deployment. Specifically, you'll need to give them the following information:
The name of the new server and the URL for Team Web Access, so that they can reconnect to their projects
The new database names for reporting, if reporting is part of your deployment
The new URL for SharePoint, if SharePoint is part of your deployment
If they are members of a team project that uses Git, instructions for how to update every clone they have locally for every repository for that project. Specifically, they will have to run the following command for every clone:
Copy Codegit remote set-url <remote name> <new URL>
Users can see what the URL is for each clone by browsing the team project from the Explorer tab.
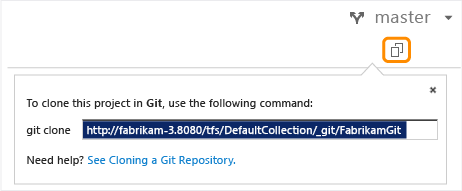
Learn more about Git here.
5-d. Configure backups on the new TFS instance
In the administration console, go to the Scheduled Backups node and reconfigure the scheduled backups to back up the TFS databases on the new server.
For more information, see
Q & A
Q: I want to change domains, not physical servers. Can I do that?
A: Yes. That's called an environment-based move, and the steps can be found here. You should not try to combine an environment-based move with a hardware-based move. First complete the hardware move, and then change the environment.
Q: What steps are needed to integrate with Project Server after a hardware move?
A: Yes, after you complete the hardware move you'll need to use the TFSAdmin ProjectServer /RegisterPWA command with the /tfs, /force, and /pwa options to re-register TFS with Project Server. You can read more about TFS integration with Project Server here.
