To use Team Foundation Build, your team must have at least one build agent to perform the processor-intensive work of your build process.
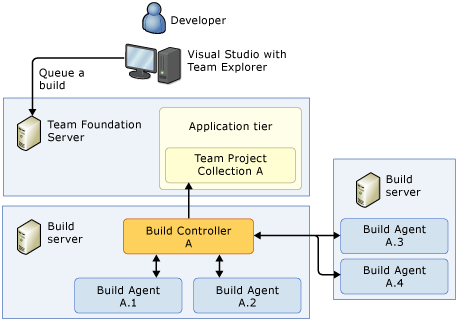
Each build agent is dedicated to and controlled by a single build controller. Build agents can be hosted on the same build server that hosts their build controller, but this is not required, and in some cases your team's needs can most efficiently be met by a single build server to host a build controller that controls build agents on multiple build servers.
The build agent executes the steps of your build process that are contained in the AgentScope activity. Typically, these steps include getting files from version control, provisioning the workspace, compiling the code, running tests, and merging files back into version control.
Make sure the build server that hosts your build agents has sufficient storage and processing capabilities to match the size and complexity of the codebase and tests on the team project collection. Typically, you should host no more than one build agent per processor core on the build server. You can also enhance performance by dedicating a single physical hard drive to the working directory of each build agent.
 Tip Tip |
|---|
If your team project collection is hosted on Visual Studio Online, and your team's needs can be met by a single standard build agent, you can use the Hosted Build Controller instead of deploying your own build agent. |
Required permissions
You must be a member of the Windows Administrators group on the build server and a member of the Project Collection Build Administrators group on your team project collection. See Permission reference for Team Foundation Server.
What do you want to do?
Install Visual Studio and other software to enable compilation and other capabilities
Assign tags to represent build agent capabilities or purposes
Deploy a build agent that can compile and test a Windows Store app
 Create or modify a build agent
To create or modify a build agent from the build server
Log on to the build server that you want to configure.
From Windows Start, run Team Foundation Administration Console.
The Team Foundation Administration Console appears.
In the tree pane of the Team Foundation Administration Console, expand the name of the server, and then choose the Build Configuration node.
Information about the build server appears in the content pane.
If the message
 Configure Installed Features appears, see Deploy a build server.
On the Build Configuration page:
To create a new build agent, choose New Agent.
To modify an existing build agent

choose Properties.
The Build Agent Properties dialog box appears.
To modify a build agent from Visual Studio
In Visual Studio, in Team Explorer:
If you are not already connected to a team project in the team project collection, then connect to the team project.
Choose
 Home, and then choose
  Builds.
On the Builds page, choose Actions, and then Manage Build Controllers.
The Manage Build Controllers dialog box appears.
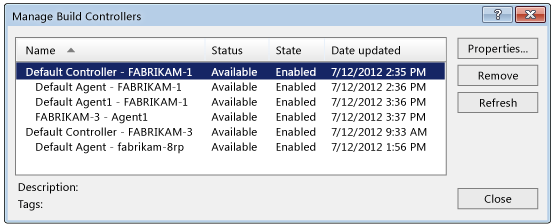
Select the build agent that you want to modify, and then choose Properties.
The Build Agent Properties dialog box appears.
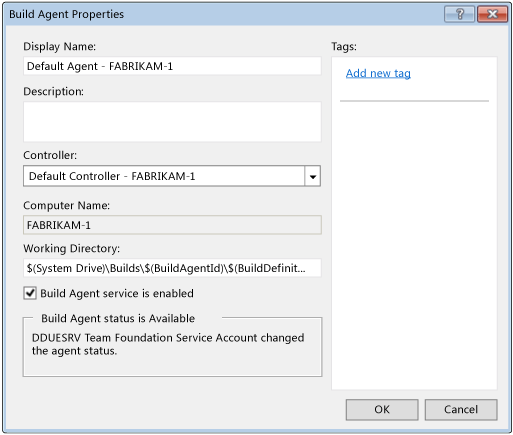
Display Name, Description: Type a name and a description to help team members easily identify the build agent.
Controller: Select the build controller that you want to control this build agent. The build controller can run on the same build server as this build agent or on a different build server.
See the sections below for details about how to configure your build agent.
Install Visual Studio and other software to enable compilation and other capabilities
You must install on the build agent the version of Visual Studio that your team uses on its dev machines. See Installing Visual Studio. You must also install any other software and components that are installed on your dev machines and that are required to build your app.
Specify the working directory
You can specify the working directory, which the build agent uses to read from or write to files. For example, source files are copied to subdirectories in this folder, and binaries are created and stored in other subdirectories in this folder.
| Tip |
|---|
You can enhance performance by dedicating a single physical hard drive to the |
Use working directory tokens
Although you can specify a literal path for the Working Directory property (for example, c:\temp\build\), a simpler and more durable approach is to use tokens to specify the path. You can use two kinds of tokens:
- Environment variables
Environment variables contain information about the environment for the system and the user who is logged on. The most typical variable you might use is SYSTEMDRIVE, but for some situations you might also use variables such as USERNAME or HOMEPATH.
TipTo list the environment variables on your build server, open a command prompt and type set.
- Team Foundation Build variables
You can use the following variables in a build agent working directory:
$(BuildAgentId): An automatically generated integer that uniquely identifies a build agent within a team project collection.
$(BuildAgentName): The Display Name of the build agent.
$(BuildDefinitionId): An automatically generated integer that uniquely identifies a build definition within a team project collection.
$(BuildDefinitionPath): The team project name and the build definition name, separated by a backslash.
Working directory example
For example, you have a build agent that is named BuildBot3. You have defined two builds that are called NightlyBuild and WeeklyBuild in a team project that is called CoolApp. In the Working Directory box, you specify the following value: $(SystemDrive)\TeamBuilds\$(BuildAgentName)\$(BuildDefinitionPath). As a result, the BuildBot3 build agent creates and uses the following two working directories:
C:\TeamBuilds\BuildBot3\CoolApp\NightlyBuild
C:\ TeamBuilds\BuildBot3\CoolApp\WeeklyBuild
Make sure the path to the working directory is not too long
The working directory that you specify must not cause the build agent to produce any physical paths that are longer than 259 characters. Otherwise, your builds could fail and log this error: TF10128: The path PhysicalPath contains more than the allowed 259 characters. Type or select a shorter path.
To solve this problem, specify a working directory that results in a shorter physical path. For example you could specify $(HOMEDRIVE)\bld\$(BuildAgentID)\$(BuildDefinitionID), which would result in a working directory such as: c:\bld\3\2\.
Subdirectories created in the working directory
The build agent creates and works in the following subdirectories under this path.
Subdirectory | Used to Store Files... |
|---|---|
Sources | Read by the build agent, such as source files. You specify the files that it downloads in the Workspace settings for each build definition. See Work with build workspaces. |
Binaries | Compiled by the build agent, such as compiled application files. |
TestResults | Produced by whatever tests the build agent ran. |
Enable your build agent to run tests
You can define a build process that performs one or more automated test runs.
 Important Important |
|---|
Many kinds of tests and test operations require that you install on your build agent the same version of Visual Studio that your team uses on its dev machines. See Installing Visual Studio. |
The build agent can run:
Code Coverage
Coded UI Tests (Requires a build server that is running in interactive mode. See Run your build server in interactive mode and Verifying Code by Using UI Automation.)
Database Test Data Generation
Database Unit Tests
Generic Tests
Load Tests
Unit Tests
Ordered Tests
Test Impact Analysis
Web Tests
Assign tags to represent build agent capabilities or purposes
As the scale of your build system grows, you might need to define specialized build agents. Whenever a build agent has special capabilities or is intended for a specific kind of usage, you should assign one or more tags to that agent. This way, when a team member creates a build definition that requires a certain kind of build agent, they can specify the tag in their build definition.
You can assign tags from the
The following table offers examples of tag names and the build agent capabilities that they could represent.
You could apply the following tag ... | To identify a build agent that can... |
|---|---|
x86 | Compile 32-bit applications |
x64 | Compile 64-bit applications |
bvt | Run your BVT tests, which are run by your nightly BVT build. |
WindowsStore | Compile and test a Windows Store app. |
IIS | Compile an ASP.NET Web application and then stage and host it on the computer on which the build agent is running. |
interactive | Perform tasks that require an agent on a build server that is running in interactive mode. |
You can apply more than one tag to a build agent. For example, you could create a build agent with the tags x86 and Release to indicate an agent that is set up to compile the Release configuration of a 32-bit application.
If you run multiple build agents on the same build server, they probably will all have the same capabilities. Therefore, you probably will want to apply the same tags to all build agents on that build server.
Remove a build agent
In Visual Studio, open the Manage Build Controllers dialog box, as explained previously in
Select the build agent that you want to remove, and then choose Remove.
| Tip |
|---|
You can also use the Team Foundation Administration Console to remove the build agent while you are logged on to the build server. |
Next steps
- Scale out your Team Foundation Build system
As your team and your code base grow, you can expand your build system incrementally, with relative ease.
- Manage your build system
Occasionally, you will need to monitor and manage your build system.
- Use your build system to compile, test, and deploy your app
After your build system is in place, your team is ready to create a simple build process (for example, a continuous integration build) and benefit from automated building and testing of your app.
