If you are a system administrator, you might have to regularly create new golden virtual machines to satisfy the needs of various team projects. Because you cannot create a virtual machine (VM) from scratch using Lab Management, you must start from an existing virtual machine created in Hyper-V or System Center Virtual Machine Manager (SCVMM) and import it into a team project. After you create the virtual machines in SCVMM, you can:
Leave the virtual machine on the host and compose an environment around it.
Convert the virtual machine into a template and store the template in the team project library.
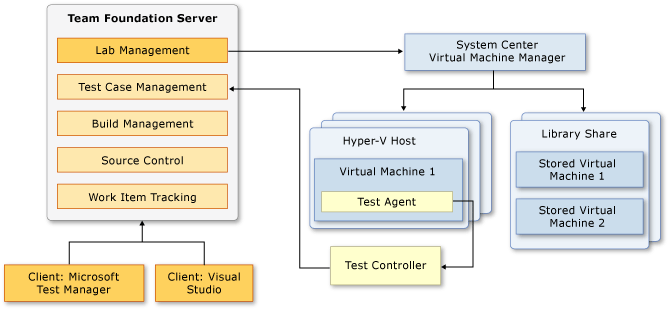
The following diagram illustrates how the various machines and agents interact with one another.
This topic contains instructions for creating virtual machines with all the necessary agents by using SCVMM, for converting those virtual machines into templates, and for storing the templates in the SCVMM library.
 Prepare a Virtual Machine with a Test Agent
To create a virtual machine
Log in as an Administrator to the server that is running Virtual Machine Manager.
Open the Virtual Machine Manager Administrator Console.
Create a virtual machine in SCVMM by using one of the following three methods:
Connect to the virtual machine by using the VM console in the SCVMM Administrator Console.
In SCVMM, click the Virtual Machines tab, right-click the virtual machine, and then click Connect to virtual machine.
Make sure that you have installed the appropriate operating system and application pre-requisites onto this virtual machine.
Enable remote desktop connections to this virtual machine.
This enables guest-based connections to the virtual machine. For more information about the types of connections, see How to: Connect to machines in a Lab Environment.
On the virtual machine, click Start, right-click Computer, and then click Properties.
In the System dialog box, click Remote settings.
On the Remote tab of the System Properties dialog box, click the appropriate Allow connections option, and then click Select Users.
In the Remote Desktop Users dialog box, confirm the appropriate user names appear or click Add to add other user accounts, and then click OK.
You can use Lab Management to deploy an application to your environment and run tests on that environment. This is called workflow integration. For workflow integration to deploy an application, you create a build definition that includes the workflow to deploy your application to each virtual machine in your environment. You can then run tests on the role that you selected in your test settings. For more information about environments and roles, see Setting Up Test Machines to Run Tests or Collect Data.
Next you will install a test agent on each virtual machine that you created.
To install a test agent on a virtual machine
Install a test agent on your virtual machine. You can find the test agent on the same DVD from which you installed Team Foundation Server.
You do not have to register your test agent with a test controller when you install your test agent. This will be done automatically when the virtual machine is deployed by Lab Management.
If you will compose a virtual environment using this virtual machine, you are finished. If you will store the virtual machine in the library, continue to the next section.
 Caution Caution |
|---|
Lab Management has very strict requirements for how a network should be configured when you create an isolated environment. Do not do any of the following:
|
Store the Virtual Machine into the SCVMM library
When you store a virtual machine in the SCVMM library, you must decide whether to store it as a virtual machine or a template. The decision to store the virtual machine as-is or as a template will depend on several factors:
Whether applications that are installed on the virtual machine can continue to work if the unique identifying information about the virtual machine is removed.
Whether virtual machines will be used only as part of a network-isolated environment.
For example, if you will make multiple copies of this virtual machine for use in the same environment, that is, you will use the machine only once in an environment, then compose a virtual environment from the virtual machine without storing it to the library. If you will use the virtual machine in more than one environment on the same network, you must either convert it into a template and store it in library, or configure each environment to use network isolation. For more information about the factors to consider, see Guidance for Creating and Managing SCVMM Environments.
To store a virtual machine as-is in the library
Store the virtual machine so that it can be imported into your team project, right-click the VM and point to Store in library.
In SCVMM Administrator Console, right-click the virtual machine and then click Shutdown.
Select the SCVMM library share that you added to your team project collection and then click Next.
Select the path for the share location for this virtual machine and then click Next.
Click Store.
To first convert a VM into a template and then store it in the library
Prepare the virtual machine to be converted into a template by clearing the administrator password and local password policy.
If the virtual machine is joined to a domain, remove it from the domain and join it to a workgroup. Restart the machine when you are prompted to do this.
Open gpedit.msc, and then click Local Computer Policy, Computer Configuration, Windows Settings, Security Settings, Account Policies, and then Password Policy.
Set the following values:
Enforce password history: 0
Minimum password length: 0
Password must meet complexity requirements: Disabled
Close gpedit.msc
Change the password of local Administrator account to be empty. You can do this by logging in as .\Administrator and then using CTRL+ALT+DEL to change the password.
Make sure that any applications already installed on the virtual machine will continue to work properly after the name of the virtual machine is changed.
CautionIf your application depends on a specific computer name or on joining a specific domain, your application might not work when a new virtual machine is deployed from the template.
Make sure that there is no media (DVD) loaded into the virtual machine. For more information about how to remove media, see How to Add a DVD or CD Drive to a Virtual Machine.
Shutdown the virtual machine. In SCVMM Administrator Console, select the virtual machine, right-click it, and then click Shutdown.
Select the virtual machine and create a clone of it. This is recommended because the original virtual machine is destroyed when it is converted into a template.
Select the clone, and remove all the checkpoints on the virtual machine. This is required as SCVMM cannot convert a virtual machine with checkpoints into a template.
Right-click the virtual machine, and then click Manage checkpoints.
Click each checkpoint, and then click Remove.
If you remove the checkpoints from a virtual machine, Hyper-V merges the disks associated with the checkpoints. This could take several minutes depending on the size of the checkpoints. You can verify the progress of this merging using Hyper-V manager on the host on which the virtual machine is deployed. Wait for the merging to be complete before moving to the next step.
In SCVMM Administrator Console, right-click the virtual machine, and then click New template.
Accept the defaults on all the screens. When prompted for a library share location, select the SCVMM library share.
Click Create to start the SCVMM job. If the SCVMM job is not completed successfully, review the error message and take the appropriate actions.
See Also
Concepts
