You customize the process configuration to modify the display of the Agile planning tool pages that you view through Team Web Access (TWA). A few additional tools require that you map workflow states to metastate mappings.
For an overview of how to customize the Agile planning tool pages, see Configure and customize Agile planning tools for a team project.
 Note Note |
|---|
If you receive error message TF400917, an invalid configuration has occurred in TWA. Re-import the process configuration file to your team project using witadmin importcommonprocessconfig. You'll get the messages you need to resolve the error. |
To manage the process configuration for a team project, use the witadmin command line tool to export and import the process configuration XML definition file. To learn about process configuration, see Process configuration XML element reference.

exportprocessconfig: Exports the process configuration definition to an XML file or the Command Prompt window.
importprocessconfig: Imports the process configuration definition XML file.
To run the witadmin command-line tool, open a Command Prompt window where either Visual Studio or Team Explorer is installed and enter:
 Copy Code Copy Code | |
|---|---|
cd %programfiles(x86)%\Microsoft Visual Studio 12.0\Common7\IDE | |
On a 32-bit edition of Windows, replace %programfiles(x86)% with %programfiles%.
Requirements
To export process configuration definitions, you must be a valid user of the team project or collection.
To import process configuration definitions, you must be a member of the following security groups: Team Foundation Administrators or Project Administrators.
For more information, see Permission reference for Team Foundation Server.
witadmin exportprocessconfig /collection:CollectionURL /p:ProjectName [/f:FileName] [/e:encoding] |
witadmin importprocessconfig /collection:CollectionURL [/p:ProjectName] /f:FileName [/e:encoding] [/v] |
 Parameters
Parameter | Description | ||
|---|---|---|---|
/collection:CollectionURLx | Required. Specifies the URL of the collection. You must specify the URI in the following format: http://ServerName:Port/VirtualDirectoryName/CollectionName If you do not specify a virtual directory, you must specify the URI in the following format: http://ServerName:Port/CollectionName. | ||
/p:ProjectName | Required. Specifies the team project for which you want to export or import the process configuration. This team project must be defined in the collection that you specified by using the /collection parameter. You do not need to specify a team project when you specify the /v switch. | ||
/f:FileName | The path and the name of the XML definition file for the process configuration to export or import.
| ||
/e:Encoding | Optional. The name of a .NET Framework 2.0 encoding format. The specified encoding will be used to export or import the XML data. For example, /e utf-7 specifies Unicode (UTF-7) encoding. If you omit this parameter, witadmin attempts to detect the encoding and uses UTF-8 if detection fails. | ||
/v | Optional. Validates the XML that defines the process configuration but does not import the definition file. | ||
/? or help | Displays help about the command in the Command Prompt window. |
Remarks
| Note |
|---|
Installing VS TFS 2013 upgrades existing team projects. They will use the process configuration file, which combines the agile configuration files and the common configuration files that are supported in TFS 2012. The following witadmin commands have been deprecated along with their corresponding configuration files:
|
If you are updating an upgraded team project, see Configure features after a TFS upgrade.
If you encounter problems accessing existing test plans or test suites after an upgrade to TFS 2013.3, see Update a team project manually to support test management.
Examples
The following values apply in each example:
URL for the collection: http://AdventureWorksServer:8080/tfs/DefaultCollection
Team project: Contoso
Port number for the server website: 8080
To add a field to the quick add panel
You can add fields for any quick add panel. For example, the following example adds Business Value to the product backlog panel.
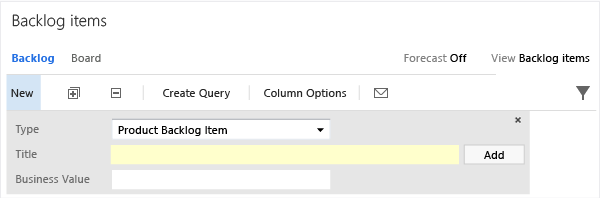
The panel only displays fields that are included in the FIELDS section of the WIT definition for the WIT selected. For example, if you select the bug WIT, then only Title displays, as Business Value isn't defined for bugs. To add another WIT to the panel, you add it to the Requirements Category as described here.
If you don't have administrative permissions for your team project, get them.
Open a Command Prompt window where either Visual Studio or Team Explorer is installed and enter:
Copy Codecd %programfiles(x86)%\Microsoft Visual Studio 12.0\Common7\IDE
On a 32-bit edition of Windows, replace %programfiles(x86)% with %programfiles%. You can
Export the process configuration file.
| Copy Code | |
|---|---|
witadmin exportprocessconfig /collection:CollectionURL /p:ProjectName /f:"DirectoryPath\ProcessConfiguration.xml" | |
An example of a CollectionURL is http://MyServer:8080/tfs/TeamProjectCollectionName.
Add the field reference name to the AddPanel section.
For example, the following syntax adds the Priority element to the panel.
| Copy Code | |
|---|---|
<AddPanel>
   <Fields>
      <Field refname="System.Title" />
      <Field refname="Microsoft.VSTS.Common.BusinessValue" />
   </Fields>
</AddPanel> | |
Tips:
You can look up the reference name for a field using this index.
Add all required fields for work item types defined for the Requirements Category. That way, you avoid having to open the work item form to fill them in when you add backlog items through the panel.
Import the process configuration file.
| Copy Code | |
|---|---|
witadmin importprocessconfig /collection:CollectionURL /p:ProjectName /f:"DirectoryPath\ProcessConfiguration.xml" | |
Refresh your backlog page to view the updated panel.
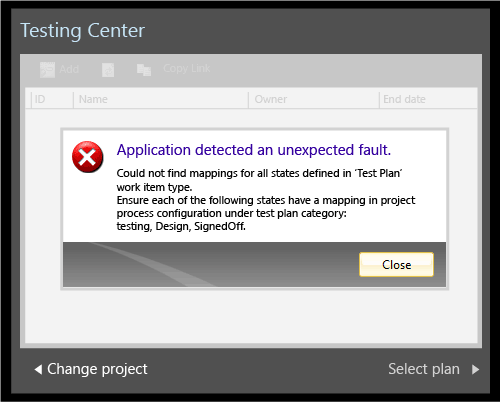
Update metastate mappings to support Test Manager
If you customize the WORKFLOW section of the test plan or test suite, you must map the states to metastates. This supports Test Manager clients that are at Visual Studio 2013.2 or earlier versions.
In the following example, the test plan workflow has been updated to use the Design, Testing, and Signed Off states. To support backward compatibility, the TestPlanWorkItems is added to the ProjectProcessConfiguration section of the process configuration definition.
WORKFLOW | Metastate mappings | ||||||||
|---|---|---|---|---|---|---|---|---|---|
|
| ||||||||
If you modify the test suite workflow, then you have to make a similar update if you want to map new states. You would add it within a TestSuiteWorkItems section. See
Q & A
Q: What customizations can I make and still use the Configure Features Wizard to update my team project after a TFS upgrade?
A: You can customize the quick add panel. The Configure Features Wizard will update your team projects and you'll get access to the latest features.
Other changes might require you to perform some manual operations when updating your team project. To learn about which customizations you can safely make and which you should avoid, see Customize the work tracking experience: Before you customize, understand the maintenance and upgrade implications.
Q: When do I need to map workflow states to metastates?
A: When you add or remove workflow states to the following WITs, you should consider updating the process configuration to add or remove corresponding metastate mappings.
WITs that belong to the Requirement Category or Task Category: Metastate mappings support the display of the Agile planning tools.
WITs that belong to the Bug Category: Metastate mappings to support My Work tool (Agile and CMMI-based team projects).
Test Plan and Test Suite: Updates to the workflow of these WITs must be mapped only when you support team members connecting to TFS from a version of Test Manager that is based on Visual Studio 2013.2 or earlier version.
Test Plan and Test Suite WITs are only available with the upgrade to TFS 2013.3, available from this download page.
Update the metastate mappings if you receive an Application detected an unexpected fault error when you connect to your team project.
How do I resolve process configuration errors?
A: When you make one of the following changes to a team project, you'll need to update the definitions for the WIT, categories, or process configuration. To avoid errors, always make your changes in this order: (1) WITs, (2) categories, and (3) process configuration..
Customization | Update or verify the WIT definition | Update or verify the process configuration definition |
|---|---|---|
Add a WIT to the Requirements Category (A WIT can belong to the Requirements Category or the Task Category, but not both.) | To include the following fields:
| To contain the necessary metastate mappings:
To contain an entry to define the color codes associated with the WIT. For example: <WorkItemColor primary="FF009CCC" secondary="FFD6ECF2" name="Product Backlog Item" /> |
Change the workflow of a WIT in the Requirements Category | N/A | To contain the necessary metastate mappings as described above for adding a WIT to the Requirements Category. |
Add a WIT to the Task Category | To include the following fields:
| To contain the necessary metastate mappings:
To contain an entry to define the color codes associated with the WIT. For example: <WorkItemColor primary="FFF2CB1D" secondary="FFF6F5D2" name="Task" /> |
Change the workflow of a WIT in the Task Category | N/A | To contain the necessary metastate mappings as described above for adding a WIT to the Task Category. |
Add a WIT to the Bug Category (Agile and CMMI only) Change the workflow of a WIT in the Bug Category (Agile and CMMI only) | N/A | To contain the necessary metastate mappings:
To learn more, see Support bug update status using My Work. |
Remove a WIT from the Requirements Category or Task Category | N/A | To remove any metastate mappings that are only associated with that WIT |
Remove a WIT from a team project | To remove the WIT from the categories file. | To remove any metastate mappings that are only associated with the WIT that you removed and the WorkItemColor element that defines the color codes for the WIT you removed. |
Q: How do I customize other functions that appear on the Agile planning tools in TWA?
A: Some customizations can be done through the user interface. Others require editing process configuration or other team project objects. For an overview, see Configure and customize Agile planning tools for a team project.
Q: Do you want to work with two or more portfolio backlogs?
A: The default experience supports one level of portfolio backlog. You can add up to five levels as described in Add a backlog to Agile portfolio management.
Q: Do you want to add or change the WITs that appear on your task board or product backlog?
A: If you've added a custom WIT and want to add that to either the backlog or task board, you can. You just can't have them appear in both places. Learn how by reading Add bugs or other work item types to backlogs or boards.
