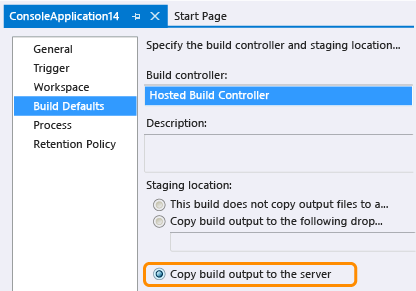
When you define your build process, you can specify a staging location so that you can deliver binaries to your team.
What do you want to do?
 Drop outputs into TFS
You might find it most convenient to drop your build outputs into your Team Foundation Server.
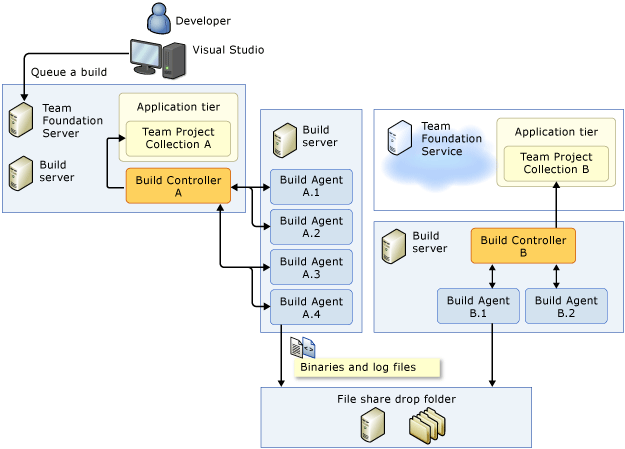
Set up a drop folder on a file share for your on-premises build controllers
You can specify a path to a file share when you define or queue a build definition that is run by an on premises-build controller. The on-premises build controller can be dedicated to a team project collection on either an on-premises Team Foundation Server (TFS) or on Visual Studio Online.
 Tip Tip |
|---|
If you see a TF270016 error in your build results log, it's possible that the build server does not have the required permissions to access the drop folder. Follow the instructions below to resolve this problem. |
Requirements
You must be a member of the Administrators group on the computer where the drop folder resides.
You can use a file share drop folder on the following operating systems:
Windows Server 2012 R2
Windows Server 2012
Windows Server 2008
Windows Server 2003
Windows 8.1
Windows 8
Windows 7
Windows Vista
To set up a drop folder on a file share
Log on to the computer where the drop folder will reside.
Open Windows Explorer (File Explorer in Windows 8), and browse to the folder that contains (or will contain) the drop folder.
If necessary, create the drop folder.
TipTry to keep the path to the drop folder as short as possible (for example: c:\drops). The drop folder must not cause the build agent to produce any physical paths that contain more than 259 characters. Otherwise, your builds will fail and log the TF205022 error message.
Open the context menu for the folder, choose Properties, and then choose the Sharing tab.
On Windows Server 2012 R2, Windows Server 2012, Windows Server 2008, Windows 8.1, Windows 8, Windows 7, and Windows Vista only: Choose Advanced Sharing.
The Advanced Sharing dialog box appears.
Select Share this folder, and then choose Permissions.
The Permissions for FolderName dialog box appears.
Choose Add.
The Select Users, Computers, or Groups dialog box appears.
Perform one of the following steps, depending on what type of account you've specified as the build service account on the build server that hosts your build controller:
NETWORK SERVICE running on the computer that contains the drop folder: In the Enter the object names to select box, enter NETWORK SERVICE.
NETWORK SERVICE running on a different computer from the one that contains the drop folder:
Choose Object Types.
The Object Types dialog box appears.
Select the Computers check box, and then choose OK.
Verify that the location is correct.
In the Enter the object names to select box, enter BuildMachine$ where BuildMachine is the name of the build machine on which the build agent is running.
A domain account: Verify that the location is correct. In the Enter the object names to select box, enter the name of the account.
Choose OK.
Repeat the previous two steps for the build service account on the build server that hosts your build agents.
In the Permissions for FolderName dialog box, choose the account that you just added to the Group or user names list.
Select the Change and Read check boxes, and then choose OK.
Next Steps
Once you have identified and set up the drop folder, you can specify the path to this folder when you define your build and when you queue a build.
