Changing G/L Account Segments
In addition to changing account numbers, you can change the segments in your account numbers.
You can change the delimiter that separates each of your account segments. For example, you can replace a dash ( ) with a slash (/). The account 1234-100-10 would become 1234/100/10.
You can also change the length of any of the segments in your account number (such as the account or department segment).
-
If you decrease the length of the segment, you can choose to truncate the characters from the left or right side.
-
If you increase its length, you can add the characters of your choice to the left or right of the existing segment.
For example, you might choose to increase the length of your account segment from 4 to 6. You could set Account Code Change to add 10 to the front of each segment. So, the account segment 1234 would become 101234.
To change account code segments
-
Click the G/L Segment Change icon (
 ) on the Toolbar or choose G/L Segment Change from the Tools
menu.
 -
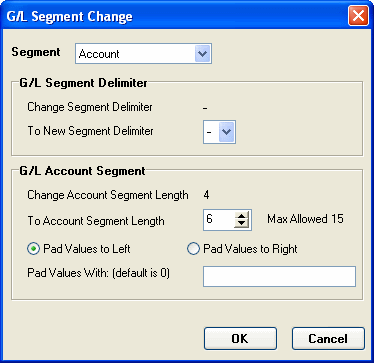
Choose the account segment that you want to change.
-
If you wish to change the delimiter, you can select one in the To New Account Delimiter field.
-
If you are changing the length of an account code segment, enter the new length of the segment in the To <name> Segment Length field.
-
If you are shortening the account code segment, choose whether you wish to delete characters from the left or right side of the segment.
-
If you are lengthening the account code segment, choose whether you wish to add characters to the left or right side of the segment. Then, in the Pad Values With field, enter the characters that you wish to add.
In the following example, the delimiter is changed to a slash and the segment lengthened from 4 to 6 (with the numbers 10 added to the front of the account segment).

-
Click OK.
-
To confirm the process, click Yes for each warning. All entries are added to the Change list.