Photon Unity Networking: General Documentation
|
Photon Unity Networking
v1.88
|
Table of Contents
Brief overview of Photon, subscriptions, hosting options and how to start.
Photon
Unlike Unity's built-in networking or Bolt, PUN always connects to a dedicated server which provides rooms, matchmaking and in-room communication for players. Behind the scenes Photon Unity Networking uses more than one server: Several "Game Servers" run the actual rooms (matches) while a "Master Server" keeps track of rooms and match players.
You have two options for the server side.
Exit Games Cloud
The Exit Games Cloud is a service which provides hosted and load balanced Photon Servers for you, fully managed by Exit Games. Free trials are available and subscription costs for commercial use are competitively low.
The service runs a fixed logic, so you can’t implement your own server-side game logic. Instead, the clients need to be authoritative.
Clients are separated by “application id”, which relates to your game title and a “game version”. With that, your players won’t clash with those of another developer or older game iterations.
Subscriptions bought in Asset Store
Follow these steps, if you bought a package with Photon Cloud Subscription in the Asset Store:
- Register a Photon Cloud Account: exitgames.com/en/Account/SignUp
- Create an App and get your AppID from the Dashboard
- Send a Mail to: developer@exitgames.com
- With:
- Your Name and Company (if applicable)
- Invoice/Purchase ID from the Asset Store
- Photon Cloud AppID
Photon Server SDK
As alternative to the Photon Cloud service, you can run your own server and develop server side logic on top of our “Load Balancing” C# solution. This gives you full control of the server logic.
The Photon Server SDK can be downloaded on: www.exitgames.com/en/OnPremise/Download
Starting the Server: doc.exitgames.com/en/onpremise/current/getting-started/photon-server-in-5min
Photon Unity Networking - First steps
When you import PUN, the "Wizard" window will popup. Either enter your email address to register for the cloud, skip this step to enter the AppId of an existing account or switch to "self hosted" Photon to enter your server's address.
This creates a configuration for either the cloud service or your own Photon server in the project: PhotonServerSettings.
PUN consists of quite a few files, however there’s only one that truly matters: PhotonNetwork. This class contains all functions and variables needed. If you ever have custom requirements, you can always modify the source files - this plugin is just an implementation of Photon after all.
To use PUN from UnityScript, move both folders "PhotonNetwork" and "UtilityScripts" to the Assets\ folder.
To show you how this API works, here are a few examples right away.
Master Server And Lobby
PUN always uses a master server and one or more game servers. The master server manages currently running games on the various game servers and will provide a game server address when you join or create a room. PUN (the client) automatically switches to that game server.
Individual matches are known as Rooms. They are independent of each other and identified by name. Rooms are grouped into one or multiple lobbies. Lobbies are an optional part in matchmaking. If you don't use custom lobbies explicitly, PUN will use a single lobby for all rooms.
By default, PUN will join the default lobby after connecting. This lobby sends a list of existing rooms to the client, so the player can pick a room (by name or some properties listed). Access the current list by using PhotonNetwork.GetRoomList(). The lists is updated in intervals to keep traffic low.
Clients don't have to join a lobby to join or create rooms. If you don't want to show a list of rooms in your client, set PhotonNetwork.autoJoinLobby = false before you connect and your clients will skip the lobby.
You can use more than one lobby to organize room-lists as needed for your game. PhotonNetwork.JoinLobby is the method to join a specific lobby. You can make them up on the client side - the server will keep track of them. As long as name and type are the same, the TypedLobby will be the same for all clients, too.
A client is always just in one lobby and while being in a lobby, creating a room will relate to this lobby, too. Multiple lobbies mean the clients get shorter rooms lists, which is good. There is no limit to the rooms lists.
A parameter in JoinRoom, JoinRandomRoom and CreateRoom enables you to select a lobby without joining it.
Players won't notice each other in the Lobby and can't send data (to prevent issues when it's getting crowded).
The servers are all run on dedicated machines - there is no such thing as player-hosted ‘servers’. You don’t have to bother remembering about the server organization though, as the API all hides this for you.
The code above is required to make use of any PhotonNetwork features. It sets your client’s game version and uses the setup-wizard’s config (stored in: PhotonServerSettings). The wizard can also be used when you host Photon yourself. Alternatively, use Connect() and you can ignore the PhotonServerSettings file.
Versioning
The Photon Cloud uses your appID to separate your players from everyone else’s.
Within one AppId, you can deliberately separate clients/players by the "Game Version" string, which is set in the "connect" methods (as parameter).
Note: As we can’t guarantee that different Photon Unity Networking versions are compatible with each other, we add the PUN version to your game’s version. This literally adds "_" + PhotonNetwork.versionPUN to your Game Version string.
Creating and Joining Games
Next, you’ll want to join or create a room. The following code showcases some required functions:
A list of currently running games is provided by the master server’s lobby. It can be joined like other rooms but only provides and updates the list of rooms. The PhotonNetwork plugin will automatically join the lobby after connecting. When you’re joining a room, the list will no longer update.
To display the list of rooms (in a lobby):
Alternatively, the game can use random matchmaking: It will try to join any room and fail if none has room for another player. In that case: Create a room without name and wait until other players join it randomly.
Advanced Matchmaking & Room Properties
Fully random matchmaking is not always something players enjoy. Sometimes you just want to play a certain map or just two versus two.
In Photon Cloud and Loadbalancing, you can set arbitrary room properties and filter for those in JoinRandom.
Room Properties and the Lobby
Room properties are synced to all players in the room and can be useful to keep track of the current map, round, starttime, etc. They are handled as Hashtable with string keys. Preferably short keys.
You can forward selected properties to the lobby, too. This makes them available for listing them and for random matchmaking, too. Not all room properties are interesting in the lobby, so you define the set of properties for the lobby on room creation.
Note that "ai" is not a key in the room-properties yet. It won't show up in the lobby until it's set in the game via Room.SetCustomProperties(). When you change the values for "map" or "ai", they will be updated in the lobby with a short delay, too.
Keep the list short to make sure performance doesn't suffer from loading the list.
Filtering Room Properties in Join Random
In JoinRandom, you could pass a Hashtable with expected room properties and max player value. These work as filters when the server selects a "fitting" room for you.
If you pass more filter properties, chances are lower that a room matches them. Better limit the options.
Make sure you never filter for properties that are not known to the lobby (see above).
MonoBehaviour Callbacks
PUN uses several callbacks to let your game know about state changes like “connected” or “joined a game”. All you have to do is implement the fitting method in any MonoBehaviour and it gets called when the event happens.
To get a good overview of available callbacks, take a look at the class Photon.PunBehaviour. If you make your script a PunBehaviour (instead of a MonoBehaviour), you can override individual callbacks easily. If you begin to type "override", your coding IDE should provide you a list of callbacks, so they are easy to find while coding, too.
This covers the basics of setting up game rooms. Next up is actual communication in games.
Sending messages in rooms
Inside a room you are able to send network messages to other connected players. Furthermore you are able to send buffered messages that will also be sent to players that connect in the future (for spawning your player for instance).
Sending messages can be done using two methods. Either RPCs or by using the PhotonView property OnSerializePhotonView. There is more network interaction though. You can listen for callbacks for certain network events (e.g. OnPhotonInstantiate, OnPhotonPlayerConnected) and you can trigger some of these events (PhotonNetwork.Instantiate). Don’t worry if you’re confused by the last paragraph, next up we’ll explain for each of these subjects.
Using Groups in PUN
Groups are not synchronized when they are changed on any PhotonView. It's up to the developer to keep photonviews in the same groups on all clients, if that's needed. Using different group numbers for the same photonview on several clients will cause some inconsistent behaviour.
Some network messages are checked for their receiver group at the receiver side only, namely:
- RPCS that are targeted to a single player (or MasterClient)
- RPCS that are buffered (AllBuffered/OthersBuffered).
- This includes PhotonNetwork.Instantiate (as it is buffered).
Technical reason for this: the photon server only supports interestgroups for messages that are not cached and are not targetted at sepcific actor(s). This might change in the future.
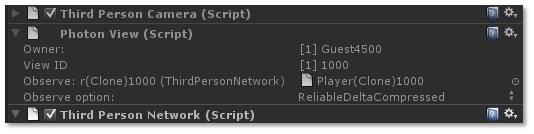
PhotonView
PhotonView is a script component that is used to send messages (RPCs and OnSerializePhotonView). You need to attach the PhotonView to your games gameobjects. Note that the PhotonView is very similar to Unity’s NetworkView.
At all times, you need at least one PhotonView in your game in order to send messages and optionally instantiate/allocate other PhotonViews.
To add a PhotonView to a gameobject, simply select a gameobject and use: “Components/Miscellaneous/Photon View”.
Observe Transform
If you attach a Transform to a PhotonView’s Observe property, you can choose to sync Position, Rotation and Scale or a combination of those across the players. This can be a great help for prototyping or smaller games. Note: A change to any observed value will send out all observed values - not just the single value that’s changed. Also, updates are not smoothed or interpolated.
Observe MonoBehaviour
A PhotonView can be set to observe a MonoBehaviour. In this case, the script’s OnPhotonSerializeView method will be called. This method is called for writing an object’s state and for reading it, depending on whether the script is controlled by the local player.
The simple code below shows how to add character state synchronization with just a few lines of code more:
If you send something “ReliableDeltaCompressed”, make sure to always write data to the stream in the same order. If you write no data to the PhotonStream, the update is not sent. This can be useful in pauses. Now on, to yet another way to communicate: RPCs.
Remote Procedure Calls
Remote Procedure Calls (RPCs) are exactly what the name implies: methods that can be called on remote clients in the same room. To enable remote calls for a method of a MonoBehaviour, you must apply the attribute: [PunRPC]. A PhotonView instance is needed on the same GameObject, to call the marked functions.
To call the method from any script, you need access to a PhotonView object. If your script derives from Photon.MonoBehaviour, it has a photonView field. Any regular MonoBehaviour or GameObject can use: PhotonView.Get(this) to get access to its PhotonView component and then call RPCs on it.
So, instead of directly calling the target method, you call RPC() on a PhotonView. Provide the name of the method to call, which players should call the method and then provide a list of parameters.
Careful: The parameters list used in RPC() has to match the number of expected parameters! If the receiving client can’t find a matching method, it will log an error. There is one exception to this rule: The last parameter of a RPC method can be of type PhotonMessageInfo, which will provide some context for each call.
Timing for RPCs and Loading Levels
RPCs are called on specific PhotonViews and always target the matching one on the remote client. If the remote client does not know the fitting PhotonView, the RPC is lost.
A typical cause for lost RPCs is when clients load and set up levels. One client is faster or in the room for a longer time and sends important RPCs for objects that are not yet loaded on the other clients. The same happens when RPCs are buffered.
The solution is to pause the message queue, during scene loading. This code shows how how you can do it:
Alternatively you can use PhotonNetwork.LoadLevel. It temporarily disables the message queue as well.
Disabling the message queue will delay incoming and outgoing messages until the queue is unlocked. Obviously, it's very important to unlock the queue when you're ready to go on.
RPCs that belonged to the previously loaded scene but still arrived will now be discarded. But you should be able to define a break between both scenes by RPC.
Various topics
Instantiating Networked Objects
In about every game you need to instantiate one or more player objects for every player. There are various options to do so which are listed below.
PhotonNetwork.Instantiate
PUN can automatically take care of spawning an object by passing a starting position, rotation and a prefab name to the PhotonNetwork.Instantiate method. Requirement: The prefab should be available directly under a Resources/ folder so that the prefab can be loaded at run time. Watch out with webplayers: Everything in the resources folder will be streamed at the very first scene per default. Under the webplayer settings you can specify the first level that uses assets from the Resources folder by using the “First streamed level”. If you set this to your first game scene, your preloader and mainmenu will not be slowed down if they don’t use the Resources folder assets.
Gain more control: Manually instantiate
If don’t want to rely on the Resources folders to instantiate objects over the network you’ll have to manually Instantiate objects as shown in the example at the end of this section.
The main reason for wanting to instantiate manually is gaining control over what is downloaded when for streaming webplayers. The details about streaming and the Resources folder in Unity can be found here.
If you spawn manually, you will have to assign a PhotonViewID yourself, these viewID’s are the key to routing network messages to the correct gameobject/scripts. The player who wants to own and spawn a new object should allocate a new viewID using PhotonNetwork.AllocateViewID();. This PhotonViewID should then be send to all other players using a PhotonView that has already been set up (for example an existing scene PhotonView). You will have to keep in mind that this RPC needs to be buffered so that any clients that connect later will also receive the spawn instructions. Then the RPC message that is used to spawn the object will need a reference to your desired prefab and instantiate this using Unity’s GameObject.Instantiate. Finally you will need to set setup the PhotonViews attached to this prefab by assigning all PhotonViews a PhotonViewID.
If you want to use asset bundles to load your network objects from, all you have to do is add your own assetbundle loading code and replace the “playerPrefab” from the example with the prefab from your asset bundle.
Offline mode
Offline mode is a feature to be able to re-use your multiplayer code in singleplayer game modes as well.
Mike Hergaarden: At M2H we had to rebuild our games several times as game portals usually require you to remove multiplayer functionality completely. Furthermore, being able to use the same code for single and multiplayer saves a lot of work on itself.
The most common features that you’ll want to be able to use in singleplayer are sending RPCs and using PhotonNetwork.Instantiate. The main goal of offline mode is to disable nullreferences and other errors when using PhotonNetwork functionality while not connected. You would still need to keep track of the fact that you’re running a singleplayer game, to set up the game etc. However, while running the game, all code should be reusable.
You need to manually enable offline mode, as PhotonNetwork needs to be able to distinguish erroneous from intended behaviour. Enabling this feature is very easy:
You can now reuse certain multiplayer methods without generating any connections and errors. Furthermore there is no noticeable overhead. Below follows a list of PhotonNetwork functions and variables and their results during offline mode:
PhotonNetwork.player The player ID is always -1 PhotonNetwork.playerName Works as expected. PhotonNetwork.playerList Contains only the local player PhotonNetwork.otherPlayers Always empty PhotonNetwork.time returns Environment.TickCount or a more precise timer if enabled; PhotonNetwork.isMasterClient Always true PhotonNetwork.AllocateViewID() Works as expected. PhotonNetwork.Instantiate Works as expected PhotonNetwork.Destroy Works as expected. PhotonNetwork.RemoveRPCs/RemoveRPCsInGroup/SetReceivingEnabled/SetSendingEnabled/SetLevelPrefix While these make no sense in Singleplayer, they will not hurt either. PhotonView.RPC Works as expected.
Note that using other methods than the ones above can yield unexpected results and some will simply do nothing. E.g. PhotonNetwork.room will, obviously, return null. If you intend on starting a game in singleplayer, but move it to multiplayer at a later stage, you might want to consider hosting a 1 player game instead; this will preserve buffered RPCs and Instantiation calls, whereas offline mode Instantiations will not automatically carry over after Connecting.
Either set PhotonNetwork.offlineMode = false; or Simply call Connect() to stop offline mode.
Limitations
Views and players
For performance reasons, the PhotonNetwork API supports up to 1000 PhotonViews per player and a maximum of 2,147,483 players (note that this is WAY higher than your hardware can support!). You can easily allow for more PhotonViews per player, at the cost of maximum players. This works as follows: PhotonViews send out a viewID for every network message. This viewID is an integer and it is composed of the player ID and the player’s view ID. The maximum size of an int is 2,147,483,647, divided by our MAX_VIEW_IDS(1000) that allows for over 2 million players, each having 1000 view IDs. As you can see, you can easily increase the player count by reducing the MAX_VIEW_IDS. The other way around, you can give all players more VIEW_IDS at the cost of less maximum players. It is important to note that most games will never need more than a few view ID’s per player (one or two for the character..and that’s usually it). If you need much more then you might be doing something wrong! It is extremely inefficient to assign a PhotonView and ID for every bullet that your weapon fires, instead keep track of your fire bullets via the player or weapon’s PhotonView.
There is room for improving your bandwidth performance by reducing the int to a short (value range: −32,768 to 32,768). By setting MAX_VIEW_IDS to 32 you can then still support 1023 players Search for “//LIMITS NETWORKVIEWS&PLAYERS” for all occurrences of the int viewID. Furthermore, currently the API is not using uint/ushort but only the positive range of the numbers. This is done for simplicity and the usage of viewIDs is not a crucial performance issue for most situations.
Groups and Scoping
The PhotonNetwork plugin does not support network groups fully. See above: "Using Groups in PUN".
Unity’s “scope” feature is not implemented.
Feedback
We are interested in your feedback, as this solution is an ongoing project for us. Let us know if something was too hidden, missing or not working. To let us know, post in our Forum: forum.exitgames.com
F.A.Q.
Can I use multiple PhotonViews per GameObject? Why?
Yes this is perfectly fine. You will need multiple PhotonViews if you need to observe 2 or more targets; You can only observe one per PhotonView. For your RPC’s you’ll only ever need one PhotonView and this can be the same PhotonView that is already observing something. RPC’s never clash with an observed target.
Can I use UnityScript / Javascript?
To use PUN from UnityScript, move both folders "PhotonNetwork" and "UtilityScripts" to the Assets\ folder. Now PUN compiles before UnityScript and that makes it available from regular UnityScript code.