Layout Guide
Native Sizes (Window and Client)
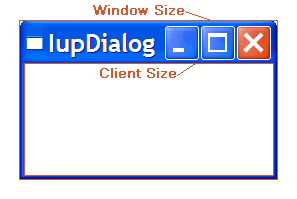
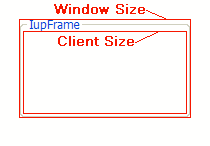
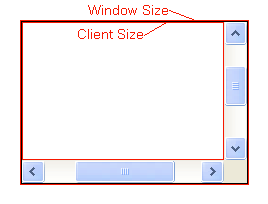
Because of the dynamic nature of the abstract layout IUP elements have implicit many types of size. But the native elements have only two types of size: Window and Client. The Window size reflects the bounding rectangle of the element. The Client size reflects the inner size of the window that excludes the decorations and margins. For many elements these two sizes are equal, but for many container they are quite different. See some examples bellow.
|
|
|
|
The native Client size is used only internally to reposition the elements in the abstract layout, but it is available using the CLIENTSIZE attribute.
IUP Sizes
Natural Size
IUP does not require that the application specifies the size of any element. The sizes are automatically calculated so the contents of each element is fully displayed. This size is called Natural size. The Natural size is calculated only when the element is mapped to the native system.
The Natural size of a dialog is the size that allows all the elements inside the dialog to be fully displayed, and so on for all the containers inside the dialog.
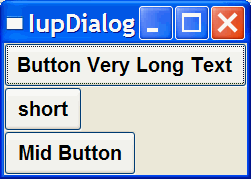
So consider the following code and its result. Each button size is large enough to display their respective text. If the dialog size is increased or reduced by the size handlers in the dialog borders the buttons do not move or change their sizes.
dlg = iup.dialog
{
  iup.vbox
  {
    iup.button{title="Button Very Long Text"},
    iup.button{title="short"},
    iup.button{title="Mid Button"}
  }
  ;title="IupDialog", font="Helvetica, Bold 14"
}
dlg:show()
|
 |
Current Size and User Size (SIZE or RASTERSIZE)
When the application defines the SIZE or RASTERSIZE attributes, it changes the User size in IUP. This size is used as a replacement for the Natural size if not a container, or as the minimum size for a container. The initial value is NULL. When set to NULL the User size is internally set to "0x0".
The returned value for SIZE or RASTERSIZE is the Current size in IUP. It returns the native Window size of the element when the element is mapped to the native system. Before mapping, the returned value is the User size defined by SIZE or RASTERSIZE attributes if any, otherwise they are NULL.
Defining the SIZE attribute of the buttons in the example we can make all have the same size. (In the following example the dialog size was changed after it was displayed on screen)
dlg = iup.dialog
{
  iup.vbox
  {
    iup.button{title="Button Very Long Text", size="50x"},
    iup.button{title="short", size="50x"},
    iup.button{title="Mid Button", size="50x"}
  }
  ;title="IupDialog", font="Helvetica, Bold 14"
}
dlg:show()
|
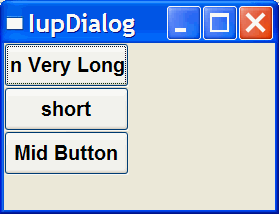 |
So when EXPAND=NO (see bellow) for elements that are not containers if User size is defined then the Natural size is ignored.
If you want to adjust sizes in the dialog do it after the layout size and positioning is done, i.e. after the dialog is mapped or after IupRefresh is called.
EXPAND
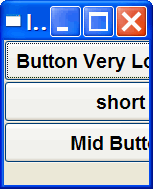
Another way to increase the size of elements is to use the EXPAND attribute. When there is room in the container to expand an element, the container layout will expand the elements that have the EXPAND attribute set to YES, HORIZONTAL or VERTICAL accordingly, even if they have the User size defined.
The default is EXPAND=NO, but for containers is EXPAND=YES.
Using EXPAND in the example, we obtain the following result:
dlg = iup.dialog
{
  iup.vbox
  {
    iup.button{title="Button Very Long Text"},
    iup.button{title="short", expand="HORIZONTAL"},
    iup.button{title="Mid Button", expand="HORIZONTAL"}
  }
  ;title="IupDialog", font="Helvetica, Bold 14"
}
dlg:show()
|
 |
So for elements that are NOT containers, when EXPAND is enabled the Natural size and the User size are ignored.
For containers the default behavior is to always expand or if expand is disabled they are limited to the Natural size. As a consequence (if the User size is not defined in all the elements) the dialog contents can only expand and its minimum size is the Natural size, even if EXPAND is enabled for its elements. In fact the actual dialog size can be smaller, but its contents will stop to follow the resize and they will be clipped at right and bottom.
SHRINK
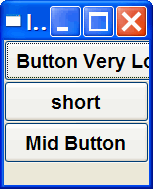
To reduze the size of the dialog and its contents to a size smaller than the Natural size the SHRINK attribute of the dialog can be used. If set to YES all the containers of the dialog will be able to reduce its size. But be aware that elements may overlap and the layout result could be visually bad.
Notice that in the example the dialog inicial size will be 0x0 because it is not defined. The picture shown is after resizing the dialog. So when using SHRINK usually you will also need to set the dialog initial size.
dlg = iup.dialog
{
  iup.vbox
  {
    iup.button{title="Button Very Long Text"},
    iup.button{title="short", expand="HORIZONTAL"},
    iup.button{title="Mid Button", expand="HORIZONTAL"}
  }
  ;title="IupDialog", shrink="yes", font="Helvetica, Bold 14"
}
dlg:show()
|
 |
Layout Hierarchy
The layout of the elements of a dialog in IUP has a natural hierarchy because of the way they are composed together.
To create a node simply call one of the pre-defined constructors like IupLabel, IupButton, IupCanvas, and so on. To create a brach just call the constructors of containers like IupDialog, IupFrame, IupVBox, and so on. Internally they all call IupCreate to create branches or nodes. To destroy a node or branch call IupDestroy.
Some of the constructors already append childreen to its branch, but you can append other children using IupAppend. To remove from the tree call IupDetach.
For the element to be visible IupMap must be called so it can be associated with a native control. IupShow, IupShowXY or IupPopup will automatically call IupMap before showing a dialog. To remove this association call IupUnmap.
But there is a call order to be able to call theses functions that depends on the state of the element. As you can see from these functions there are 3 states: created, appended and mapped. From created to mapped it is performed one step at a time. Even when the constructor receives the children as a parameter IupApped is called internally. When you detach an element it will be automatically unmapped if necessary. When you destroy an element it will be automatically detached if necessary.
A more simple and fast way to move an element from one position in the hierarchy to another is using IupReparent.
The dialog is the root of the hierarchy tree. To retrieve the dialog of any element you can simply call IupGetDialog, but there are other ways to navigate in the hierarchy tree.
To get all the children of a container call IupGetChild or IupGetNextChild. To get just the next control with the same parent use IupGetBrother. To get the parent of a control call IupGetParent.
Layout Display
The layout size and positioning is automatically updated by IupMap. IupMap also updates the dialog layout even if it is already mapped, so using it or using IupShow, IupShowXY or IupPopup (they all call IupMap) will also update the dialog layout. The layout size and positioning can be manually updated using IupRefresh, even if the dialog is not mapped.
After changing containers attributes or element sizes that affect the layout the elements are NOT immediately repositioned. Call IupRefresh for the container* to update all the dialog layout (* or any other element in the dialog, including the dialog itself).
To only force a redraw of an element and its children call IupUpdate.
