1.14. Importing and exporting virtual machines
From Oracle VM VirtualBox
VirtualBox can import and export virtual machines in the industry-standard Open Virtualization Format (OVF).[6]
OVF is a cross-platform standard supported by many virtualization products which allows for creating ready-made virtual machines that can then be imported into a virtualizer such as VirtualBox. VirtualBox makes OVF import and export easy to access and supports it from the Manager window as well as its command-line interface. This allows for packaging so-called virtual appliances: disk images together with configuration settings that can be distributed easily. This way one can offer complete ready-to-use software packages (operating systems with applications) that need no configuration or installation except for importing into VirtualBox.
Note
The OVF standard is complex, and support in VirtualBox is an ongoing process. In particular, no guarantee is made that VirtualBox supports all appliances created by other virtualization software. For a list of known limitations, please see Chapter 14, Known limitations.
Appliances in OVF format can appear in two variants:
-
They can come in several files, as one or several disk images, typically in the widely-used VMDK format (see Section 5.2, “Disk image files (VDI, VMDK, VHD, HDD)”) and a textual description file in an XML dialect with an
.ovfextension. These files must then reside in the same directory for VirtualBox to be able to import them. -
Alternatively, the above files can be packed together into a single archive file, typically with an
.ovaextension. (Such archive files use a variant of the TAR archive format and can therefore be unpacked outside of VirtualBox with any utility that can unpack standard TAR files.)
To import an appliance in one of
the above formats, simply double-click on the OVF/OVA file.[7] Alternatively, select "File" → "Import appliance" from
the Manager window. In the file dialog that comes up, navigate to the file
with either the .ovf or the
.ova file extension.
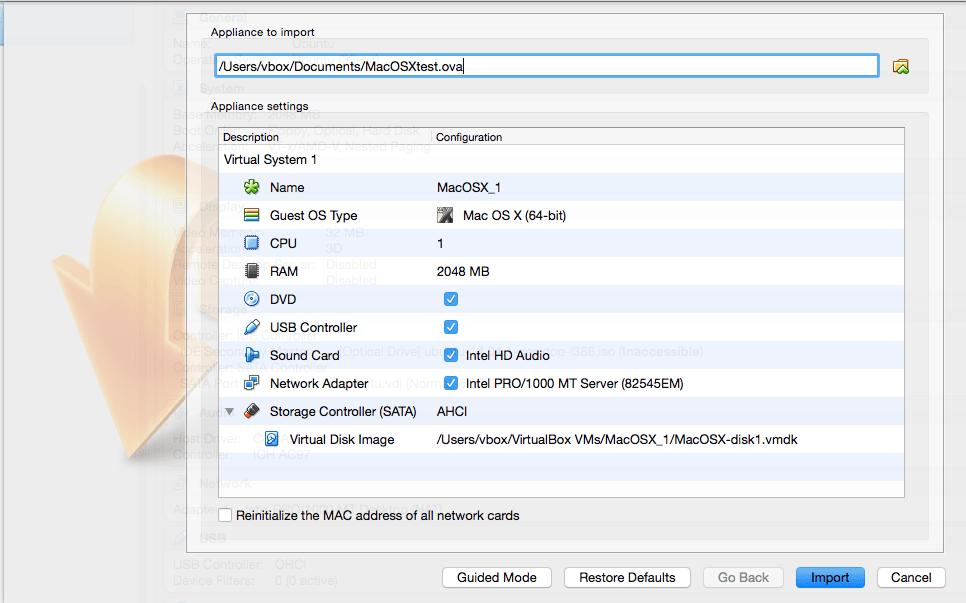
If VirtualBox can handle the file, a dialog similar to the following will appear:
|
This presents the virtual machines described in the OVF file and allows you to change the virtual machine settings by double-clicking on the description items. Once you click on "Import", VirtualBox will copy the disk images and create local virtual machines with the settings described in the dialog. These will then show up in the Manager's list of virtual machines.
Note that since disk images tend to be big, and VMDK images that come with virtual appliances are typically shipped in a special compressed format that is unsuitable for being used by virtual machines directly, the images will need to be unpacked and copied first, which can take a few minutes.
For how to import an image at the command line, please see Section 8.10, “VBoxManage import”.
Conversely, to export virtual machines that you already have in VirtualBox, select "File" → "Export appliance". A different dialog window shows up that allows you to combine several virtual machines into an OVF appliance. Then, select the target location where the target files should be stored, and the conversion process begins. This can again take a while.
For how to export an image at the command line, please see Section 8.11, “VBoxManage export”.
Note
OVF cannot describe snapshots that were taken for a virtual machine. As a result, when you export a virtual machine that has snapshots, only the current state of the machine will be exported, and the disk images in the export will have a "flattened" state identical to the current state of the virtual machine.