For every change you make and commit, you should provide a log message for that change. That way you can later find out what changes you made and why, and you have a detailed log for your development process.
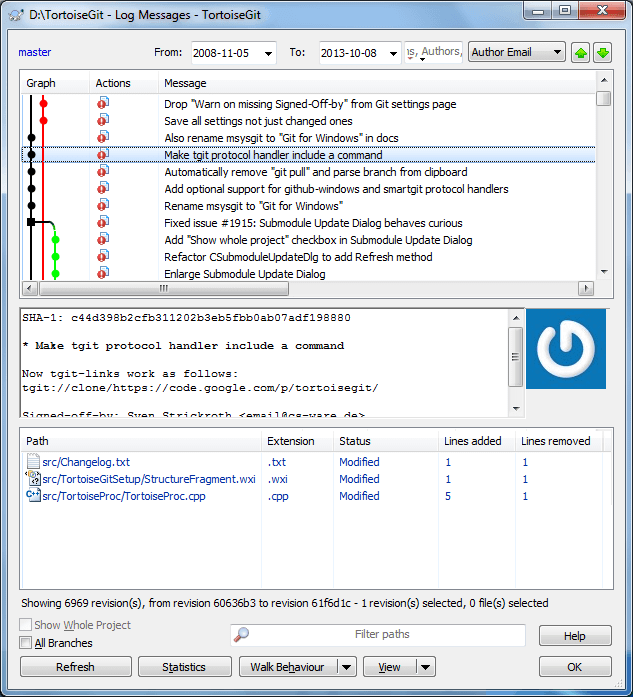
The Log Dialog retrieves all those log messages and shows them to you. The display is divided into 3 panes.
-
The top pane shows a list of revisions where changes to the file/folder have been committed. This summary includes the date and time, the person who committed the revision and the start of the log message.
The line shown in bold indicates the HEAD commit and the entry "Working tree changes" is a virtual entry representing the current (uncommitted) state of your working tree.
-
The middle pane shows the full log message for the selected revision.
-
The bottom pane shows a list of all files and folders that were changed as part of the selected revision.
But it does much more than that - it provides context menu commands which you can use to get even more information about the project history.
There are several places from where you can show the Log dialog:
-
From the explorer context menu using → .
-
From various TortoiseGit dialogs where you can select a commit (oftentimes using a button).
-
From various TortoiseGit dialogs where commit entries or files are shown using the context menu.
The top pane has an Actions column containing icons that summarize what has been done in that revision. There are four different icons, each shown in its own column.

If a revision modified a file or directory, the modified icon is shown in the first column.

If a revision added a file or directory, the added icon is shown in the second column.

If a revision deleted a file or directory, the deleted icon is shown in the third column.

If a revision replaced(rename) a file, the replaced icon is shown in the fourth column.
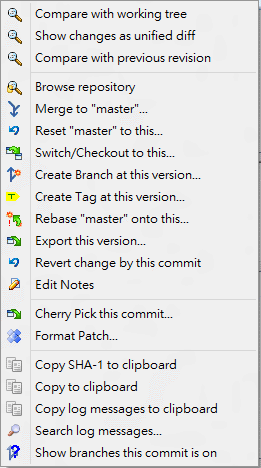
The top pane of the Log dialog has a context menu that allows you to
access much more information. You can press the Shift key to see the extended menu with some more options.
- Compare with working tree
-
Compare the selected revision with your working tree. The default Diff-Tool is TortoiseGitMerge which is supplied with TortoiseGit. If the log dialog is for a folder, this will show you a list of changed files, and allow you to review the changes made to each file individually.
- Show changes as unified diff
-
View the changes made in the selected revision as a Unified-Diff file (GNU patch format). This shows only the differences with a few lines of context. It is harder to read than a visual file compare, but will show all file changes together in a compact format.
- Compare with previous revision
-
Compare the selected revision with the previous revision. This works in a similar manner to comparing with your working tree. For folders this option will first show the changed files dialog allowing you to select files to compare.
- Browse repository
-
Open the repository browser to examine the selected file or folder in the repository as it was at the selected revision (cf. Section 2.16, “The Repository Browser”).
- Reset (current branch) to this
-
Resets the HEAD to the selected commit (cf. Section 2.24, “Reset”).
- Switch / Checkout to revision
-
Update your working tree to the selected revision. Useful if you want to have your working tree reflect a time in the past, or if there have been further commits to the repository and you want to update your working tree one step at a time.
- Create branch from revision
-
Create a branch based on the selected revision (cf. Section 2.27, “Branching/Tagging”).
- Create tag from revision
-
Create a tag on a selected revision (cf. Section 2.27, “Branching/Tagging”).
- Rebase (current branch) to this
-
Rebase current branch on top of the selected commit (cf. Section 2.30, “Rebase”).
- Export this version...
-
Export the selected revision to an archive file such as zip. This brings up a dialog for you to confirm the revision, and select a location for the export (cf. Section 2.34, “Exporting a Git Working Tree”).
- Revert change by this commit
-
Revert changes from which were made in the selected revision. All changes are integrated into your working tree. You may choose to commit immediately or edit and commit later. To abandon the reverted changes, perform a hard reset.
- Edit notes
-
Edit notes of the selected commit.
- Cherry Pick this commit
-
Cherry Pick this commit on top of HEAD (cf. Section 2.29, “Cherry picking”).
- Bisect start
-
Start bisection. Find by binary search the change that introduced a bug (cf. Section 2.26, “Bisect”).
- Format Patch...
-
Create Patches from this commit.
- Copy SHA-1 to clipboard
-
Copy the commit hash of the selected revision to the clipboard.
- Copy to clipboard
-
Copy the log details of the selected revisions to the clipboard. This will copy the revision number, author, date, log message and the list of changed items for each revision.
- Copy log message to clipboard
-
Copy the log message of the selected revision to the clipboard.
- Search log messages...
-
Search log messages for the text you enter. This searches the log messages that you entered and also the action summaries created by Git (shown in the bottom pane). The search is not case sensitive.
![[Tip]](tip.png)
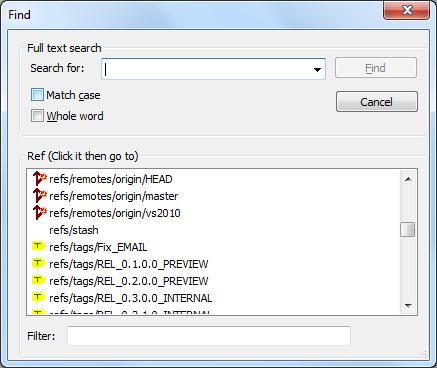
Tip This allows you to easily search for refs (tags and branches).
If you press SHIFT while clicking on a ref or on you can navigate to the commit w/o selecting it.
- Shows branches this commit is on
-
Shows the branches that the select commit belongs to. It shows both local and remote branches.
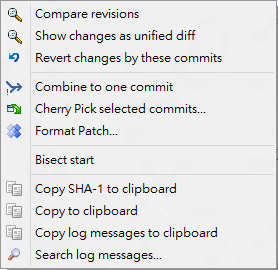
If you select two revisions at once (using the usual
Ctrl-modifier), the context menu changes and
gives you fewer options:
- Compare revisions
-
Compare the two selected revisions using a visual difference tool. The default Diff-Tool is TortoiseGitMerge which is supplied with TortoiseGit.
- Show differences as unified diff
-
View the differences between the two selected revisions as a Unified-Diff file. This works for files and folders.
- Revert changes by these commits
-
Revert changes from which were made in the selected revisions. All changes are integrated into your working tree. You may choose to commit immediately or edit and commit later. To abandon the reverted changes, perform a hard reset.
- Combine to one commit
-
Combine continuous commits to one commit.
- Cherry Pick selected commits
-
Cherry Pick chosen Commits on top of current HEAD (cf. Section 2.29, “Cherry picking”).
- Format Patch...
-
Create patches between two chosen commits.
- Copy SHA-1 to clipboard
-
Copy the commit hashes of the selected revisions to the clipboard, delimited by CRLF.
- Copy to clipboard
-
Copy log messages to clipboard as described above.
- Copy log messages to clipboard
-
Copy the log messages of the selected revisions to the clipboard. This will copy the log message for each revision. This facilitates the preparation of release notes.
- Search log messages...
-
Search log messages as described above.
If you select two or more revisions (using the usual Ctrl or Shift modifiers), You can combine select commits to one commit. And cherry pick these commits to current branch.
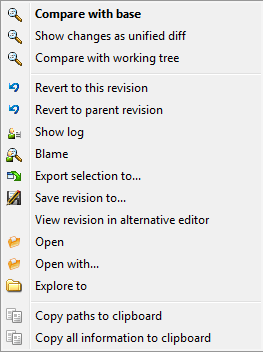
The bottom pane of the Log dialog also has a context menu that allows you to
- Compare with base
-
Compare chosen file with base version.
- Show as unified diff
-
Show file changes in unified diff format. This context menu is only available for files shown as modified.
- Compare with working tree
-
Compare chosen file with working tree.
- Revert changes to this revision
-
Revert chosen files to the satte of this revision.
- Revert changes to parent revision
-
Revert chosen files to the state before this revision.
- Show log
-
Show the revision log for the selected single file.
- Blame...
-
Opens the Blame dialog, allowing you to blame up to the selected revision (cf. Section 2.33, “Who Changed Which Line?”).
- Save revision to...
-
Save the selected revision to a file so you have an older version of that file.
- Export selection to...
-
Saves the selected files to a target directory. Compared to "Save revision to..." this preserves the directory structure.
- View revision in alternative editor
-
Show chosen file with an alternative editor such as notepad2 with chosen commit.
- Open/Open with...
-
Open the selected file, either with the default viewer for that file type, or with a program you choose.
- Explore to
-
Open directory of file with Explore.
- Copy paths to clipboard
-
Copy paths to clipboard
- Copy all information to clipboard
-
Copy all information to clipboard, include version info.
|
|
Tip |
|---|---|
|
You may notice that sometimes we refer to changes and other times to differences. What's the difference? |
If you want to restrict the log messages to show only those you are interested in rather than scrolling through a list of hundreds, you can use the filter controls at the top of the Log Dialog.
The first element is the branch/revision filter. Clicking on on opens the Reference Browser (see Section 2.11, “Browse All Refs”). There you can select single or multiple references. If you select exactly two references, you can choose how to combine them (showing especially both A and B "A B"; showing differences "A...B" or all commits between A and B "A..B"). This filter element also contains a special context menu. Here shortcuts for "HEAD", "FETCH_HEAD", "All" and "All local branches" are available. Also, the last manual selected filters are included there.
The start and end date controls allow you to restrict the output to a known date range. The search box allows you to show only messages which contain a particular phrase. A default limitation for From can be configured in the settings dialog on the Dialogs 1 page (cf. Section 2.36.1.3, “TortoiseGit Dialog Settings”).
Click on the search icon to select which information you want to search in, and to choose regex mode. Normally you will only need a simple text search, but if you need to more flexible search terms, you can use regular expressions. If you hover the mouse over the box, a tooltip will give hints on how to use the regex functions. You can also find online documentation and a tutorial at http://www.regular-expressions.info/ . The filter works by checking whether your filter string matches the log entries, and then only those entries which match the filter string are shown.
To make the filter show all log entries that do not
match the filter string, start the string with an exclamation mark ('!').
For example, a filter string !username will only
show those entries which were not committed by username.
You can also filter the path names in the bottom pane using the → Related paths are those which contain the path used to display the log. If you fetch the log for a folder, that means anything in that folder or below it. For a file it means just that one file. If you want to grey out the unrelated ones, check → Uncheck both menu items to hide the unrelated paths completely.
In the lower left there are the checkboxes All branches and Show whole project. Use these to override the branch resp. a file/folder filter and show the log for the whole repository. Please note that these settings are remembered for a repository - even if you started the log dialog on a single file.
You can show whole project history, no choose directory or file by click Show Whole Project
+ → + → + → You can disable showing some reference types in the log graph.
→ You can enable/disable Gravatar for a specific repository.
→ just follow up first parent commit. This will help understand overwhole history.
→ Skips all merge points.
→ This is available to a single file only, which tracks renames. Otherwise, the log list stops at the commit that the current filename introduced.
→ The log graph is simplified to include merge points, commits with references, and possibly other commits.
→ The log graph is simplified to include commits with references only.
You can use the dropdown control on the upper right to select a navigation type (e.g. Author Email, Parent 1, Selection history), then use the and green buttons to navigate through the commits which match the navigation type relative to the current selected one.
Alternatively to the and green buttons, hotkeys ALT+UP and ALT+DOWN are also available.
Regarding the navigation type "Selection History", TortoiseGit memorizes the history of selected commits, so that you can navigate through those commits you selected in the past easily. You can also navigate them by pressing ALT+LEFT, ALT+RIGHT, Browse Back, and Browse Forward. Back and Forward buttons on mouse are also available.
If you also press SHIFT you can navigate through the selection history without selecting the last commits (i.e., just scrolling to and highlighting them). This helps you to navigate through commits and then select the commit(s) you really want to select (e.g. you can compare the current selected commit with the one you selected before).
If you want to jump to a commit with a particular hash, you may do so by pressing Ctrl+V or Shift+Insert (into any log dialog element other than the search box) to paste the hash from the clipboard. If it has the form of a valid commit hash, the log dialog will attempt to jump to it.
The button brings up a box showing some interesting information about the revisions shown in the Log dialog. This shows how many authors have been at work, how many commits they have made, progress by week, and much more. Now you can see at a glance who has been working hardest and who is slacking ;-)
This page gives you all the numbers you can think of, in particular the period and number of revisions covered, and some min/max/average values.
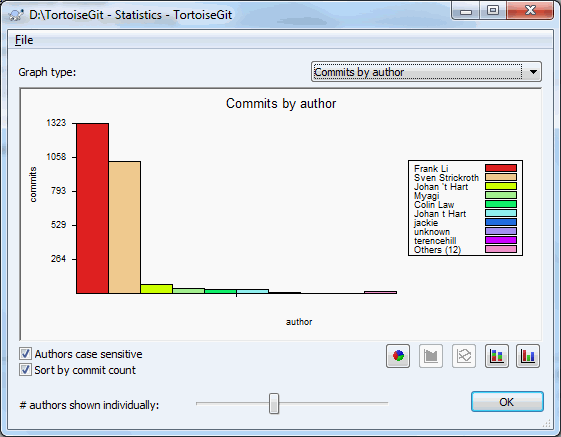
This graph shows you which authors have been active on the
project as a simple histogram, stacked histogram or
pie chart.
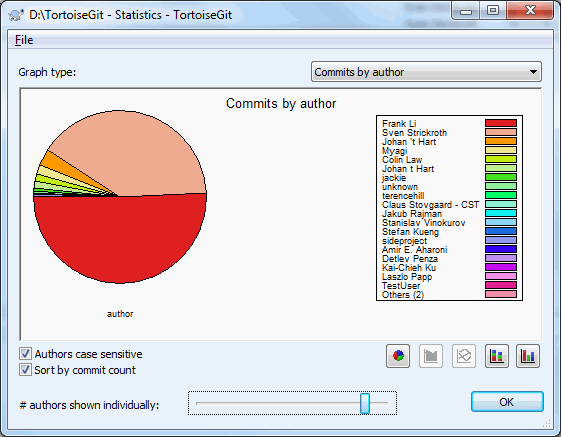
Where there are a few major authors and many minor contributors, the number of tiny segments can make the graph more difficult to read. The slider at the bottom allows you to set a threshold (as a percentage of total commits) below which any activity is grouped into an Others category.
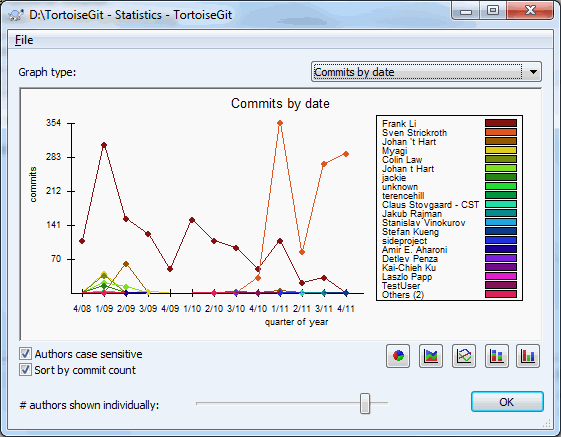
This page gives you a graphical representation of project
activity in terms of number of commits and
author. This gives some idea of when a project is being worked
on, and who was working at which time.
When there are several authors, you will get many lines on the graph. There are two views available here: normal, where each author's activity is relative to the base line, and stacked, where each author's activity is relative to the line underneath. The latter option avoids the lines crossing over, which can make the graph easier to read, but less easy to see one author's output.
By default the analysis is case-sensitive, so users
PeterEgan and PeteRegan
are treated as different authors. However, in many cases user names
are not case-sensitive, and are sometimes entered inconsistently,
so you may want DavidMorgan and
davidmorgan to be treated as the same person.
Use the Authors case insensitive checkbox
to control how this is handled.
The statistics dialog also honours the .mailmap file (see the section called “MAPPING AUTHORS”).
Note that the statistics cover the same period as the Log dialog. If that is only displaying one revision then the statistics will not tell you very much.