2.5. Committing Your Changes To The Repository
From TortoiseGit
Storing the changes you made to your working tree is known as committing the changes. you can use → first, to see which files have changed locally.
If there are no conflicts, you are ready to commit your changes. Select any file and/or folders you want to commit, then → .
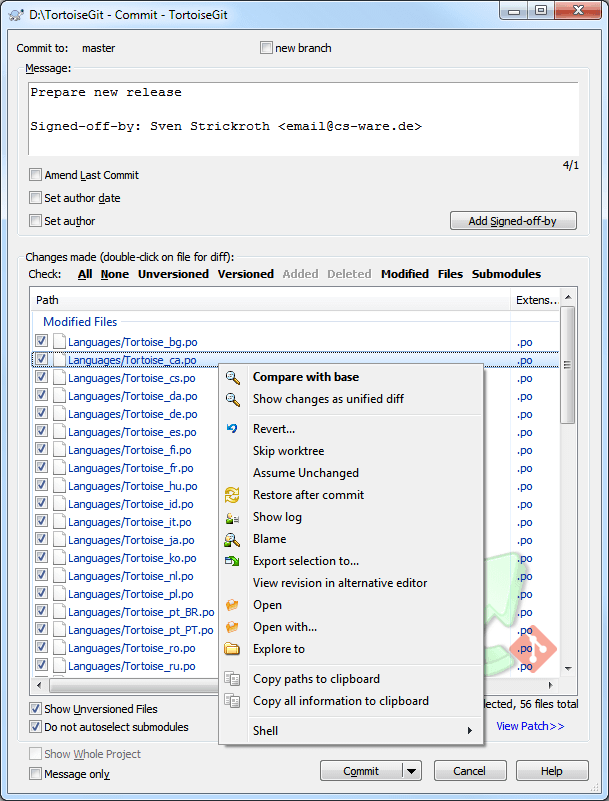
The commit dialog will show you every changed file, including added, deleted and unversioned files. If you don't want a changed file to be committed, just uncheck that file. If you want to include an unversioned file, just check that file to add it to the commit.
Default commit dialog just list select paths and their child directory files. If you want to list all files of project, you can just click .
|
|
Many unversioned files in the commit dialog |
|---|---|
|
If you think that the commit dialog shows you too many unversioned (e.g. compiler generated or editor backup) files, there are several ways to handle this. You can:
Read Section 2.20, “Ignoring Files And Directories” for more information. |
Double clicking on any modified file in the commit dialog will launch the external diff tool to show your changes. The context menu will give you more options, as shown in the screenshot. You can also drag files from here into another application such as a text editor or an IDE.
You can select or deselect items by clicking on the checkbox to the left of the item.
The columns displayed in the bottom pane are customizable. If you right click on any column header you will see a context menu allowing you to select which columns are displayed. You can also change column width by using the drag handle which appears when you move the mouse over a column boundary. These customizations are preserved, so you will see the same headings next time.
|
|
Drag and Drop |
|---|---|
|
You can drag files into the commit dialog from elsewhere, as long as the working tree is the very same. For example, you may have a huge working tree with several explorer windows open to look at distant folders of the hierarchy. If you want to avoid committing from the top level folder (with a lengthy folder crawl to check for changes) you can open the commit dialog for one folder and drag in items from the other windows to include within the same atomic commit. You can drag unversioned files which reside within a working tree into the commit dialog, and they will be Git added automatically. |
|
|
Commits are just local |
|---|---|
|
Please note, that all commits are just local and only affect your local working tree. In order to share them with others you need to push them to a remote repository. See Section 2.8, “Push” and Section 2.9, “Sync” for more information. |
Sometimes you want to only commit parts of the changes you made to a file. Such a situation usually happens when you're working on something but then an urgent fix needs to be committed, and that fix happens to be in the same file you're working on.
right click on the file and use → . This will create a copy of the file as it is. Then you can edit the file, e.g. in TortoiseGitMerge and undo all the changes you don't want to commit. After saving those changes you can commit the file.
|
|
Using TortoiseGitMerge |
|---|---|
|
If you use TortoiseGitMerge to edit the file, you can either edit the changes as you're used to, or mark all the changes that you want to include. right click on a modified block and use → to include that change. Finally right click and use → which will invert your changes (unmarked blocks) that you don't want to them to appear in current commit. |
After the commit is done, the copy of the file is restored automatically, and you have the file with all your modifications that were not committed back.
Be sure to enter a log message which describes the changes you are committing. This will help you to see what happened and when, as you browse through the project log messages at a later date. The message can be as long or as brief as you like; many projects have guidelines for what should be included, the language to use, and sometimes even a strict format.
You can apply simple formatting to your log messages using a convention
similar to that used within emails.
To apply styling to text, use
*text* for bold,
_text_ for underlining, and
^text^ for italics.
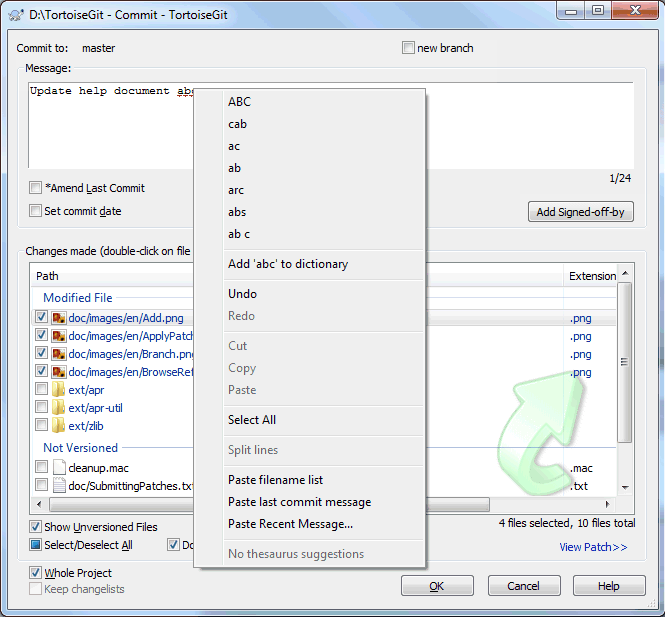
TortoiseGit includes a spellchecker to help you get your log messages
right (cf. Section 1.4.4, “Spellchecker”). This will highlight any mis-spelled words. Use the context menu
to access the suggested corrections. Of course, it doesn't know
every technical term that you do, so correctly
spelt words will sometimes show up as errors. But don't worry. You can
just add them to your personal dictionary using the context menu.
The log message window also includes a filename and function auto-completion
facility. This uses regular expressions to extract class and function names
from the (text) files you are committing, as well as the filenames themselves.
If a word you are typing matches anything in the list (after you have typed at
least 3 characters, or pressed Ctrl+Space),
a drop-down appears allowing you to select the full name.
The regular expressions supplied with TortoiseGit are held in the TortoiseGit
installation bin folder. You can also define your own
regexes and store them in %APPDATA%\TortoiseGit\autolist.txt.
Of course your private autolist will not be overwritten when you update your
installation of TortoiseGit. If you are unfamiliar with regular expressions,
take a look at the introduction at
https://en.wikipedia.org/wiki/Regular_expression
,
and the online documentation and tutorial at
http://www.regular-expressions.info/
.
Getting the regex just right can be tricky, so to help you sort out a
suitable expression there is a test dialog which allows you to enter
an expression and then type in filenames to test it against.
Start it from the command prompt using the command
TortoiseGitProc.exe /command:autotexttest.
You can re-use previously entered log messages. Just use the command → to view a list of the last few messages you entered for this working tree. The number of stored messages can be customized in the TortoiseGit settings dialog.
The log message window also includes a commit message snippet facility.
These snippets are shown in the autocomplete dropdown once you type
a snippet shortcut, and selecting the snippet in the autocomplete dropdown
then inserts the full text of the snippet.
The snippets supplied with TortoiseGit are held in the TortoiseGit
installation bin folder. You can also define your own
snippets and store them in %APPDATA%\TortoiseGit\snippet.txt.
# is the comment character. Use escape sequences \t \r \n \\.
You can add your name and email address to the end of the log message by clicking .
You can clear all stored commit messages from the Saved data page of TortoiseGit's settings, or you can clear individual messages from within the Recent messages dialog using the Delete key.
If you want to include the checked paths in your log message, you can use the command → in the edit control.
Another way to insert the paths into the log message is to simply drag the files from the file list onto the edit control.
|
|
Using keyboard |
|---|---|
|
You can access the OK button from keyboard by pressing Ctrl+return. |
|
|
Integration with Bug Tracking Tools |
|---|---|
|
If you have activated the bug tracking system, you can set one or more Issues in the Bug-ID / Issue-Nr: text box. Multiple issues should be comma separated. Alternatively, if you are using regex-based bug tracking support, just add your issue references as part of the log message. Learn more in Section 2.35, “Integration with Bug Tracking Systems / Issue Trackers”. |
|
|
Adjust the size of message text box |
|---|---|
|
Move your mouse to the gap between "Message" group box and "Changes made" group box, then drag the separator. |
|
|
Commit to a new branch |
|---|---|
|
If you want to commit to a fresh branch (based on the current branch), you can check the checkbox and enter a branch name in the displayed textbox. |
|
|
Commit multiple times in a row and directly pushing changes |
|---|---|
|
The main button has a drop-down menu. There are the options and . The option commits your changes and leaves the Commit dialog open, so that you can continue committing. The last option will commit your changes and immediately push your changes. If no remote tracking branch is configured for the current active branch, the push dialolg (cf. Section 2.8, “Push”) is opened. |
After pressing , a dialog appears displaying the progress of the commit.
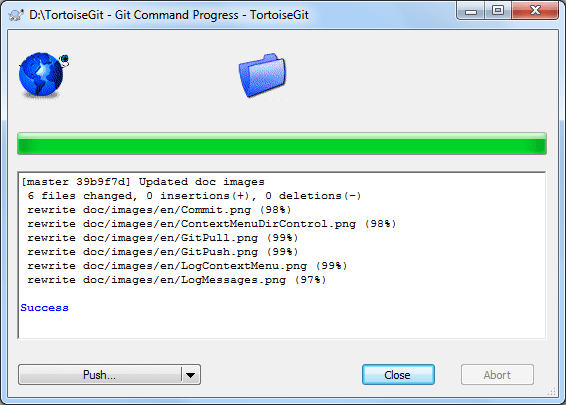
In the lower left, there is a menu button which provides shortcuts to further steps, such as (resets the commit dialog and allows you to continue committing) or in order to push your commit to a remote repository.
You can find more information at Section G.3.26, “git-commit(1)”.