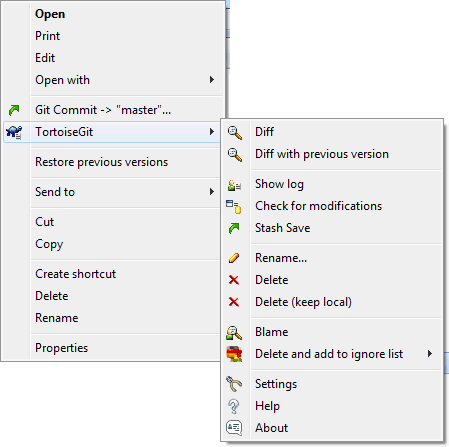
Unlike CVS, Git allows renaming and moving of files and folders. So there are menu entries for delete and rename in the TortoiseGit submenu. However, unlike SVN Git does not track filenames. Git only tracks the content of files. So there is in general no need to use the Git rename or remove functionality or even to "repair renames" as in SVN. Renames and copies are automatically detected when showing the log. However, using the Git delete and move functionality the files are automatically removed from the Git index (i.e., not shown as missing, but deleted) and in case of move/rename also re-added with the new names (i.e., the new names don't show up as unversioned).
Use → to remove files or folders from Git.
When you → a file, it is removed from your working tree immediately as well as being marked for deletion in the repository on next commit. Up until you commit the change, you can get the file back using → on the parent folder or on the or Section 2.5, “Committing Your Changes To The Repository” or Section 2.6, “Getting Status Information” dialogs.
If you want to delete an item from the repository, but keep it locally as an unversioned file/folder, use → . You might have to hold the Shift key while right clicking on the item in the explorer list pane (right pane) in order to see this in the extended context menu.
![[Tip]](tip.png)
|
Getting a deleted file or folder back |
|---|---|
|
If you have deleted a file or a folder and already committed that delete operation to the repository, then a normal → can't bring it back anymore. But the file or folder is not lost at all. If you know the revision the file or folder got deleted (if you don't, use the log dialog to find out) open the repository browser and switch to that revision. Then select the file or folder you deleted, right-click and select → . Refer to Section 2.16, “The Repository Browser” and Section 2.13, “Log Dialog” to find out more. |
If you want to do a simple in-place rename of a file or folder, use → Enter the new name for the item and you're done.
If you want to move files around inside your working tree, perhaps to a different sub-folder, you can use the right-mouse drag-and-drop handler:
-
select the files or directories you want to move
-
right-drag them to the new location inside the working tree
-
release the right mouse button
-
in the popup menu select →
![[Caution]](caution.png)
|
Do Not Git Move Submodule |
|---|---|
|
You should not use the TortoiseGit
Move or Rename
commands on a folder which has been created using
|
Making case-only changes to a filename needs special attention, because Windows does not honor the filename casing by default. Therefore just renaming a file using the rename command of the Explorer is likely not to work. It is important to rename it using Git in order to update the index to make it use the new filename. Use the command in the TortoiseGit submenu.
If the repository already contains two files with the same name
but differing only in case (e.g. TEST.TXT
and test.txt), you
will not be able to commit, and only one of them can be checkout
on a Windows client. Whilst Git (in general) supports case-sensitive
filenames, Windows does not.
This sometimes happens when files are committed from a system with a case-sensitive file system, like Linux, or when the setting core.ignorecase is set to false (cf. Section G.3.27, “git-config(1)”).
In that case, you have to decide which one of them you want to keep and delete the other(s) from the repository (or rename the other(s)). Easiest way is to do that on a case-sensitive file system, followed by commiting and pushing the changes. Doing it on Windows requires several steps (and two commits):
Solution
-
Delete the file in explorer.
![[Caution]](caution.png)
Caution Do NOT use the or the command in the TortoiseGit submenu!
-
Open the Commit dialog. (All the checked items are of
Deletedstatus.) -
Un-check only one item you want to keep.
-
Commit the changes.
-
Revert deletion of the wanted file in order to get it back. If you want to keep both or more files which had the "same" name, but with a different new name, do this for all files in question and rename them before proceeding with the next file.
Usually you set your ignore list such that all generated files are ignored in Git. But what if you want to clear all those ignored items to produce a clean build? Usually you would set that in your makefile, but if you are debugging the makefile, or changing the build system it is useful to have a way of clearing the decks.
TortoiseGit provides just such an option using → . You may have to hold the Shift while right clicking on a folder in the explorer list pane (right pane) in order to see this in the context menu. This will show a dialog which lists all possible clean up options (cf. Section 2.23, “Cleanup”).
