One of the features of version control systems is the ability to isolate changes onto a separate line of development. This line is known as a branch. Branches are often used to try out new features without disturbing the main line of development with compiler errors and bugs. As soon as the new feature is stable enough then the development branch is merged back into the main branch.
Another feature of version control systems is the ability to mark particular revisions (e.g. a release version), so you can at any time recreate a certain build or environment. This process is known as tagging.
Git is very powerful at branching and tagging. It is very easy to create branches and tags.
Creating a branch is very simple: →
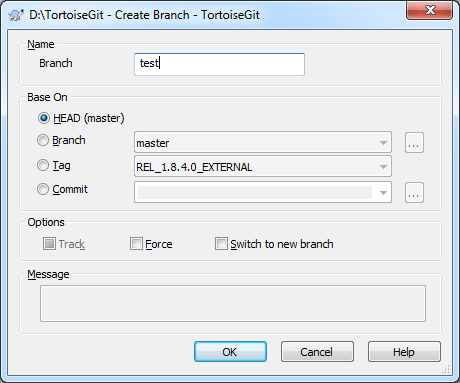
Branch: input your branch name.
Creating a tag is very simple: →
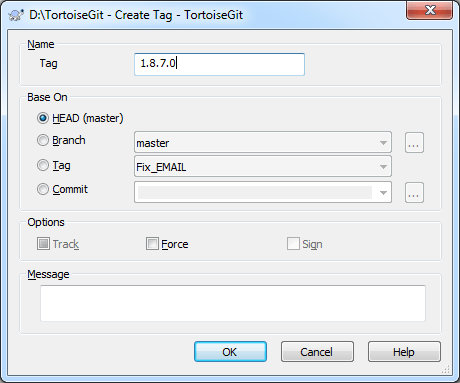
Tag: input your tag name.
You can choose one commit that base on.
- HEAD
-
Current commit checked out.
- Branch
-
The latest commit of chosen branch.
- Tag
-
The commit of chosen tag.
- Commit
-
Any commit, you click to launch log dialog to choose commit. You also can input commit hash, or friendly commit name, such as HEAD~4.
If you want your working tree to be switched to the newly created branch automatically, use the Switch to new branch/tag checkbox. But if you do that, first make sure that your working tree does not contain modifications. If it does, those changes will be merged into the branch working tree when you switch.
track is a checkbox with three values. If it is checked
--track is passed to git on OK, if it is
unchecked --no-track is passed to git on OK.
The third state indicates, that neither --track nor --no-track
is passed to git on OK - see branch.autosetupmerge configuration variable
(Section G.3.27, “git-config(1)”) and --track parameter documentation for Section G.3.10, “git-branch(1)”.
Check Sign to create a GPG signed tag. This requires GPG and also the configuration variable "user.signingkey" to be set (see Section 2.36.6.2, “Git Config” and Section G.3.27, “git-config(1)”).
![[Tip]](tip.png)
|
Tip |
|---|---|
|
When using GPG 1.4 (which is shipped with Git for Windows) this requires a key without a passphrase. GPG >= 2 comes with an agent like pageant and, thus,.also works with passphrase protected keys, however, you might need to configure git to use the right gpg.exe. This can be done be setting the configuration variable "gpg.program" (e.g., "C:/Program Files (x86)/GNU/GnuPG/pub/gpg.exe"). We tested this with Gpg4win (GPG4win vanilla is sufficient and with version 2.2.x it is also compatible to GPG 1.4 key files). |
Press to create branch or tag at local repository.
Note that unless you opted to switch your working tree to the newly created branch, creating a Branch or Tag does not affect your working tree. Even if you create the branch from your working tree, those changes are committed to the original branch, not to the new branch.
On how to switch working tree to tag/branch, please refer to Section 2.4, “Checking Out A Working Tree (Switch to commit)”.
You can find more information at Section G.3.10, “git-branch(1)” and Section G.3.134, “git-tag(1)”.