One of the features of version control systems, is the ability to isolate changes onto a separate line of development. This line is known as a Branch.
Branching is useful to control changes during the lifecycle of a software project. For example, suppose you have made the first release of your software project version 1.0. You now begin adding new features in preparation for your next major release 2.0. Between your initial release and the new version it is discovered that there are bugs in the software. The current revision of the sources code is in a state of flux and are not expected to be stable for at least another month and therefore there is no way to make a bugfix release based on the newest sources.
Instead of attempting to make the fix to the current version, or the HEAD branch, you would create a branch on the revision trees for all the files that made up release 1.0. You can then make modifications to the branch without disturbing the head branch. When the modifications are finished you can either incorporate them on the head branch or leave them on the release 1.0 branch.
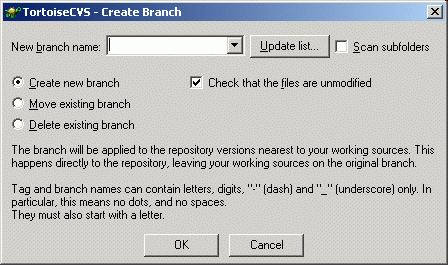
To create a branch, select the directory or files that you want to branch. Right-click the on the selection, and choose CVS → Create Branch... from the context-menu.
You will then be presented with the Branch Dialog. Here you can enter a label in the Branch field. The same name restrictions that apply to Tags, apply to branches as well. Once you have entered the desired branch name click the OK. Unlike most CVS operations, the branch is immediately applied to the repository, and no commit is required. The branch, however, is only applied on the repository. To start working on the newly created branch select the branch to work on.
To start working on a branch instead of the default development line, you have to bind your local copy to the branch. This is needed to make sure that actions such as updates, commits etc. work on the branch rather than on the main line of development.
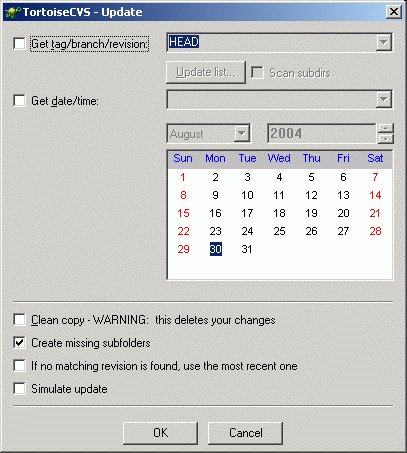
To move your local copy to another branch, select the top level folder of the project. You can also select the exact folders and files that are part of the desired branch if you know this information. Right-click the on the selection, and choose CVS → Update Special....
You will then be presented with the Update Special Dialog. Here you can enter the branch name in the Get Tag/Branch/Revision field you wish to select. Click the OK button, and TortoiseCVS will now do the necessary updates to move your working copy to the desired branch. The updating may also include adding or removing files depending on the state of the branch.
TortoiseCVS puts what is known as sticky tags on the files that are affected by the branch. To remove the sticky tags you must go back to the head branch.
When you are satisfied with the changes you have done on a branch, you may want those changes to be available on the head branch of development. Incorporating changes from one branch to another, is known as merging.
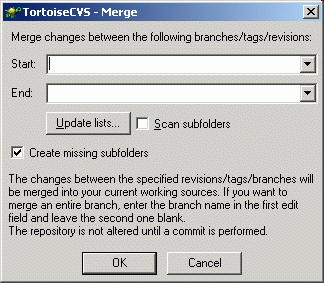
To merge from a branch, move your local copy to the branch you want to merge the changes into. See Selecting a Branch to Work On or Going Back to the Head Branch. Select the top level folder of the project. You can also select the exact folders and files that are part of the desired branch if you know this information. Right-click the on the selection, and choose CVS → Merge....
You will then be presented with the Merge Dialog. Here you can enter the branch name in the Branch to merge from field you wish to merge. Click the OK button, and TortoiseCVS will now merged the branch specified into your local copy. Your changes will not be made on the server repository, until you commit your changes.
The merge given above will try to merge changes from the start of the branch. If you do the operation a second time (to merge changes done to the branch after the last merge), merging from the start of the branch is not what you want, and it will most likely get you into trouble. To get around this problem, you should give the branch a new tag after every merge, and use the new tag when naming the branch for subsequent merges.
Note: The above paragraph only applies for standard Unix CVS (aka cvshome.org CVS). If your server runs CVSNT, you can take advantage of a special feature known as merge points. This means that CVS keeps track of your last merge, so that you can effortlessly merge from the same branch repeatedly. For more information on this feature, see the CVSNT Wiki page (note that the CVSNT Manual is not yet up to date on this point).
If you want to stop working on a branch and move your local copy back to the main line of development, you have to make TortoiseCVS remove all sticky tags.
To remove the sticky tags, and thus update your local copy to the main development line, select the top level folder of the project. You can also select the exact folders and files that are part of the desired branch if you know this information. Right-click the on the selection, and choose CVS → Update Special....
You will then be presented with the Update Special Dialog. Select the Return to main (HEAD) branch checkbox and click the OK button. TortoiseCVS will now do the necessary updates to move your working copy back to the head branch.


