What's New in PhotoGrav - Overview
From PhotoGrav 3.0
PhotoGrav 3.0 - Overview and What's New
Table of Contents
- Introduction
- Session Files
- Information Views and Panels
- Interactive Mode
- Working with Images
- Comparison of Results
- Automatic Updates
- Resize/Resample Images
- Licensing and Security
- Conclusion
Introduction
PhotoGrav 3.0 seeks to build on and improve the demonstrated success of PhotoGrav 2.11 to the laser engraving industry. This document is intended to give a brief overview of PhotoGrav 3.0 and its most important new and additional features. It also describes how the new user interface’s features relate to version 2.11. PhotoGrav version 3.0, like version 2.11, was designed first and foremost for simplicity of use. It is intended that by far the most common use of PhotoGrav is listed in the following 8 steps:
- Launch PhotoGrav 3.0
- Open the source color or grayscale image (jpg, tif, bmp, png).
- Select the material of choice or import existing parameters from version 2.11.
- Resize/Resample the image to the appropriate size (inches) and resolution (dpi).
- Final Process (formerly Auto Process).
- Save or Export the image or images in any of the supported image types. The binary/engraved image can only be saved as a tif/bmp/png; saving in jpg format is not permitted for binary image types.
- Print and/or Save the Engraving Session Information.
- Shutdown PhotoGrav 3.0
That’s all there is to it! These 8 steps outline the overall approach to using
PhotoGrav 3.0. Now, there are a number of other tools and techniques built into
PhotoGrav 3.0 that one can learn to use which can significantly increase
your
productivity. Let’s take a look at some of the new and/or enhanced features in
more detail.
Session Files
One of the design improvements in version 3.0 is the addition of “Session
Files”. A session file is a file that is designed to save the current state of
ones work including all parameter settings, user preferences, machine and
material info, as well as the source image. Permitting the source image to be
saved with the session alleviates the need to remember where the “original”
image file is located. One can simply reopen the session file and perform any
necessary modifications and/or adjustments without having to relocate the
original image. If one happens to be using PhotoGrav for multiple engravers the
machine information will be stored in the session file as well. This permits one
to save machine/material “templates” such that the user can just open up the
session “template” pertaining to that particular machine/material and begin
using PhotoGrav with the machine and material info already selected.
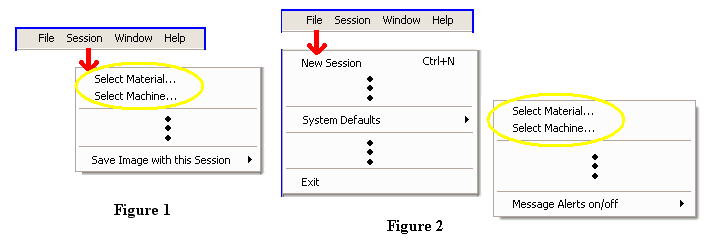
Due to the new session file design format, however, one must keep in mind that
there are now two modes of selecting a machine and/or material. These two modes
are selecting the “session” machine/material (Figure 1) and setting the “system”
material/machine (Figure 2). The “session” selection stays with that particular
session and the “system” selection sets the default material/machine type so
that any new session that is created will default to the machine/material type
that is selected in the “system” settings.
Almost everything else in this document pertaining to PhotoGrav 3.0 is in the context of a PhotoGrav
session file (.pgs).
Information Views and Panels
PhotoGrav 3.0 provides a few options for displaying information about the image,
session, machine, parameters, etc. The session window is divided up into 2
primary views. The first is the “Image” view. This is where the images are
displayed and image commands such as zoom in, zoom out, pan, etc. are performed.
Due to the numerous sizes and resolutions of existing monitors PhotoGrav 3.0
offers the ability to view the images in either single or split view mode. This
allows for a larger viewing area where the images can be cycled one at a time in
single view mode. On the other hand it also permits one to compare side-by-side
the resulting images in split screen mode (Figure 3).
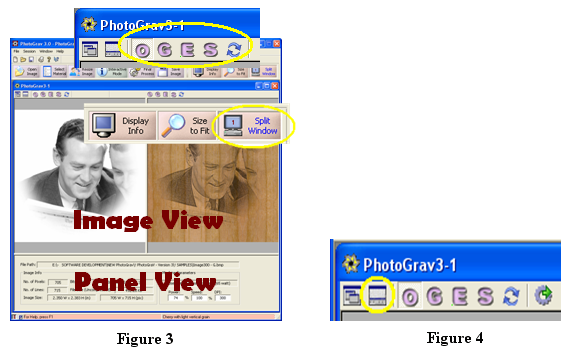
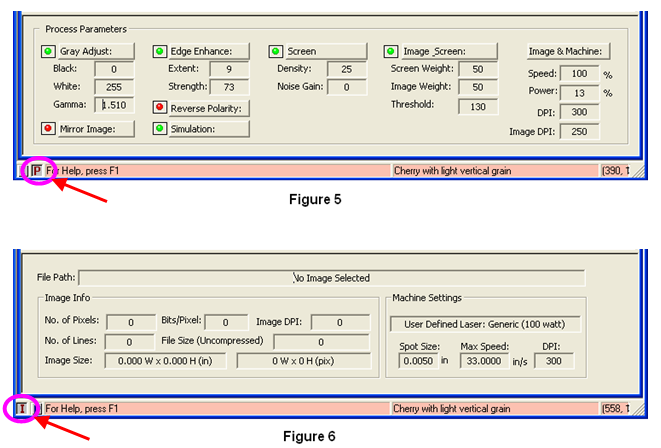
The second view that provides information is called the “Panel” view. The
“Panel” view is further divided into 2 subsequent views named “Image Info” and
“Parameter Info”. Either of the "Panel" views can be displayed or hidden
by clicking the button as indicated in Figure 4. The “Image Info” panel
can be displayed by clicking the “I” as indicated in Figure 6 and simply shows
basic information about the image and the currently selected machine. The next
sub panel is the “Parameter Info” panel which can be displayed by clicking the
“P” as indicated in Figure 5 and displays a fixed summary of the current
parameter settings. This “Parameter Info” view changes to permit adjustments and
modifications to the parameters when in “Interactive Mode” which will be
discussed shortly.
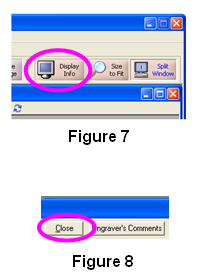
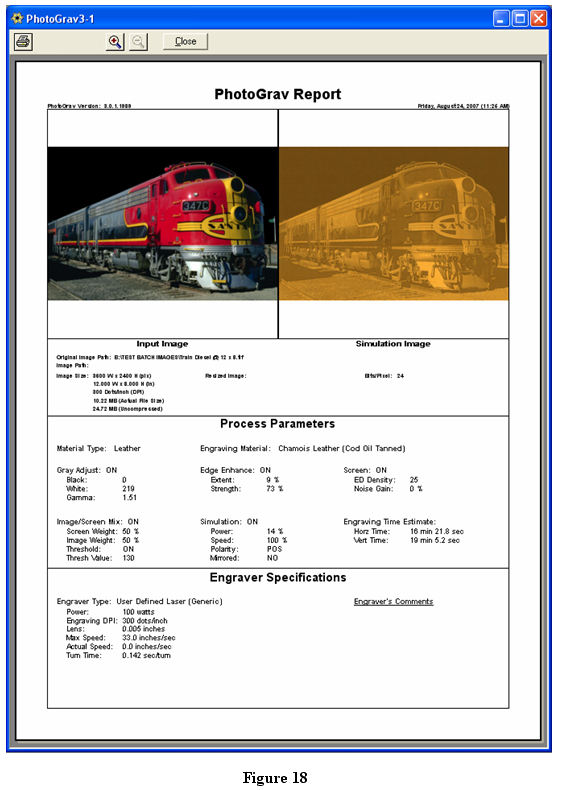
Another source for information is the “PhotoGrav Report” or “Session Info”
(Figure 18). This is a formatted report of the parameters, machine, and image
settings for a particular session that can be viewed or printed. The
“Session Info” can be displayed by clicking the “Display Info” button as shown
in Figure 7 and can be closed as can be seen in Figure 8.
This report also includes thumbnail images of the original and simulated image types. This provides an opportunity to print and file every job performed while having quick access to all the data that was used for that job. One can also use it to quickly view all the relevant settings for a session in a neatly organized fashion.
Interactive Mode
In PhotoGrav version 3.0 an attempt was made to completely redesign the
“Interactive Mode” with the intention that more PhotoGrav users could move
through the hurdle from casual user to a much more advanced user with relative
ease and efficiency. The developers of PhotoGrav have discovered that by far the
majority of users have never learned to use all the advanced features that
PhotoGrav has to offer. Due to this fact PhotoGrav 3.0 consolidated all the
different screen settings into a single “interactive mode, parameter panel view”
(Figure 7).
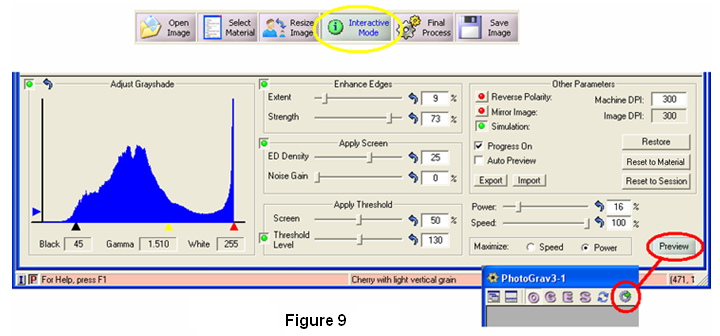
Interactive mode is designed for the primary purpose to
provide a quick and efficient preview of the final image, since with average
size images it would simply take too long to run through the entire PhotoGrav
processing pipeline every time a small change is made to a parameter. With this
in mind PhotoGrav 3.0 distinguishes between “Preview” and “Final Process”. The
“Final Process” button (formerly called “Auto Process” in version 2.xx) takes
the raw image data along with the current material, parameter, and machine
settings and completely processes the image producing the binary or engraved
image ready to be saved and engraved. On the other hand the “Preview” button
(only available in “Interactive Mode” see Figure 9) processes a scaled version
of the image (NOT THE ORIGINAL IMAGE) suitable for rapid viewing as one adjusts
and modifies the parameters in almost if not real time.
In PhotoGrav 2.xx one is limited to a fixed display size
whereas in PhotoGrav 3.0 one is not restricted to a fixed display size. The
removal of this restriction provides for a larger viewing area for a more
accurate representation of the resulting image. However, a larger viewing area
requires more processing speed in order to maintain real time performance. The
real time performance of interactively adjusting the parameter settings is
directly correlated to the size of the image and the size of the display screens
viewing area. Although it is undoubtedly a better option to remove the fixed
display restrictions which better prepares PhotoGrav to adapt to the increasing
speeds of modern computers. Even with existing average to high end computers one
can expect almost real time performance when interacting with the parameters
while in “Interactive Mode”.
Due to the plethora of monitor and display types,
resolutions, and sizes that exist in the market place today PhotoGrav 3.0 offers
a couple of options to facilitate the advanced user who relies on the
“Interactive Mode” in their production cycle. The first option is the “Auto
Preview” check box (Figure 9). This is provided to give the user the ability for
PhotoGrav to regenerate the preview image automatically after each parameter
adjustment without the user having to manually click on the “Preview” buttons.
The user may select to turn this on or off depending on the image size and/or
display screen size to increase performance. The second option is the “Progress
On” check box. This option offers the user the option of increasing performance
by turning this off. When the progress bar is turned off then PhotoGrav will
process the “Preview” image slightly faster; however, with larger images and
depending on the speed of the users’ computer one may want to turn this on. By
turning this on it gives a “heads up” as to what PhotoGrav is doing followed by
an indication when the “Preview” image is ready for display.
Once the image and parameters are determined either in
“Interactive Mode” or otherwise then the user can select to process the image
using the “Final Process” button. Clicking on the “Final Process” button
inherently assumes that the user is now ready to prepare and process the image
for engraving and exporting. Once the final processing is complete one can
export/save the images or compare the images to other sessions (see Comparison
of Results later on).
While working in “Interactive Mode” the user may want to
restore the parameters to a previous value. PhotoGrav 3.0 provides parameter
restoration at 3 different levels. The first is “Restore” which restores the
parameters settings of the current session to the values it carried along the
last time that the image was processed using the “Final Process” button. The
second method of restoration is “Reset To System”. This resets the parameters to
the default settings of the base material selected for that session. And finally
the third level of restoring the parameters is “Reset To Last Saved”. When one
clicks this button it resets the parameters back to the settings since the
session was last saved.
One may want to export/import some parameter settings while
in “Interactive Mode” and therefore PhotoGrav 3.0 offers these capabilities
through the selection of the respective buttons (Figure 9). PhotoGrav 3.0 allows
the user to import parameter settings from version 2.xx (.prm files) or version
3.0 and later (.pgp files), however, one can only export parameter settings in
version 3.0 and above formats (.pgp files).
Working with Images
One of the significant new features in PhotoGrav 3.0 is the ability to handle
multiple file formats. In version 2.xx 8-bit grayscale images were the only
image type accepted. PhotoGrav 3.0 now has the capability to handle and process
images directly from color to binary. PhotoGrav 3.0 supports the 4 most popular
image types available today which are jpeg, tiff, bmp, and png image formats.
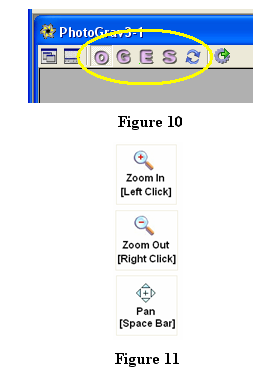
In version 2.xx one could cycle through the various images,
namely grayscale input, binary output, and color simulated. Since PhotoGrav 3.0
now handles color images as the input there are 4 images that one can select for
viewing, namely Original input, Grayscale, Engraved/binary, and the
Simulated
images (Figure 10). Moreover, PhotoGrav has built in “hot” keys, for those
who prefer to use the keyboard, to switch between the four different images. The
“hot” keys for the Original, Grayscale, Engraved, Simulated
images are F6, F7, F8, F9 respectively. If one has “Split Screen”
selected then the existing images can be selected independently for each screen.
The “hot” keys for the second viewing pane are CTRL+F6,
CTRL+F7, CTRL+F8,
CTRL+F9 for the Original, Grayscale, Engraved,
Simulated respectively.
If one has “Split Screen” selected then the existing images
can be selected independently for each screen. To open an image one can select
the “Open Image” button on the primary command bar. This button can be selected
even if there is no session window open in which case a new session window will
be created and the respective image inserted into that session. If, on the other
hand, an existing session is open then the selected image will replace the
existing image if an image exists. In other words, if the user already has a
session open, then he or she should create a “New” session prior to opening the
image to prevent the replacement of the existing session’s image.
Once the image is opened, with the size and resolution
adjusted as needed, and the appropriate material selected one is ready to “Final
Process” (formerly Auto Process) the image. The image can be inspected either
before or after the image is processed. PhotoGrav 3.0 offers similar zoom and
pan options as in PhotoGrav 2.xx (Figure 11). Since PhotoGrav uses and processes
the “actual” data on each zoom or pan window display one can notice a bit of a
delay. This is a trade off that exists in order to achieve as accurate viewing
results as possible. By left or right clicking of the mouse button one can
incrementally zoom in or out respectively. It is also possible to drag a zoom
“box” or rectangle around the desired area for closer inspection of the images.
Another image command is the “pan” command. This command centers the image at
the point where the mouse button was clicked. Holding down the [Space Bar] will
activate this command. Finally there is a “Size to Fit” command located on the
primary command bar. This command resets the image to the size of the image
display window.
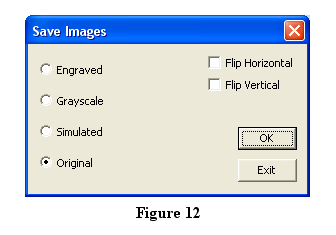 Now that the image has been processed it is ready to be saved
to disk for engraving (Figure 12). To do this simply select “Save Image” and
save the appropriate images to disk in any of the PhotoGrav supported file
formats. The only exception is the “Engraved” image which cannot be saved as a
jpeg due to the fact this format usually uses a lossy compression type scheme
which would create dire effects on the engraved image. One can elect to save the
images while flipping either horizontally, vertically or both. One may find the
“Flip Horizontal” check box to be turned on depending on the material type
selected due to the fact that some material types such as acrylic engrave better
on the back side, therefore requiring the image to be flipped or mirrored.
Now that the image has been processed it is ready to be saved
to disk for engraving (Figure 12). To do this simply select “Save Image” and
save the appropriate images to disk in any of the PhotoGrav supported file
formats. The only exception is the “Engraved” image which cannot be saved as a
jpeg due to the fact this format usually uses a lossy compression type scheme
which would create dire effects on the engraved image. One can elect to save the
images while flipping either horizontally, vertically or both. One may find the
“Flip Horizontal” check box to be turned on depending on the material type
selected due to the fact that some material types such as acrylic engrave better
on the back side, therefore requiring the image to be flipped or mirrored.
After the “Save Image” dialog is opened one must select the
“Exit” button to close out of this dialog screen. The reason for this is that
often one may want to save more than just the “Engraved” image so this goes into
a continuous loop until all images are saved as needed.
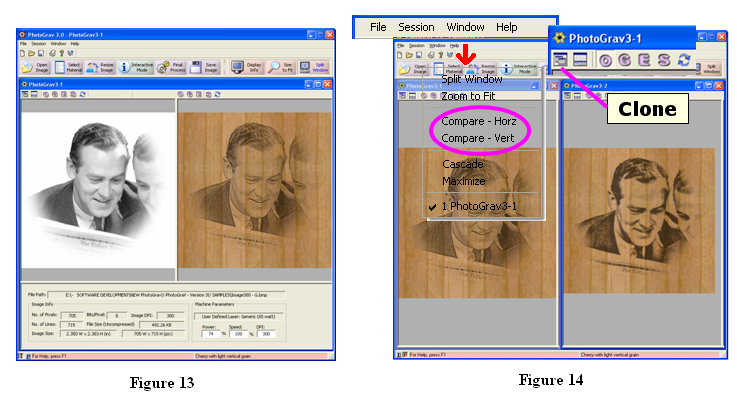
Comparison of Results
The comparison of images whether simulated or otherwise can be an efficient time
saving procedure when it comes to preparing the image for engraving. PhotoGrav
3.0 offers two different methods by which one can compare the processed image.
The first is to compare the various images solely within a particular session
(Figure 13) and the second is to compare the results of two sessions with each other
(Figure 14).
Learning how to use this feature along with the simulation of results should
once again increase productivity. While the simulation is attempting to get as
close as possible to the final results there are many variables that affect the
actual versus the simulated results. Therefore, it is recommended that one
think of this more as a relative comparison of the simulated images rather than
an absolute final result. This essentially means that once one learns how a
particular “simulated” image compares to the actual engraved image for a
specific material and machine type; then a “relative” difference or pattern
should emerge giving the user a sense of how to adjust the parameters to improve
the actual engraving. This simulation feature was significantly relied upon during
the design of PhotoGrav to improve performance and efficiency.
In PhotoGrav 3.0 there is a “Clone” button to further assist in comparing
processed results (Figure 14). This “Clone” button assumes that the user wants
to spin off or clone another session based on the current active session. This
provides an exact duplicate of the current selected session or active session.
Now one can quickly process another session and compare the two (if desired)
without having to go through the whole process of reopening the same image in
another session.
Automatic Updates
One of the major drawbacks of PhotoGrav version 2.xx is the inability for
additional materials and machine types to be added to the list of
materials/machines to choose from (Figure 15). PhotoGrav 3.0 has many more
materials and machines included out of the box with the capability to
automatically download any new materials and/or machine types once they become
available. This does not prevent one from still saving/exporting and
loading/importing parameter files from both PhotoGrav 3.0 and version 2.xx or
custom configuring the machine settings as required. To check for and download
any new machines and materials go to [Help]->[Check for Updates].

Resize/Resample Images
Resizing or Resampling the original image is almost always a requirement because
one rarely receives the image in the actual size needed for engraving (this does
vary some depending on the engravers policy). PhotoGrav 3.0 offers the ability
to resize or resample an image to the desired size and resolution without having
to depend on other software.
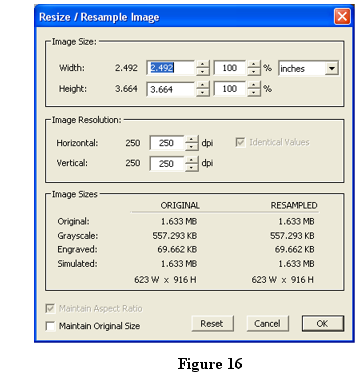
PhotoGrav will raise a notification if it detects a
discrepancy between the selected machine resolution and the resolution of the
image (Figure 16). The image should be resampled to the same resolution (or an
integer multiple of) as the desired engraving resolution (machine dpi setting).
PhotoGrav uses the machine settings exclusively to prepare
and simulate the image to give the user an estimate or relative difference of
what to expect when the actual engraving is performed. Therefore, PhotoGrav does
not adjust the “actual engraver” setting which is usually modified through the
software driver that comes with the engraver, but rather only adjusts the
machine setting in PhotoGrav 3.0 which is used to prepare the image for
engraving.
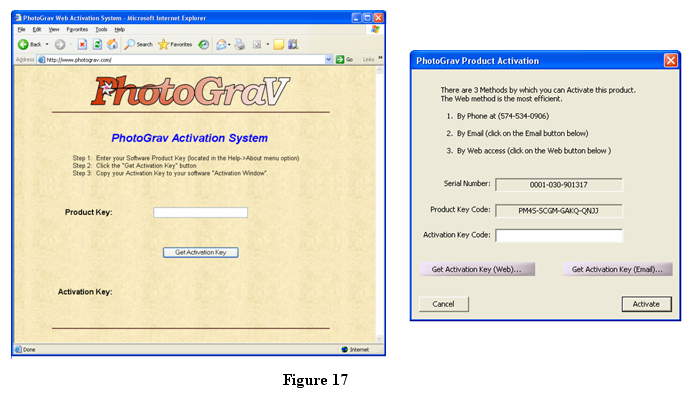
Licensing and Security
PhotoGrav version 3.0 incorporates a “PhotoGrav Activation System” (Figure 15).
This provides an opportunity to activate the software by Web, Email, or Phone.
The PhotoGrav 3.0 license allows for installation on up to 2 different machines
and reactivation on the same machine as often as needed. After installation the
user has 15 days to activate the software and once the activation is complete
the software may be used indefinitely. If one has any issues regarding this
procedure please give us a call and we will be happy to address any specific
needs.
Conclusion
This
has been a brief overview and introduction to the new, enhanced and improved
features of PhotoGrav 3.0. It also illustrates and outlines some of the primary
functions one is expected to perform while using PhotoGrav. While PhotoGrav 2.xx
has been shown to be very successful and well received within the laser
engraving industry, we believe that PhotoGrav 3.0 not only addresses the
inconveniences that existed in Version 2, but also offers substantial
improvements in and extensions to almost all of the functions that PhotoGrav
performs.
Please don’t hesitate to give us a call or email us with any
feedback or questions regarding the PhotoGrav Software Product. We would like to
help you achieve the best results possible for laser engraving photographs on a
wide range of materials. We at ImageLaz hope that you find PhotoGrav 3.0 helpful
to your engraving endeavors, and that you can become increasingly more efficient
yet maintain a superb laser engraving product. Thank you for your support.

Jerry L
Troyer, President, ImageLaz LLC