Chapter 2 - Operational Overview
From PhotoGrav 3.0
 |
|
|
2.0 Introduction
The objective of this chapter is to present the essential information that you
need to know in order to effectively use PhotoGrav. Section 2.1 briefly
describes PhotoGrav's primary functions and flow of events that those functions
support during a typical PhotoGrav session. Beginning with PhotoGrav version 3.0
multiple simultaneous PhotoGrav sessions can be opened, modified, and
independently saved. Section 2.2 provides a concise, high-level description of
the program's concepts and the rationale for those concepts. Finally, section
2.3 presents a list of items that summarize the important information about
PhotoGrav.
2.1 Functional Flow of Events
PhotoGrav employs a small number of primary toolbar buttons to functionally
organize the major steps involved in engraving a photograph. Each functional
button has one or more major functions to accomplish and, upon completion of
those functions, control passes back to the main session window. Figure 2.1.1
illustrates the normal flow of events in PhotoGrav processing.
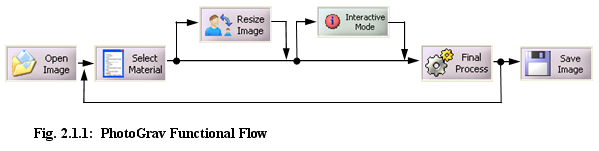
The Open Image Button provides the capability to select the image that you want
to engrave while the Select Material Button selects the engraving material that
you want to use. PhotoGrav stores a set of processing parameters with each
material that it models. These processing parameters are optimized for each
particular material to ensure excellent engraving results without any user
intervention. These optimized parameters make possible the “Final Process” path
indicated in Fig 2.1-1.
The Resize Image Button provides the capability for you to resize/resample the
input image without having to rely on another software application to perform
this task. PhotoGrav will NOT resize or even modify the original image in any
way because PhotoGrav makes a working copy of the original file. Also, on every
resize/resample operation PhotoGrav uses the original image to perform the
resize operation in order to maintain the highest degree of quality.
The Interactive Mode Button provides the capability to individually specify
parameters for all of PhotoGrav’s processing functions and to view the result in
near real time. Most importantly, one can view a simulation of what the
engraving would actually look like on the material that you have selected.
Although the Interactive Mode provides complete access to PhotoGrav’s functions
that have been tuned specifically for Laser Engravers, you will probably find
that you can seldom do better than PhotoGrav’s Automatic Final Processing
option.
The Final Process Button (Auto Process in previous versions) allows the input
image to be processed and finalized in the proper format for the laser engraver.
To ensure that the image is processed and finalized with the latest
modifications of the parameters this operation should ALWAYS be performed
whether in Interactive Mode or otherwise prior to saving the image to disk.
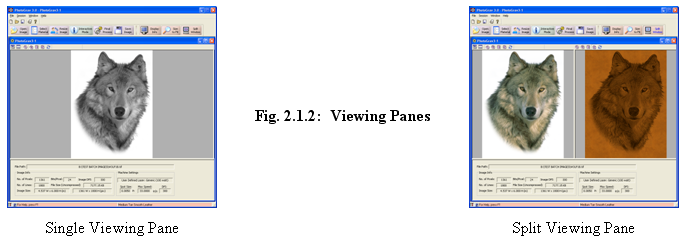
The Viewing Panes (Figure 2.1.2), whether in split mode or otherwise, displays
the Original (Input) image, the Grayscale image, the Engraved (Binary) image
(the image that is to be used for engraving), and the Simulated image (what the
engraving will look like on the selected material). The images appear on the
screen one or two (if in split mode) at a time. One can, however, click a button
to rapidly cycle through the various images for comparison purposes or view the
images side by side when in split view mode. You can also magnify the images by
clicking near the center of the area you want magnified or by defining a
rectangular area to be enlarged to fill the screen. All three images are
magnified by the same amount so comparisons are still easy to do even after
magnification. Once the processed image is acceptable the various images can be
save to disk for storing and to transfer to your engraver.
The Save Image Button allows the various images (Original, Grayscale, Engraved,
Simulated) to be saved to disk (when appropriate) in the supported file formats
i.e. jpg, tif, bmp, png. When saving the Engraved image the jpg file format is
NOT permitted due to the fact that in most cases it would ruin the engraved
image information which would not be suitable for engraving.
2.2 Basic PhotoGrav Concepts
The objective of the PhotoGrav program is to efficiently process digitized
photographs so they can be engraved on a variety of common engraving materials
with a high degree of confidence that the engraved photographs will be
acceptable products. This objective is achieved via two basic PhotoGrav
concepts:
1. Processing operations that are "tuned" for each engraving material, and
2. A simulation of the engraved image
The intent of this section of the user guide is to provide a concise, high-level
description of these two concepts and their underlying rationale. A more
detailed description can be found in "Appendix 5: PhotoGrav Concepts and
Design".
PhotoGrav's processing operations were designed and developed specifically to
process images for laser engraving and were parameterized so that a wide range
of effects could be achieved by adjustment of the parameters. Then the
parameters were individually "tuned" for each of the engraving materials
supported by the program. This "tuning" was accomplished experimentally, using
several test images, by specifying several sets of parameters for each engraving
material, actually engraving the images on the material, and evaluating the
resulting engravings. This process was repeated until the resultant engravings
appeared to be near optimal for the subject material. The parameters that
produced the final, "near optimal' engraving were then recorded and a data set
was created for the material. These data sets are stored as part of the
description of each engraving material and are automatically retrieved whenever
a material is selected as the current engraving material within PhotoGrav.
Although the tuning process described above results in "near optimal" parameter
settings for each engraving material, engraving results are still often somewhat
image dependent. In other words, the settings that produce an excellent
engraving for one image on a specific material might result in an engraving that
is less satisfactory for another image using the same engraving material.
Further, it is very difficult to view the raw processed image on a computer
monitor and to judge from that display whether or not the final engraving will
be satisfactory. To overcome these difficulties, PhotoGrav provides, optionally,
a simulation of what the processed image will look like once it is actually
engraved on the selected material and the ability to modify the parameters as
needed.
PhotoGrav's simulation capability is intended to provide a WYSIWYG (What You See
Is What You Get) capability. In other words, the appearance of the simulated
image on your computer monitor should be close to the appearance of the actual
engraving produced from the processed image for most of the included materials.
The simulated image is not merely an overlay of "dots" on top of a
representation of the engraving material, but rather a convolution of the
various parameters and images.
In other words, it is a full-fledged simulation wherein a lens-power model,
calibrated for each material, is used to calculate an effective laser spot size
which is then "burned" into a representation of the engraving material. Further
details about the simulation and model can be found in Appendix 5.
The Simulation Image produced by PhotoGrav should always be a representation of
the final engraving. For example, for "Black Laser Brass", the Simulation Image
should appear with proper polarity even though the processed image, if displayed
in its "raw" form, would appear to have a "negative" polarity. There is one
special case of this WYSIWYG capability that should be noted. For acrylics,
which are normally engraved on the "back" of the material, the Simulation Image
produced by PhotoGrav is the view from the "front" of the material, i.e., the normal viewing
perspective. So, even in this special case, the Simulation Image produced by
PhotoGrav is a true WYSIWYG representation, i.e., the simulated engraving is
presented as it would normally be viewed by your customers as a finished
product. Although the primary utility of the Simulation Image is to help you
make fine adjustments to create a more satisfactory engraving, it can also be
printed and used for customer proofs or as supplements to file copies of your
shop's projects. The prints are especially effective if you have a color printer
attached to your computer.
Although the simulation model has been calibrated for a variety of laser
engravers and for many common engraving materials, there are bound to be
variables that at times cause noticeable differences between PhotoGrav's
Simulation Image and the actual engraving. For example, black laser brass from
different manufacturers, or even different "batches" from the same manufacturer,
will sometimes engrave somewhat differently under identical engraver settings.
Also, variables in the laser engraver itself, e.g., dirty lenses or mirrors, can
cause variations in the engraving performance. You should try to control these
variables to the degree possible and also realize that PhotoGrav, like any other
tool, requires some practice and skill on your part to adapt its capabilities to
your particular environment and requirements. It is also important to remember
that, for engraved photographs, "beauty is in the eye of the beholder", i.e.,
the perceived goodness of an engraving is a very subjective measure. You might
therefore find that PhotoGrav's processing parameters for a particular material
do not result in engravings that match your tastes. If so, use PhotoGrav's
interactive processing capabilities (see Sec. 3.4) and its Named Parameter Sets
to define things the way you want them to be.
One other aspect of PhotoGrav's operational characteristics requires some
discussion before concluding this section. In the Image Viewing Panes (see Fig.
2.1.2), PhotoGrav displays the Original Image, the Grayscale Image, the Engraved
Image, and the Simulation Image for comparison purposes. The Grayscale Image is
the input image and the Engraved Image is the processed binary image that is to
be sent to the engraver. The Engraved Image is normally displayed in the same
polarity and the same left-to-right orientation as the Grayscale Image even
though those characteristics might be automatically changed by PhotoGrav when
the image is saved on disk for transfer to your engraver. The reason for
displaying the Engraved Image in this fashion is merely to facilitate the
comparison to the input image. If this is a bit confusing, just remember that
the Simulated Image always represents what will be engraved if you save the
processed image (Engraved Image in PhotoGrav's terminology) to disk and transfer
it to the engraver with no changes.
2.3 Important PhotoGrav Information
The following is a collection of important things that you should know about
PhotoGrav. Some of the items have already been discussed in previous sections
and some of them will be covered in later sections. However, since much of the
information following Chapter 2 is very detailed and is intended as reference
material, the essential elements of that information are summarized below so you
can begin using PhotoGrav with confidence after reading this section. If an item
is discussed elsewhere in this document, then a reference to the appropriate
section is included below.
- PhotoGrav has been designed for compatibility with a display screen color pixel
depth of 32-bit and a resolution of 1024 x 768 or larger. See section 1.2 of the
PhotoGrav User Guide for instructions on how to adjust this. (Reference: Sec.
3.3)
- The input image ("Original/Grayscale Image") for PhotoGrav can be any image type
in the following format: tif, bmp, jpg, png. (Reference: Sec. 3.2.2)
- The input image to PhotoGrav should be scanned in some image processing program
such as CorelDraw or Adobe PhotoShop, so that its size and resolution (dpi) are
"correct". If the image is already in a digital format then PhotoGrav is able to
resample the image to the desired size and resolution (dpi). Most images taken
with a digital camera have an arbitrary resolution of either 72 or 96 dpi. In
most engraving cases a dpi of 72 or 96 must be altered for best results.
The dpi (dots per inch) for the image should be the same, or an integer factor or divisor, of the dpi at which you intend to engrave the image. For example, if you intend to engrave at 250 or 500 dpi, then the image should be scanned at 250 dpi. If you intend to engrave at 300 or 600 dpi, then the image should be scanned at 300 dpi. Engraving results can often be very disappointing otherwise. The size of the image, at the scanned resolution (dpi), should be the desired size of the final engraved image.
- Processed photographs (PhotoGrav's "Engraved Image") should be engraved using
the highest resolution lens (smallest spot size) that you have available. If you
do not own your manufacturer's "high-resolution lens" and if you intend to
engrave a lot of photographs, then you might consider obtaining such a lens.
- Use PhotoGrav's “Machine Properties” or “Select Machine” dialog window to set
the parameters and characteristics for your specific laser engraver. The
“Machine Properties” window is accessible from the File→System Defaults→Select
Machine menu item. The session “Machine Properties” can be modified by selecting
Session→Select Machine from the menu bar. (Reference: Sec. 3.6)
Although you specified your Laser Engraver model and its maximum power on your very first PhotoGrav execution, there are other parameters that further define your specific machine. In particular, within the “Machine Properties” window, you should add and/or delete lenses from the “Lenses” list to match your set of lenses. Similarly, the list of “dpi's” should be edited to reflect the dpi settings available on your machine. Also, if your laser engraver’s maximum wattage is not listed under “Watts” then add it to the list as well.
- PhotoGrav is not designed to "Print" directly to laser engravers. To engrave a
PhotoGrav processed image (the "Engraved Image"), save the "Engraved Image" to
disk and use your standard program, e.g., CorelDraw, to send the image to the
engraver. (Reference: Sec. 4.1.2.1)
- DO NOT RESIZE NOR ROTATE the "Engraved Image" (the image to be sent to the
engraver) in CorelDraw, or any other image processing program, before sending it
to your engraver. The "Engraved Image" is a binary image, as it must be for
laser engraving, and resizing and rotation operations in general do not work
well for binary images.
- PhotoGrav's “Sessions” provide a powerful mechanism whereby you can customize
PhotoGrav's parameters to achieve the results you want and can be assured that
those results are repeatable in the future. If PhotoGrav's default parameter
settings do not provide a satisfactory result for a specific material after the
“Final Process” button is pressed, then select the “Interactive Mode” button to
create "Engraved Images" at several parameter settings that you suspect might be
better. Save the various “Session’s” with different names and then actually
engrave the images. Choose the engraving you prefer and then delete the
“Session’s” that do not correspond to that “best” engraving. If satisfied with
the “best” engraving, note which session was used and/or rename it so you can
readily access it in the future for similar engraving projects. Otherwise,
repeat the process until the results are satisfactory. You can now use this
“Session” as a template to begin other similar “Session” types. (Reference: Sec.
3.1)
- The engraving material to be modeled is selected via the “Material Properties”
dialog window. The “Material Properties” dialog window can be accessed by
selecting the File→System Defaults→Select Material menu item. The session
“Material Properties” can be modified by selecting Session→Select Material
from the menu bar. (Reference: Sec. 3.2.3)
- The leather materials included with PhotoGrav, unlike most of the other
furnished engraving materials, are not standardized materials. Further, the
engraving behavior of leather depends very much on the tanning process, whether
the leather is oiled or not, etc. therefore, PhotoGrav's Simulation Image for
any specific leather material might not be a good representation relative to the
specific leather material that you want to use. However, you can use the
furnished material as a starting point for your own calibration process wherein
you save your final, calibrated parameters as a PhotoGrav Session File
Template.
- The list of engraving materials includes two plastic materials that are
“User-Defined Caps” with white or black cores. These materials can be used
to model just about any plastic with a solid-color cap and with either a
black or white core. Some calibration and parameter adjustment, as described
in item 8 above, might be necessary for certain plastics and colors. (Reference: Sec. A1.1, Tip 5)
- Two copies of PhotoGrav cannot be running at the same time. If PhotoGrav
refuses to start, there is probably another copy of PhotoGrav running in a
minimized window.
- PhotoGrav produces temporary image files during its execution that can become
quite large if the input image is large. Try to maintain a reasonable quantity
of free disk space on the hard disk where you installed PhotoGrav (200 MB should
be more than adequate for most purposes).
- PhotoGrav is a Windows 32-bit program which runs equally well under 2000, XP, and Vista. A 64-bit version is planned to be released and it is recommended that you call PhotoGrav or check online at www.photograv.com for the latest information.